
This is part 4 of my journey in exploring Wazuh as an endpoint monitoring and protection tool. In my previous posts, I introdued Wazuh’s components and capabilities, built my lab environment using the Quickstart guide, and configured the server. I also deployed agents to my Ubuntu and Windows VMs. With my environment setup, I am now ready to delve into practical examples.
Introduction
In this post, I’ll walk through practical examples of how I leveraged Wazuh’s capabilities to detect and respond to common threats in my own environment. I’ll look at how to block a malicious actor, how to monitor an endpoint’s file system integrity, how to detect and block an SSH brute force attack aimed at my Ubuntu endpoint, and detecting unauthorized processes – all critical security use cases that I was able to address using Wazuh’s out-of-the-box features.
I will follow the “Proof of Concept Guide” and “Capabilities” sections of Wazuh’s documentation as references to test its capabilities as an endpoint monitoring and protection tool.In preparation for this phase, my previous series dealt with preparing my lab environment, although there will be additional changes to the server and agent configurations as I proceed with this testing phase.
Blocking a known malicious actor
This section will show how to block malicious IP address from accessing web resources on a web sever. I will set up Apache web server on my Ubuntu VM, and try to access them on my Kali VM (attacker).
To block an IP of a malicious actor, which in this example is my Kali VM, I will add its IP address to the reputation database. I will then configure Wazuh to block my Kali VM from further accessing the Apache web server for 60 seconds
In this use case, I will be using the Wazuh CDB list and active response capabilities.
Configuration – Ubuntu endpoint
These are the step I followed to install the Apache web server and monitor its logs with the Wazuh agent.
- Update local packages and install the Apache web server:
sudo apt update && sudo apt install apache2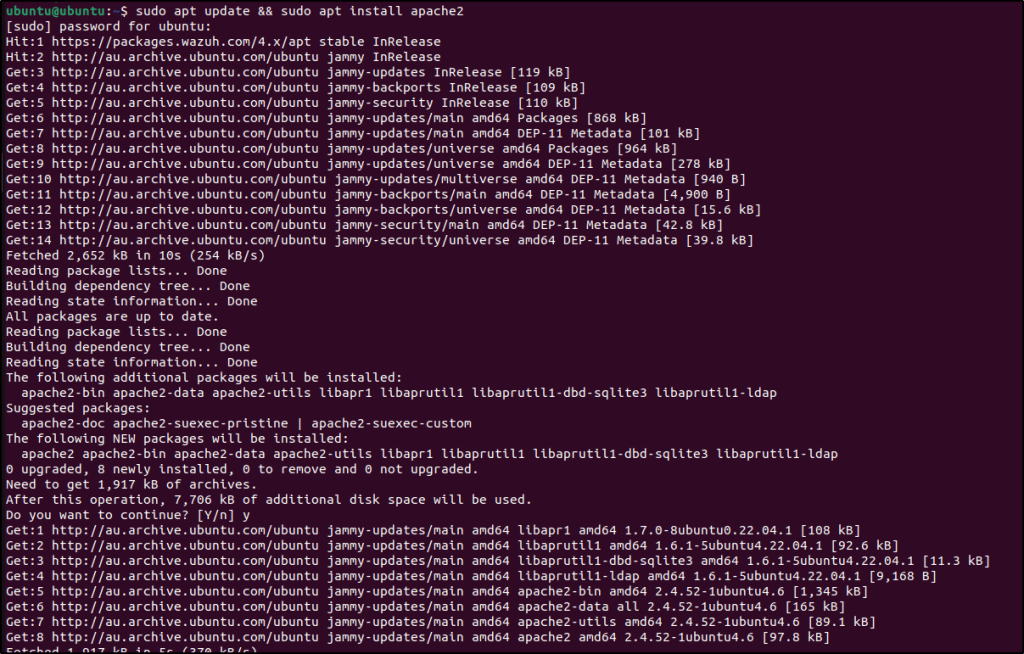

If the firewall is enabled, modify the firewall to allow external access to web ports. Skip this step if the firewall is disabled:
sudo ufw status
sudo ufw app list
sudo ufw allow 'Apache'
My firewall is in inactive, so I didn’t change the firewall settings.
Checked the status of the Apache service to verify that the web server is running:
sudo systemctl status apache2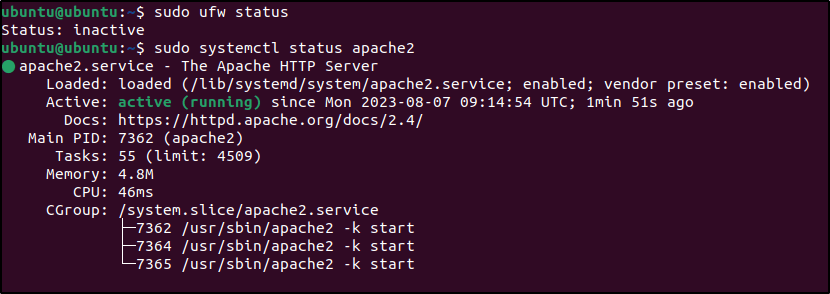
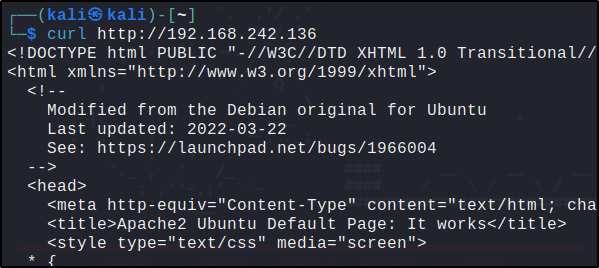
Used the curl command or open http://<UBUNTU_IP> in a browser to view the Apache landing page and verify the installation:
curl http://<UBUNTU_IP>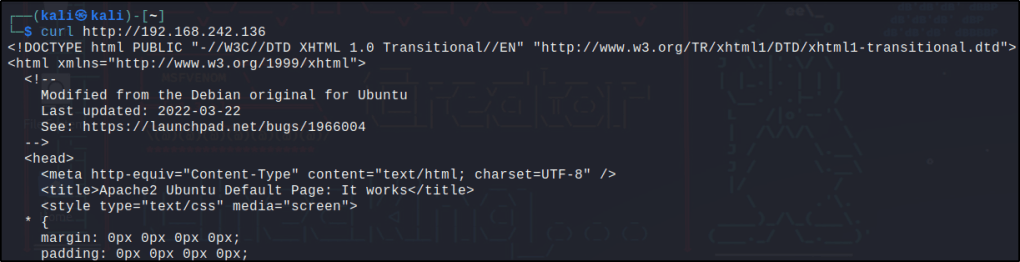
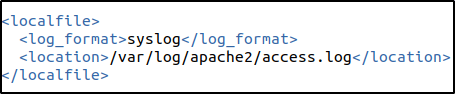
Added the following to /var/ossec/etc/ossec.conf file to configure the Wazuh agent and monitor the Apache access logs:
<localfile>
   <log_format>syslog</log_format>
   <location>/var/log/apache2/access.log</location>
</localfile>

Restarted the Wazuh agent to apply the changes:
sudo systemctl restart wazuh-agentConfiguration – Server
To add the IP address of my Kali VM to a CDB list, and then configure rules and active response; these are the steps I took.
Downloaded the utilities and configured the CDB list
Installed the wget utility to download the necessary artifacts using the command line interface:
sudo yum update && sudo yum install -y wget
sudo apt update -y && sudo apt install wget -y
Wget is already installed in my Wazuh server so I didn’t have to install it.
Downloaded the Alienvault IP reputation database:
sudo wget https://raw.githubusercontent.com/firehol/blocklist-ipsets/master/alienvault_reputation.ipset -O /var/ossec/etc/lists/alienvault_reputation.ipset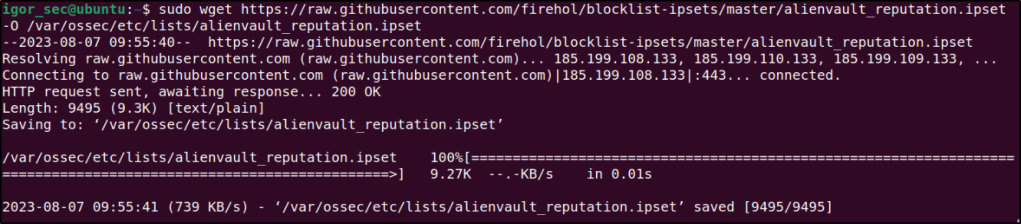
Appended the IP address of the attacker endpoint to the IP reputation database. Replace <ATTACKER_IP> with my Kali machine IP address in the command below:
sudo echo "<ATTACKER_IP>" >> /var/ossec/etc/lists/alienvault_reputation.ipset
Downloaded a script to convert from the .ipset format to the .cdb list format:
sudo wget https://wazuh.com/resources/iplist-to-cdblist.py -O /tmp/iplist-to-cdblist.py
Converted the alienvault_reputation.ipset file to a .cdb format using the previously downloaded script:
sudo /var/ossec/framework/python/bin/python3 /tmp/iplist-to-cdblist.py /var/ossec/etc/lists/alienvault_reputation.ipset /var/ossec/etc/lists/blacklist-alienvaultOptional: Removed the alienvault_reputation.ipset file and the iplist-to-cdblist.py script, as they are no longer needed:
sudo rm -rf /var/ossec/etc/lists/alienvault_reputation.ipset
sudo rm -rf /tmp/iplist-to-cdblist.py
Assigned the right permissions and ownership to the generated file:
sudo chown wazuh:wazuh /var/ossec/etc/lists/blacklist-alienvault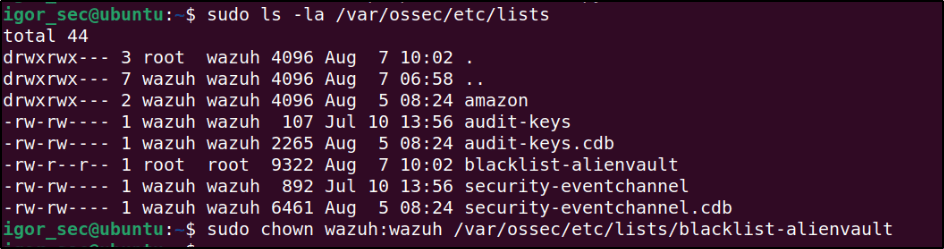
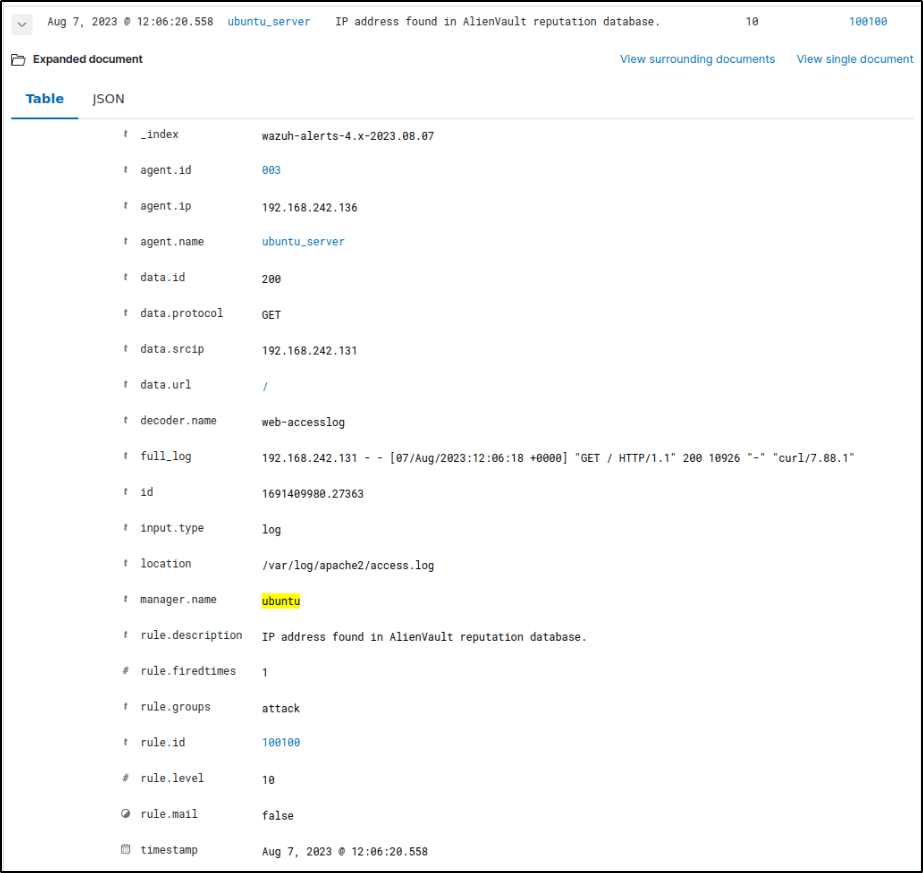
Performed a test to confirm if the configurations were done properly.
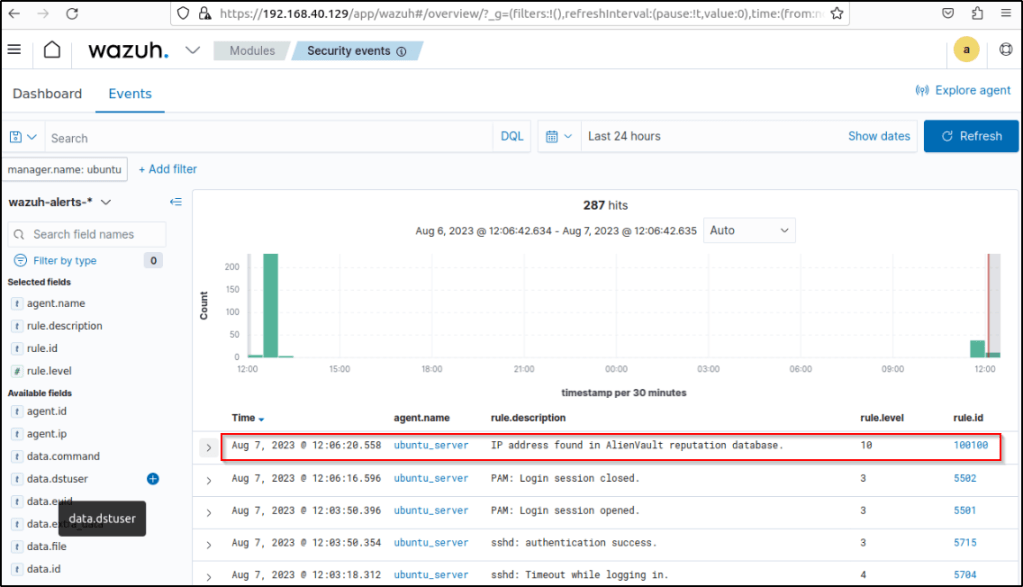
The agent logged the activity and was forwarded to the server where it triggered an alert based on the configurations made.
Configure the active response module to block the malicious IP address
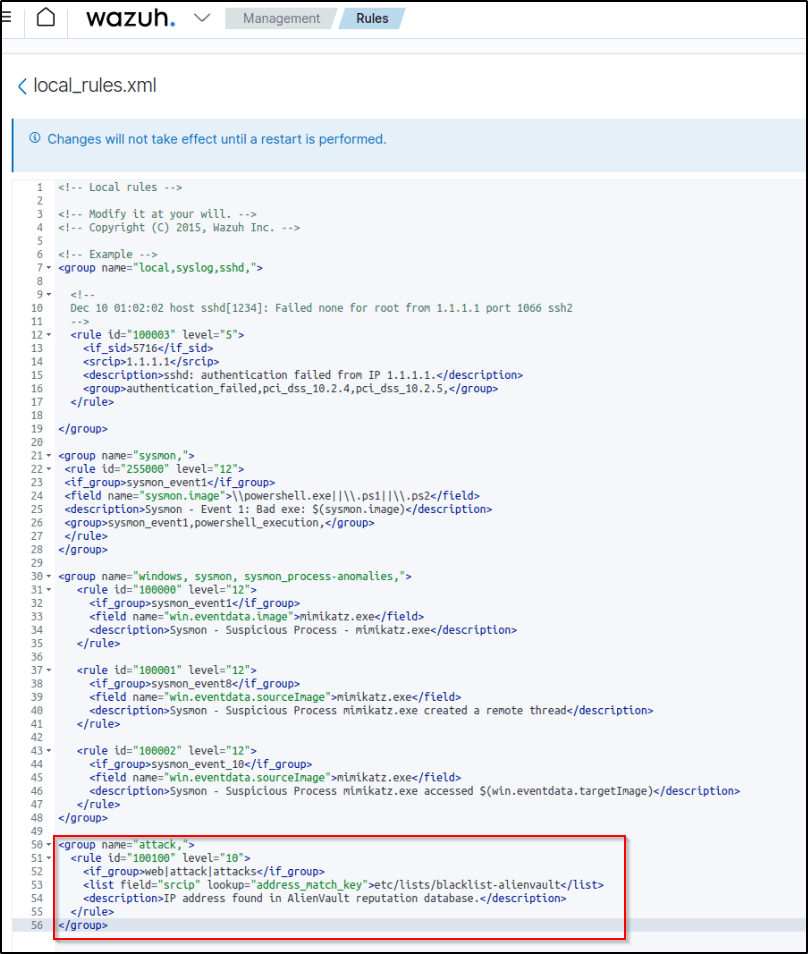
Added a custom rule in /var/ossec/etc/rules/local_rules.xml to trigger a Wazuh active response script:
<group name="attack,">
  <rule id="100100" level="10">
     <if_group>web|attack|attacks</if_group>
     <list field="srcip" lookup="address_match_key">etc/lists/blacklist-alienvault</list>
     <description>IP address found in AlienVault reputation database.</description>
  </rule>
</group>
Editing the custom ruleset file can be done through a text editor or utilizing the dashboard.

Restarted the manager.
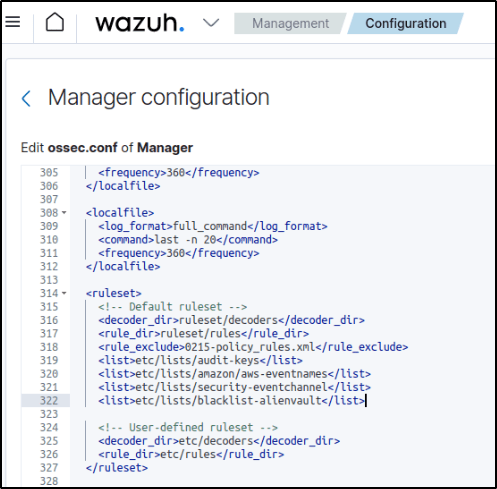
sudo systemctl restart wazuh-managerEdited the Wazuh server /var/ossec/etc/ossec.conf configuration file and added the etc/lists/blacklist-alienvault list to the <ruleset> section:
<ossec_config>
   <ruleset>
     <!-- Default ruleset -->
     <decoder_dir>ruleset/decoders</decoder_dir>
     <rule_dir>ruleset/rules</rule_dir>
     <rule_exclude>0215-policy_rules.xml</rule_exclude>
     <list>etc/lists/audit-keys</list>
     <list>etc/lists/amazon/aws-eventnames</list>
     <list>etc/lists/security-eventchannel</list>
     <list>etc/lists/blacklist-alienvault</list>

     <!-- User-defined ruleset -->
     <decoder_dir>etc/decoders</decoder_dir>
     <rule_dir>etc/rules</rule_dir>
   </ruleset>

</ossec_config>
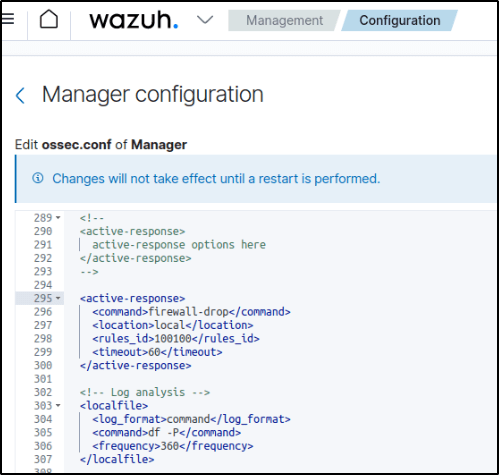
Added the active response block to the Wazuh server /var/ossec/etc/ossec.conf file:
The firewall-drop command integrates with the Ubuntu local iptables firewall and drops incoming network connection from the attacker endpoint for 60 seconds:
<ossec_config>
  <active-response>
    <command>firewall-drop</command>
    <location>local</location>
    <rules_id>100100</rules_id>
    <timeout>60</timeout>
  </active-response>
</ossec_config>
Restarted the Wazuh manager to apply the changes:
Attack emulation
Performed the following command from may Kali VM to access the web server in my Ubuntu endpoint:

The attacker endpoint connects to the victim’s web servers the first time. After the first connection, the Wazuh active response module temporarily blocks the Kali’s IP address for the succeeding connection to the web servers for 60 seconds.
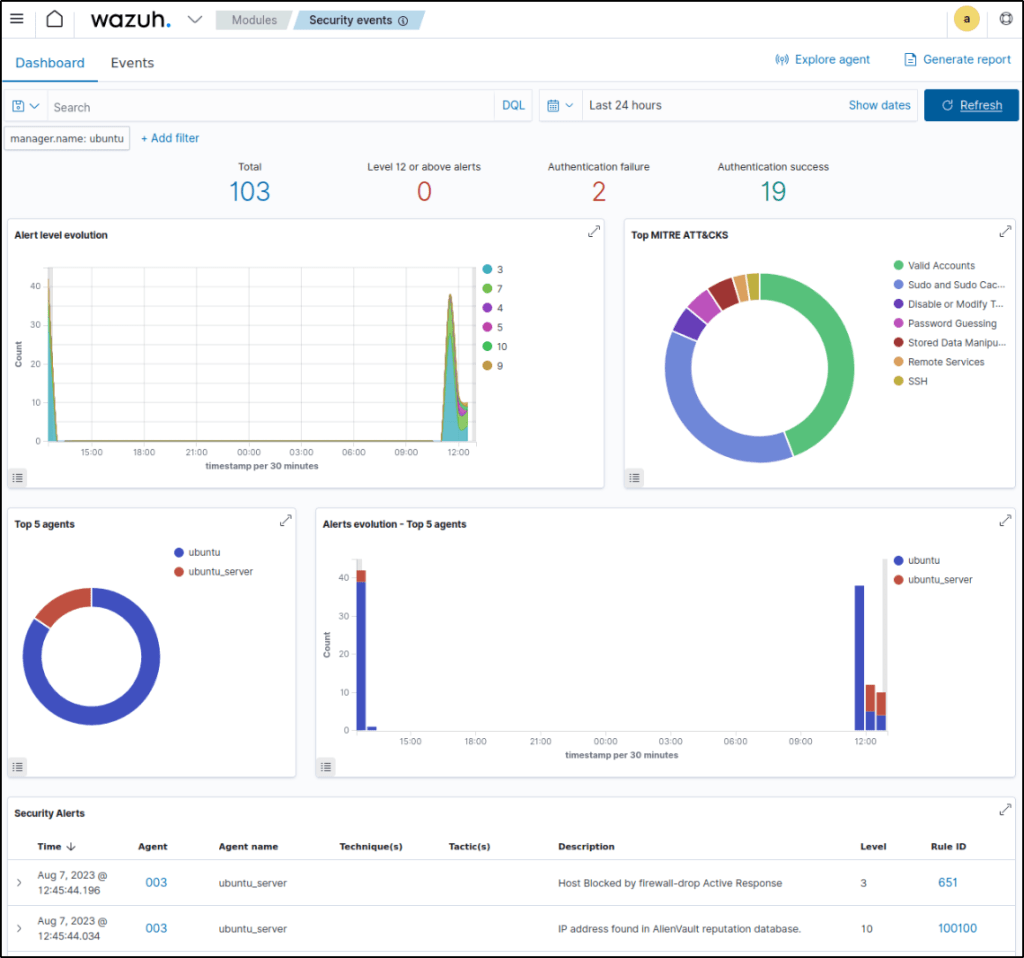
Visualize the alerts
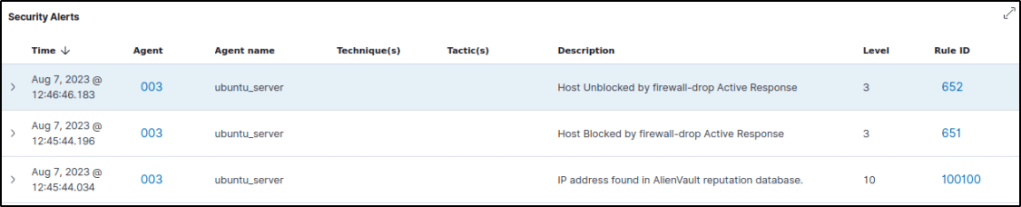
The alerts are visually presented int the Dashboard. The rules triggered are 651 or 100100.
60 seconds after the IP address was blocked, a description “Host Unblocked by firewall-drop Active Response” emerges, which is a response action that is used to unblock a host that was previously blocked.
File integrity monitoring
The FIM module checks for unauthorized file modifications, deletions, and new file creations by comparing checksums and attributes against a baseline. Alerts are triggered when mismatches between current files and baseline are detected.
Configuration
Performed the following steps to configure the Wazuh agent to monitor filesystem changes in the /root directory.
- Added the directories for monitoring within the
<syscheck>block in/var/ossec/etc/ossec.confconfiguration file. In this example, I configured Wazuh t monitor the/tmpdirectory . To get additional information about the user and process that made the changes, who-data audit can be enabled:
<directories check_all="yes" report_changes="yes" realtime="yes">/root</directories>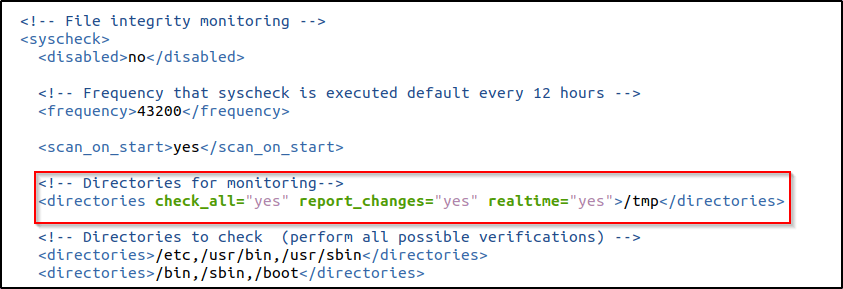
Info about Real-time monitoring
The realtime attribute enables real-time/continuous monitoring of directories on Windows and Linux endpoints only.
2. Restarted the Wazuh agent to apply the configuration changes:
sudo systemctl restart wazuh-agentTest the configuration
The following are the steps I took to test Wazuh’s FIM capability.
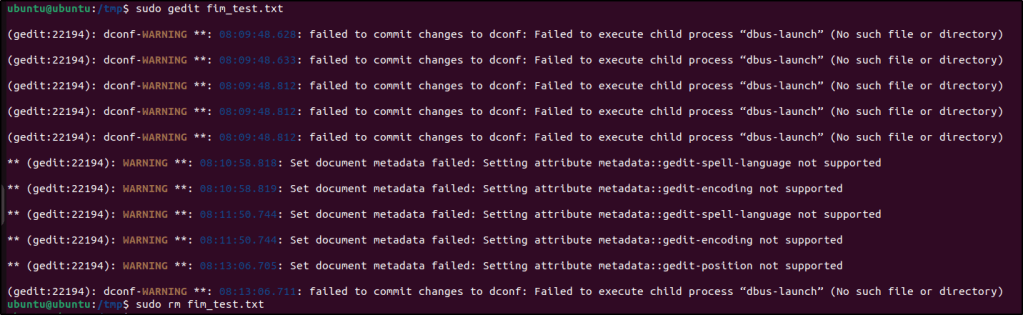
- Created a text file in the monitored directory then wait for 5 seconds.
- Added content to the text file and save it. Wait for 5 seconds.
- Deleted the text file from the monitored directory.
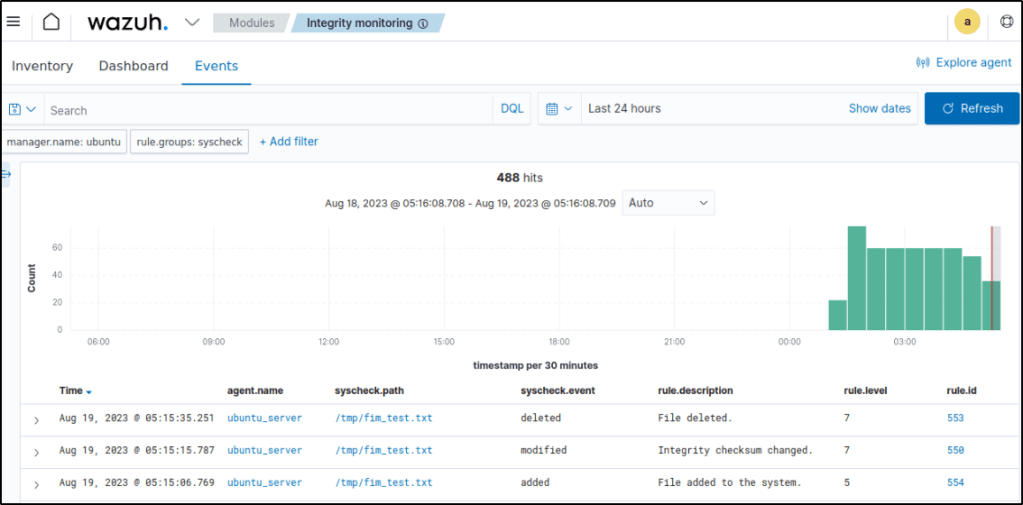
Visualize the alerts
Alerts are displayed in the Security events module with either rule.id of 550,553, or 554 triggered.
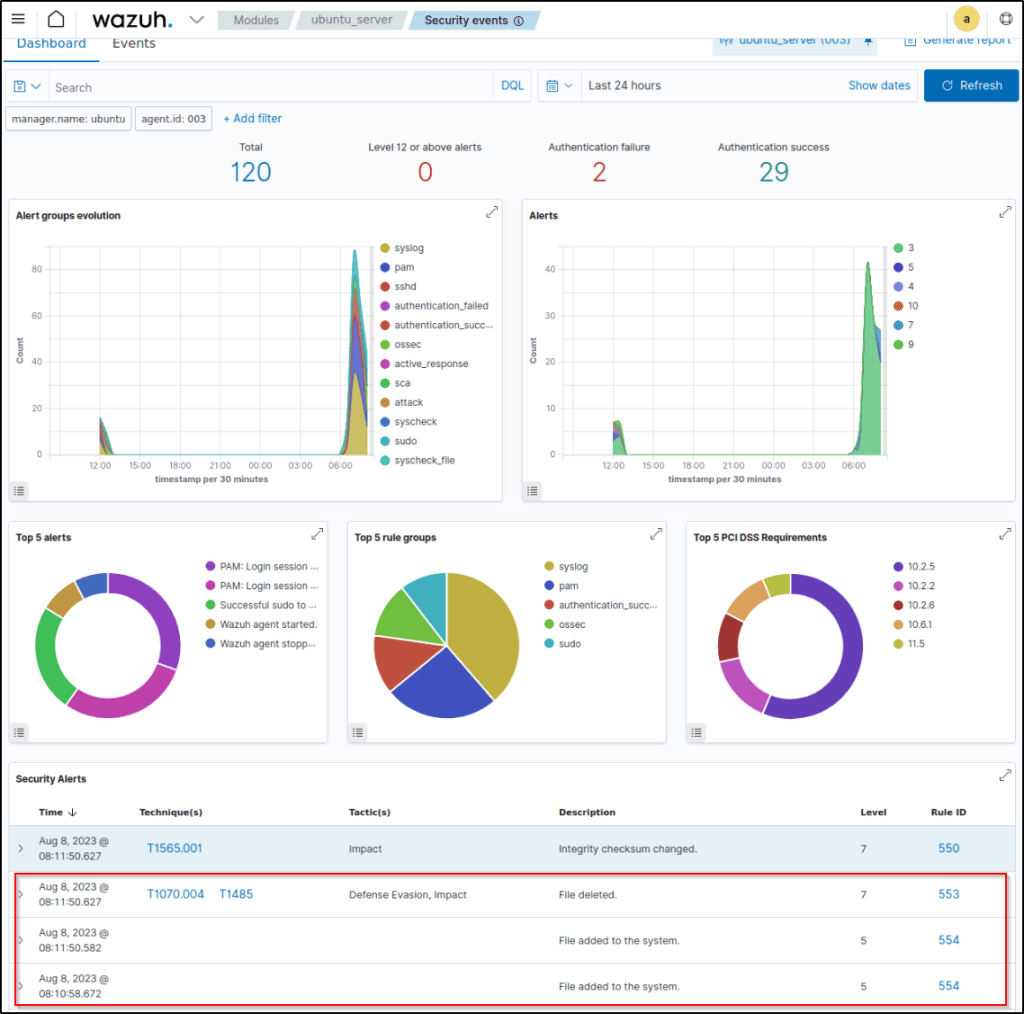
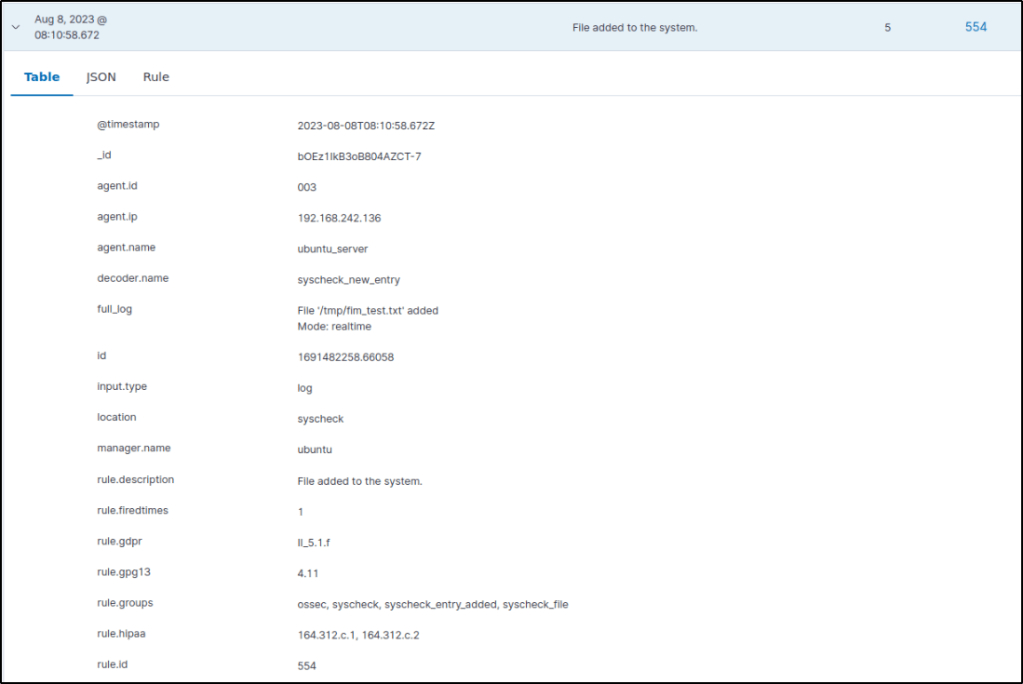
Expanded one of the events to display more information about the event that triggered the alert..
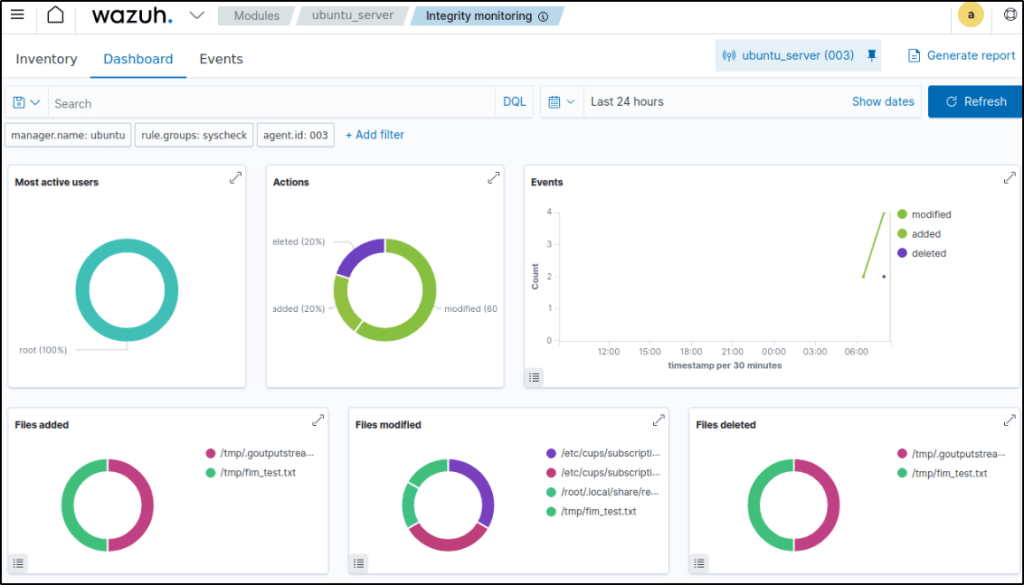
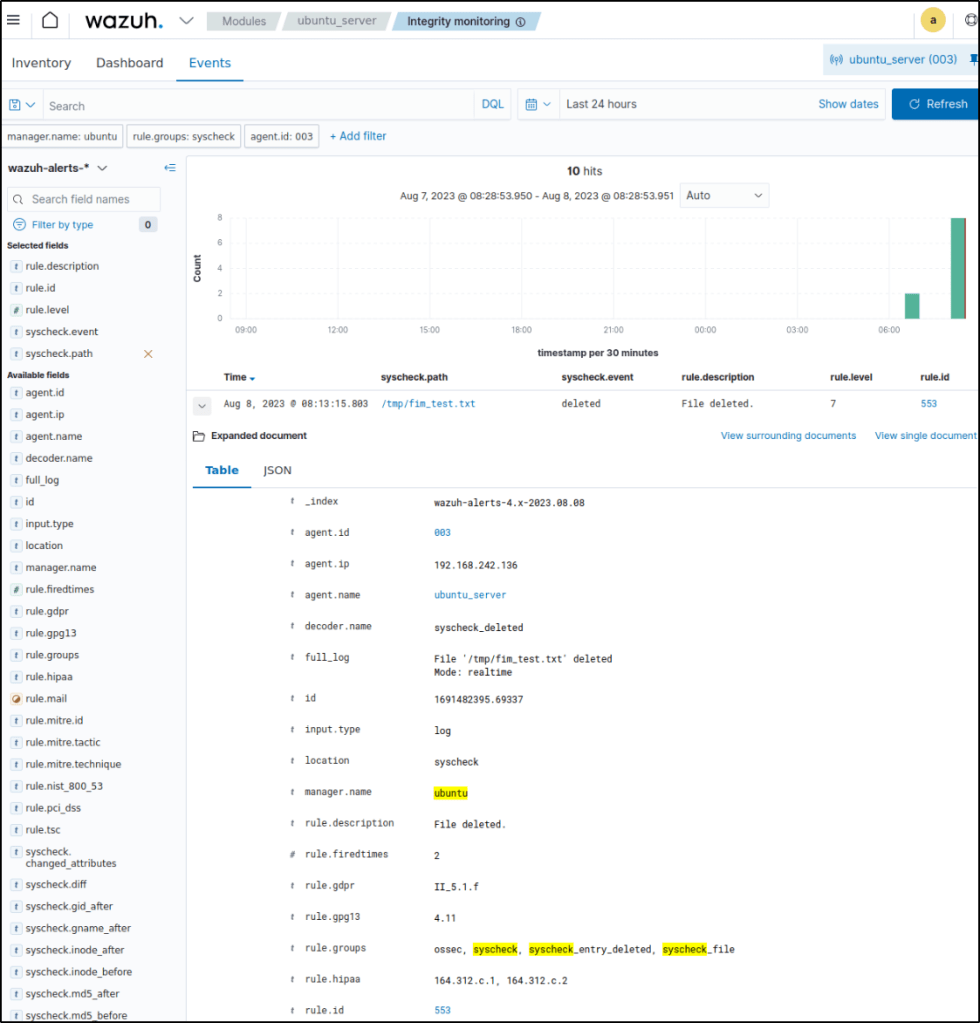
FIM scan results are better observed in the Integrity monitoring module. It displays visually representation of events that are only related to FIM events.

Who-data monitoring
Who-data audit is used to enhance FIM module’s alert data grabbing. The who-data monitoring feature in Wazuh leverages the Linux audit subsystem to track who is making changes to monitored directories in real-time. It captures audit events when files in a watched directory are created, modified, or deleted, and includes details on the associated user.
Configuration
Installed the auditd daemon on my Ubuntu agent.
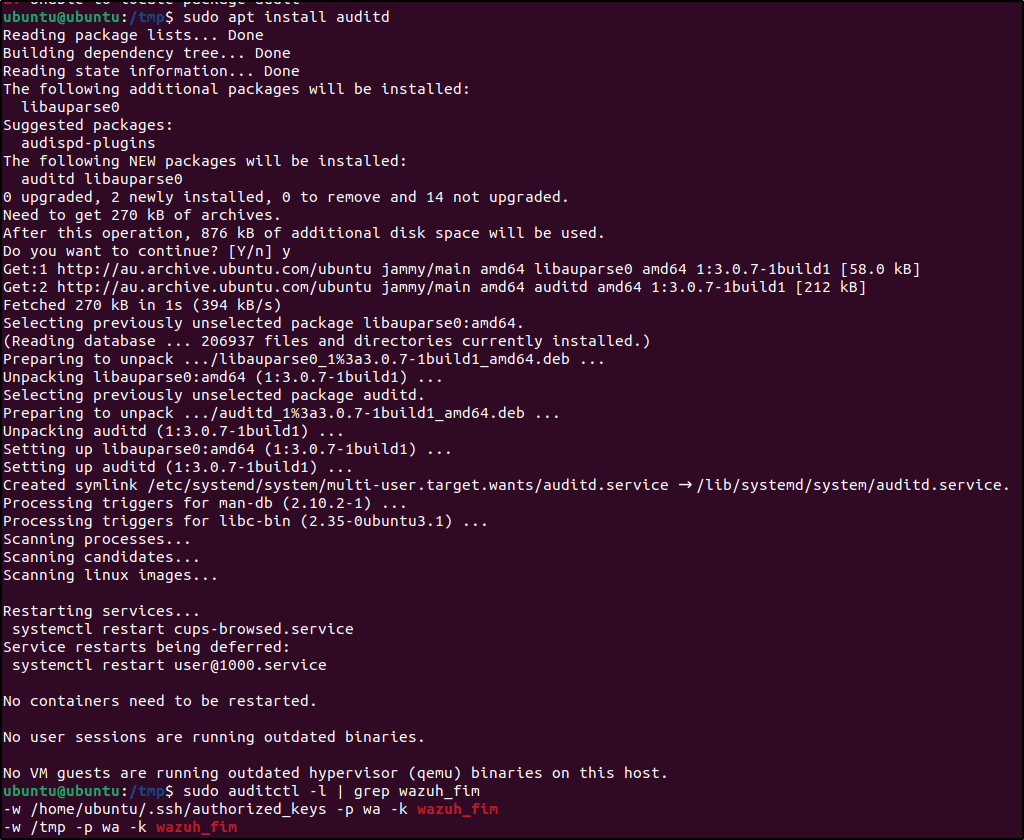
Checked if the audit rule for monitoring the selected directory is applied.
auditctl -l | grep wazuh_fimEdited the Wazuh agent /var/ossec/etc/ossec.conf configuration file and add the configuration below:
<directories check_all="yes" report_changes="yes" realtime="yes" whodata="yes">/tmp</directories>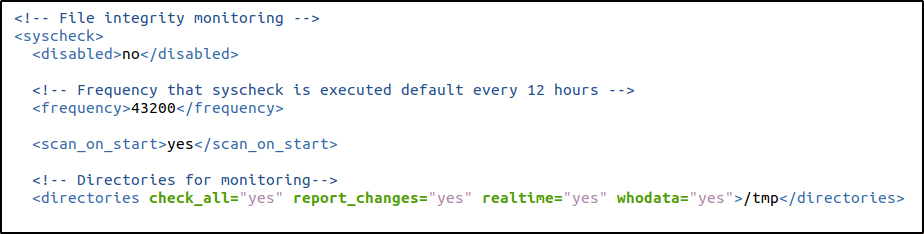
Performed the same test.
Three alerts are generated, which captured the three steps I took to test the configurations.
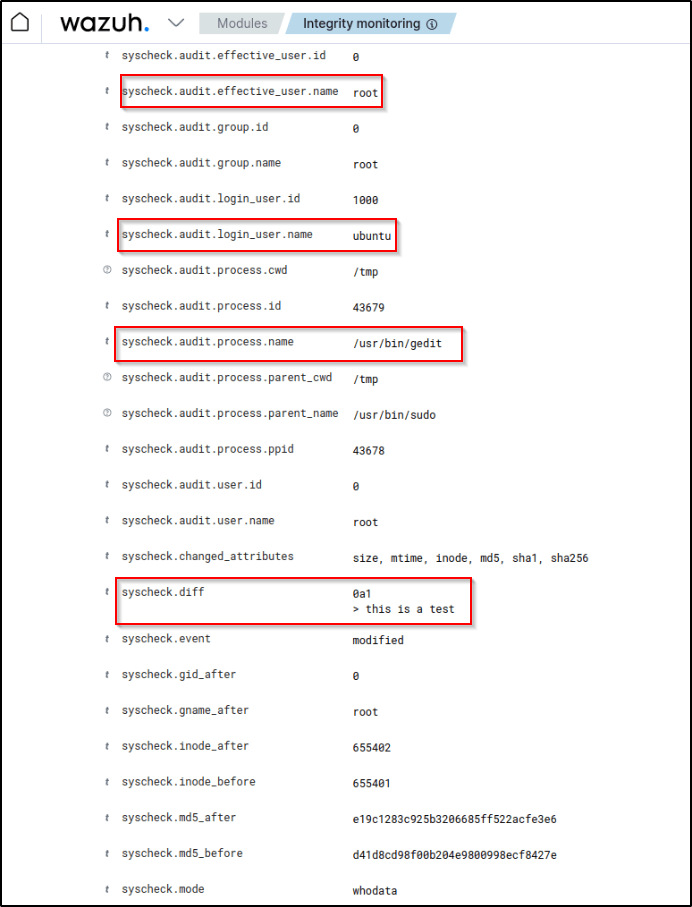
If I expand one of the alerts, additional interesting alert fields are presented like audit.user.name,audit.login_user.name, and audit.process.name among others. The data gathered are enhanced by the who-data audit which provides useful forensic details beyond just detecting that a change occurred.
Detecting account manipulation (FIM)
Here is another scenario where unauthorized account manipulation may allow attackers to gain access to a system. As a persistence technique, adversaries can modify the SSH authorized_keys file in the .ssh directory within a user home directory in a Linux system. For example, for a user named smith, you can find the authorized_keys file located at /home/smith/.ssh/authorized_keys. This file defines the public keys this user uses to login into some of their accounts.
Wazuh FIM module can be configured to monitor the authorized_keys file. When the public keys are modified, this will trigger an alert.
Configuration
The following steps would configure the FIM module to monitor SSH key modification.
- Edited the
/var/ossec/etc/ossec.confconfiguration file and addauthorized_keysfor monitoring:
<syscheck>
  <directories whodata="yes">/home/*/.ssh/authorized_keys</directories>
</syscheck>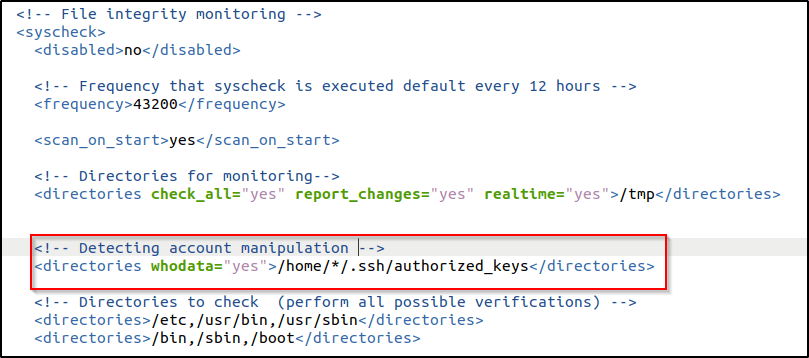
2. Restarted the Wazuh agent to apply the configuration:
systemctl restart wazuh-agentTest the configuration
Generated an SSH key-pair for user authentication and save it as .ssh/test_key using the following command: (in the /home/ubuntu/ dir)
ssh-keygen -f .ssh/test_key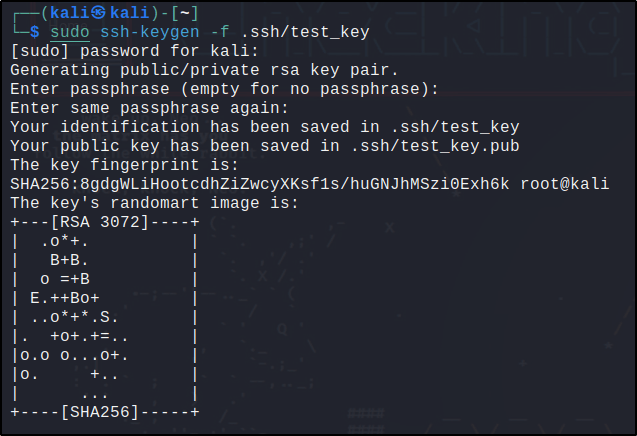
I used an empty passphrase.
Run the following command to copy the content of the generated SSH public key test_key.pub and add it to the authorized_keys file in the target Ubuntu user .ssh directory:
cat ~/.ssh/test_key.pub | ssh <UBUNTU_USER>@<UBUNTU_IP> "sudo tee -a /home/<UBUNTU_USER>/.ssh/authorized_keys"
I got errors executing the command so I used a different set of commands but functions with the same purpose.
sudo ssh-copy-id -i ~/.ssh/test_key.pub ubuntu@192.168.242.136 && ssh ubuntu@192.168.242.136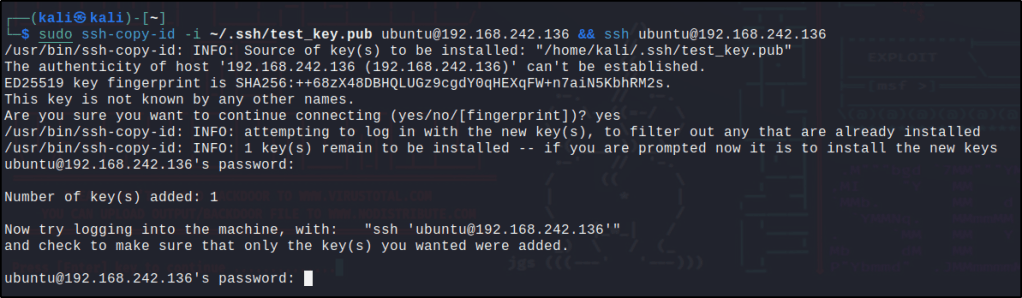
Visualize the alert
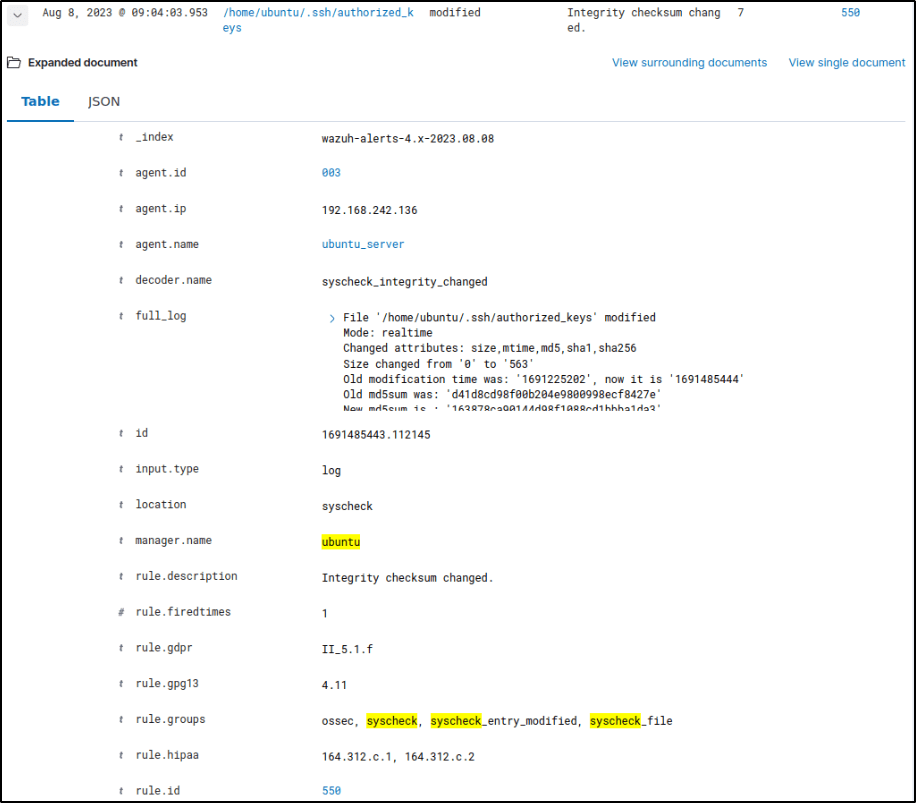
The Integrity module on the Wazuh dashboard displayed the alert generated when the FIM module detected changes to the authorized_keys file.
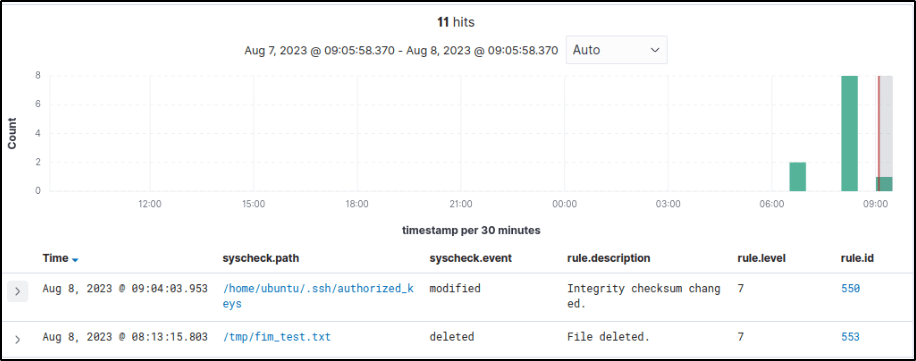
Expanding on it will display info about the event.
Reporting file changes (FIM)
This test is similar to the initial FIM test conducted that when changes such as creation, modification, or deletion of a file in the monitored file system is detected, it will trigger an alert. The only difference here is the addition of a configuration to exclude changes made to a path or file.
Configuration
Followed these steps to configure the FIM module to report changes made to a file. The configuration reports changes made to files in /appfolder except for the private-file.conf file.
- Edited the
/var/ossec/etc/ossec.confconfiguration file and added the configuration below. I copied instead the configuration I used in the initial testing of FIM. This sets/appfolderfor monitoring and makes an exception in reporting changes for/appfolder/private-file.confusingnodiff:
<syscheck>
 <directories check_all="yes" report_changes="yes" realtime="yes" whodata="yes">/appfolder</directories>
 <nodiff>/appfolder/private-file.conf</nodiff>
</syscheck>
2. Restarted the Wazuh agent to apply the configuration changes.
Test the configuration
Created a directory /appfolder and the files appreport.conf and private-file.conf in the directory:
sudo mkdir /appfolder && sudo touch /appfolder/appreport.conf && sudo touch /appfolder/private-file.confAdded the value I added this text to the appreport.conf and private-file.conf files:
sudo echo “I added this text” | sudo tee /appfolder/appreport.conf /appfolder/private-file.confVisualize the alert
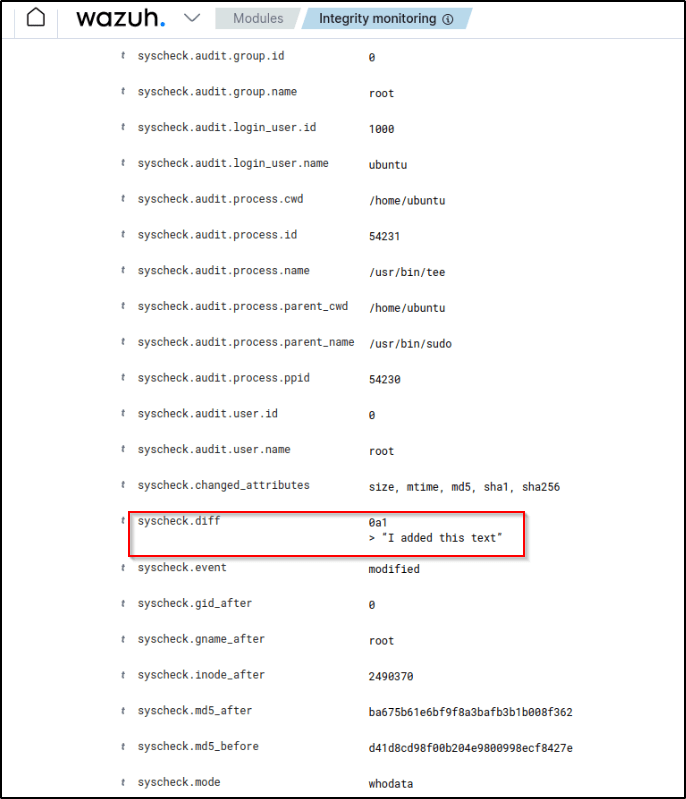
Four alerts are generated in relation to the monitored directory.

If I expand the alert for the appreport.conf file with rule.id:550 I could see the content added to the file.
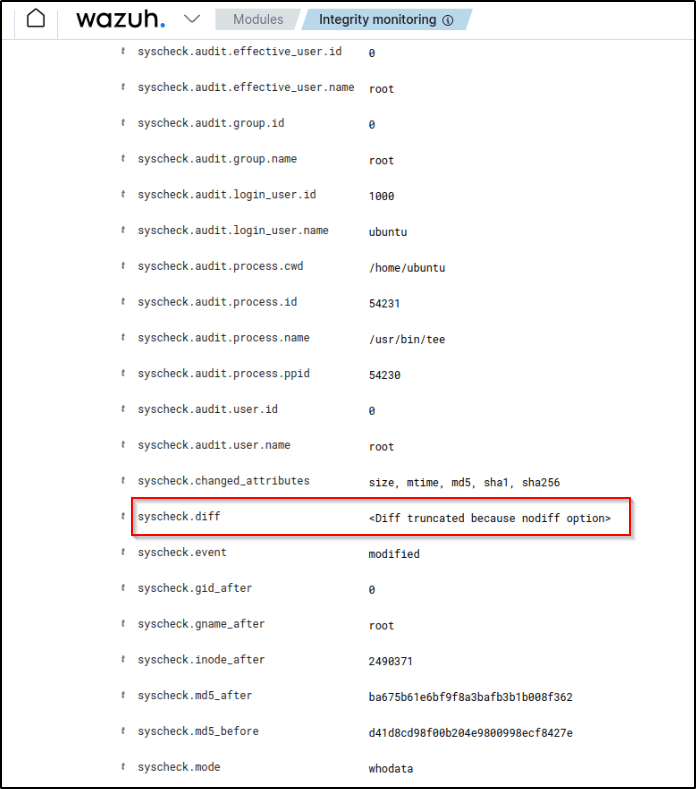
Meanwhile, if I expand the alert for the private-file.conf file with rule.id:550, FIM doesn’t report the content added to the file.
Monitoring configuration changes (FIM)
This is the last test in relation to FIM. Tracking configuration changes is important for maintaining accountability around system and application modifications. By monitoring for changes and logging details on who made each change, organizations can establish an audit trail of responsibility and authorization.
The Wazuh FIM module uses the whodata and report_changes attributes to record the following information about such changes:
- The login user that made the changes.
- The time of the changes.
- The process that the user executed.
- The changes made to the file.
Configuration
Configured the FIM module to monitor the /etc/app.conf file and report changes.
Created a file app.conf in the /etc directory:
touch /etc/app.confEdited the /var/ossec/etc/ossec.conf configuration file and added the configuration below:
<syscheck>
  <directories check_all="yes" report_changes="yes" whodata="yes">/etc/app.conf</directories>
</syscheck>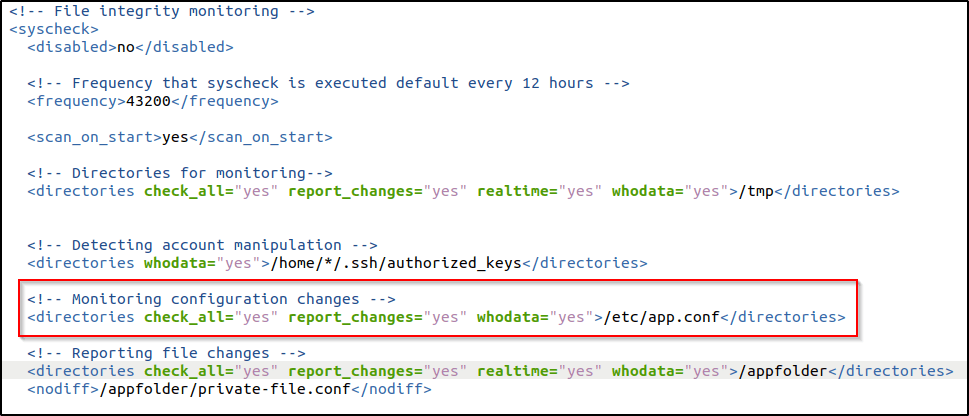
Restarted the Wazuh agent to apply the configuration changes:
Test the configuration
Modified the /etc/app.conf file by using nano with root privilege:
sudo nano /etc/app.confAdded updated image to V2 to mimic a change in the configuration file, and save.

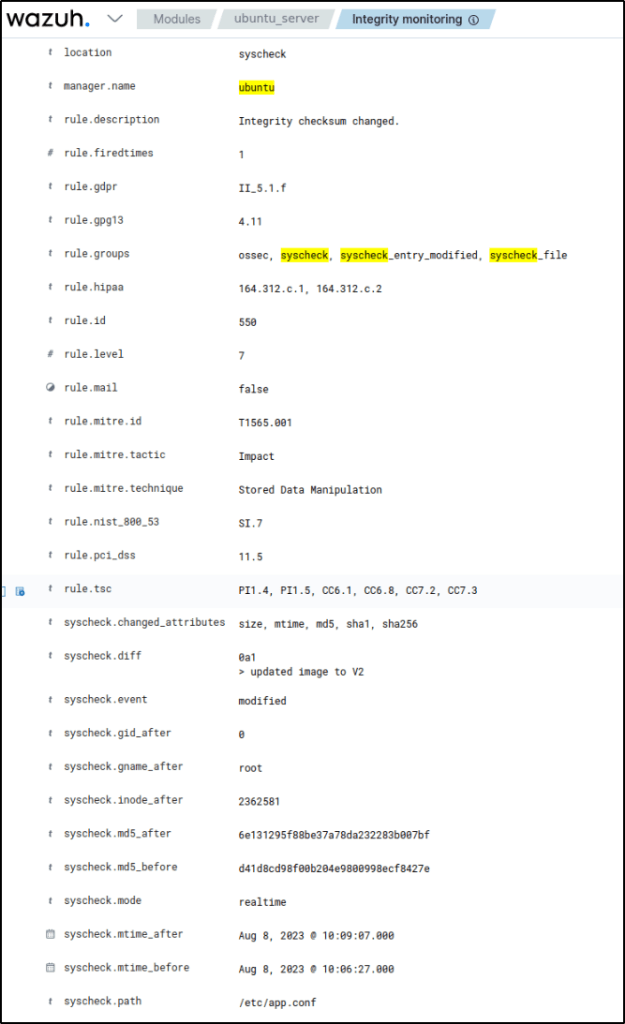
Visualize the alert
An alert was triggered after modifying the contents of the config file.
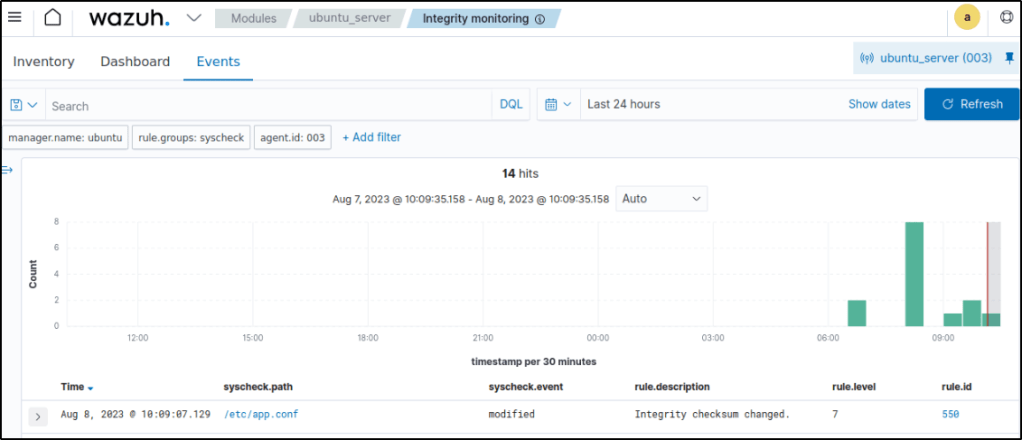
Expanded the alert and it displayed information like nano text editor modified the configuration file. The logged-in user on the endpoint was ubuntu. The user modified the file using root privilege. The content added to the file is updated image to V2.
Detecting a brute-force attack
Brute force attacks, where threat actors attempt to guess credentials through rapid automated tries, are a prevalent tactic for unauthorized access to endpoints and services. Wazuh can identify these brute forcing attempts by correlating authentication failure events, often against services like SSH, or FTP on Linux or RDP on Windows. Once detected, Wazuh can trigger active responses to block the attacker’s IP address and prevent further brute forcing, automating protection against this common attack vector. Configuring active response policies allows Wazuh to both detect and respond to brute force attacks on Linux and Windows endpoints.
Configuration
The following steps will configure the monitored Ubuntu endpoint to allow authentication failure attempts on the machine.
- I installed Hydra on my Kali VM for executing the attack:
sudo apt updatesudo apt install -y hydraAttack emulation
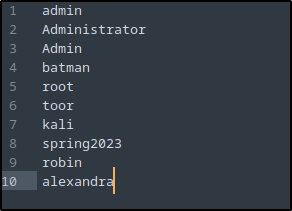
- Created a text file with 10 random passwords.
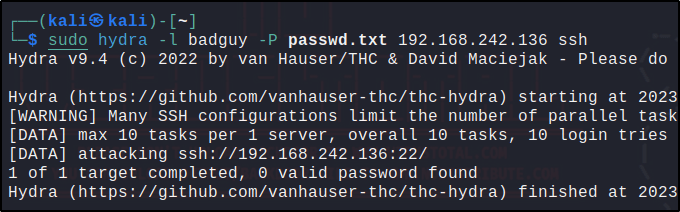
2. I executed Hydra from my attacker to execute a brute-force attack against the Ubuntu endpoint.
sudo hydra -l badguy -P <PASSWD_LIST.txt> <RHEL_IP> ssh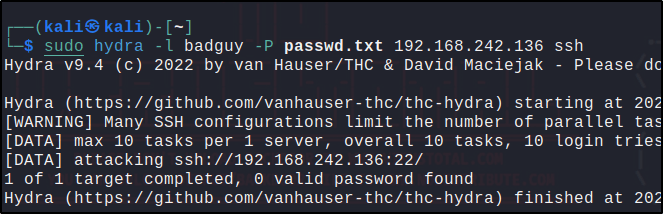
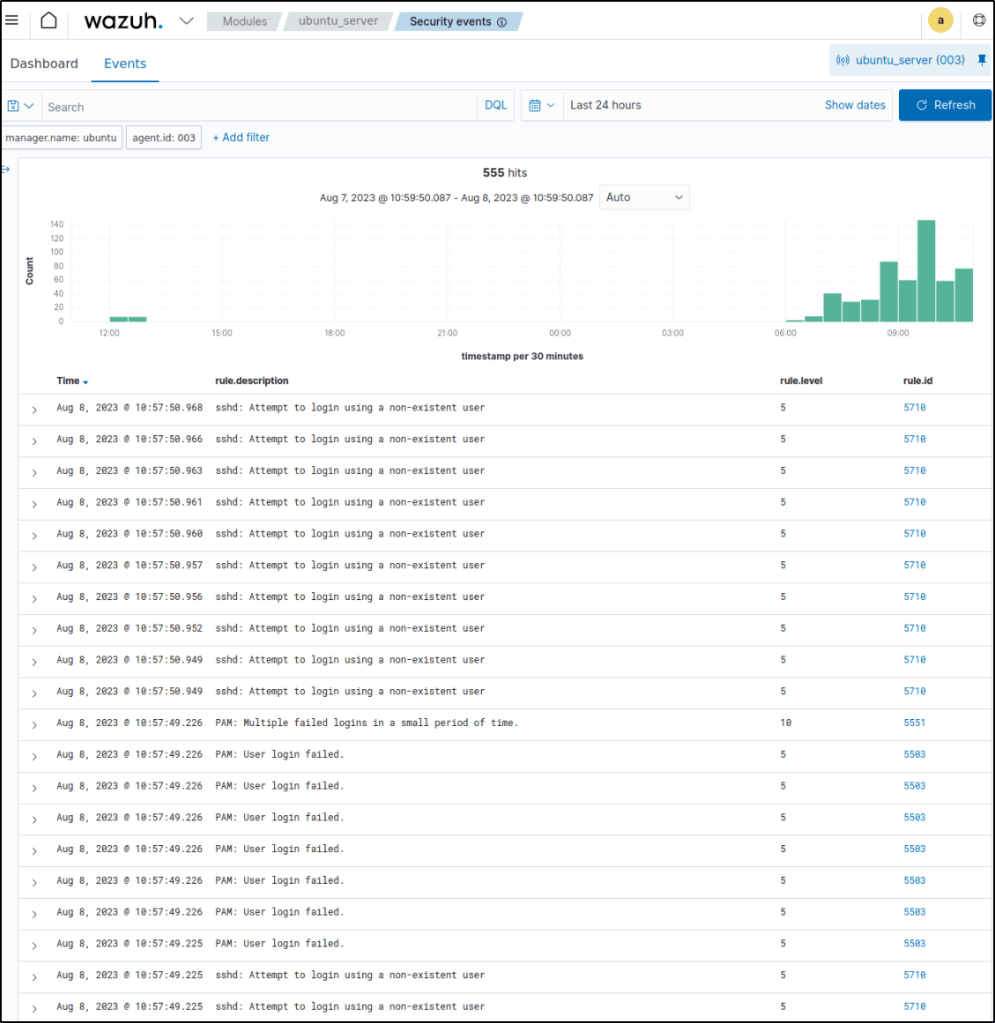
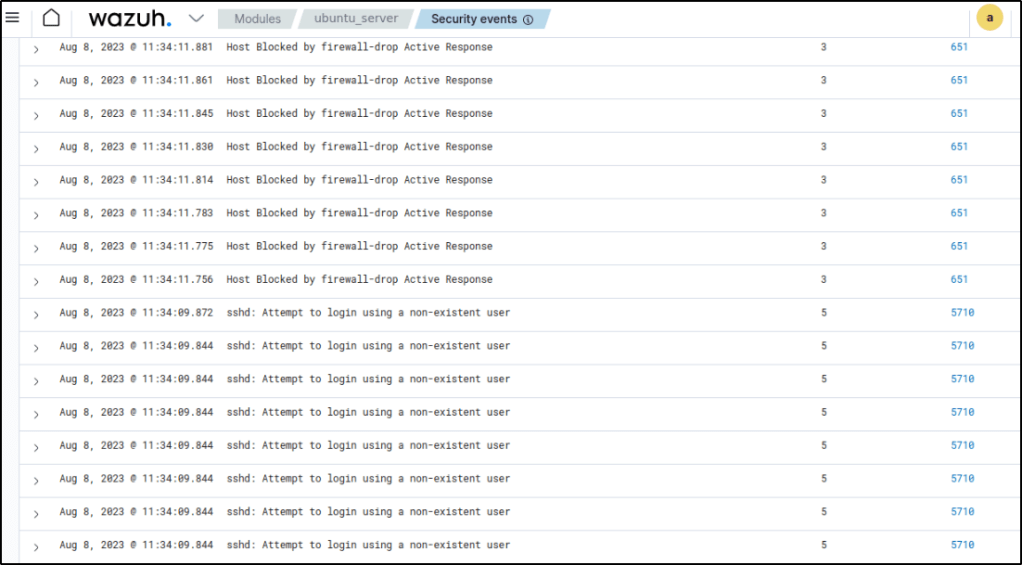
Visualize the alerts
rule.id of 5551 OR 5712, and other related rules: 5710, 5711, 5716, 5720, 5503, 5504 are triggered when the ssh brute-force attack was performed detecting an SSH brute force attempt.
Blocking SSH brute-force attack with active response
The active response module in Wazuh can automatically execute actions like running scripts on endpoints when certain rules are triggered, enabling automated incident response. This capability can be used to block SSH brute force attacks by configuring a rule to detect repeated SSH authentication failures and trigger an active response that blocks the attacker’s IP address. When Wazuh correlates multiple failed SSH logins, indicating a likely brute force attempt, the configured active response script will execute on the endpoint to immediately block the attacking IP. This prevents further brute forcing and protects against unauthorized SSH access without human intervention
Wazuh server Configuration
Wazuh includes default active response scripts located in /var/ossec/active-response/bin on Linux/Unix agents that can be used for automated incident response. One such script is firewall-drop, which leverages iptables on the local endpoint to block malicious IP addresses. Configuring this firewall-drop script as an active response allows Wazuh to automatically execute it when malicious activity is detected, dropping the attacker’s connection. This enables agent endpoints to protect themselves in real-time by blocking intruder IPs with the built-in active response capabilities.
- From my previous blogs, I can confirm that a
<command>block calledfirewall-dropwith the following configuration is present within the<ossec_config>block of the/var/ossec/etc/ossec.conffile :
<command>
 <name>firewall-drop</name>
 <executable>firewall-drop</executable>
 <timeout_allowed>yes</timeout_allowed>
</command>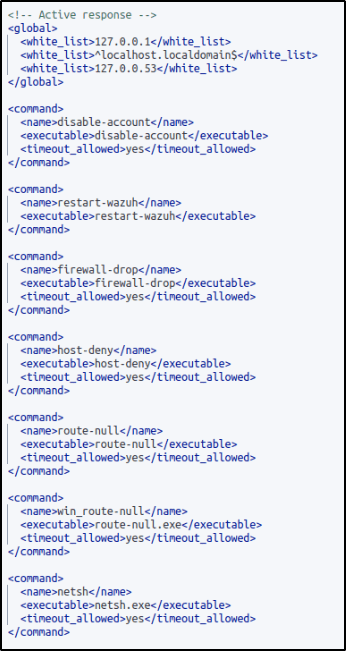
The <command> block contains information about the action to be executed on the Wazuh agent:
<name>: Sets a name for the command. In this case,firewall-drop.<executable>: Specifies the active response script or executable that must run upon a trigger. In this case, it’s thefirewall-dropexecutable.<timeout_allowed>: Allows a timeout after a period of time. This tag is set toyeshere, which represents a stateful active response.
2. Added the <active-response> block below to the Wazuh server /var/ossec/etc/ossec.conf configuration file:
<ossec_config>
  <active-response>
    <command>firewall-drop</command>
    <location>local</location>
    <rules_id>5763</rules_id>
    <timeout>180</timeout>
  </active-response>
</ossec_config>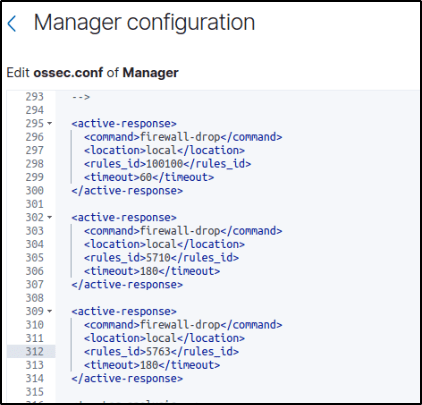
<command>: Specifies the command to configure. This is the command namefirewall-dropdefined in the previous step.<location>: Specifies where the command executes. Using thelocalvalue means that the command executes on the monitored endpoint where the trigger event occurs.<rules_id>: The active response module executes the command if rule ID5763 - SSHD brute force trying to get access to the systemfires.<timeout>: Specifies how long the active response action must last. In this use case, the module blocks for 180 seconds the IP address of the endpoint carrying out the brute-force attack.
Saved and restarted the Wazuh manager service to apply the changes:
Test the configuration
Using the same command I used before in detecting an SSH brute force attack, I run hydra from my Kali VM to start brute forcing.
Visualize the alerts
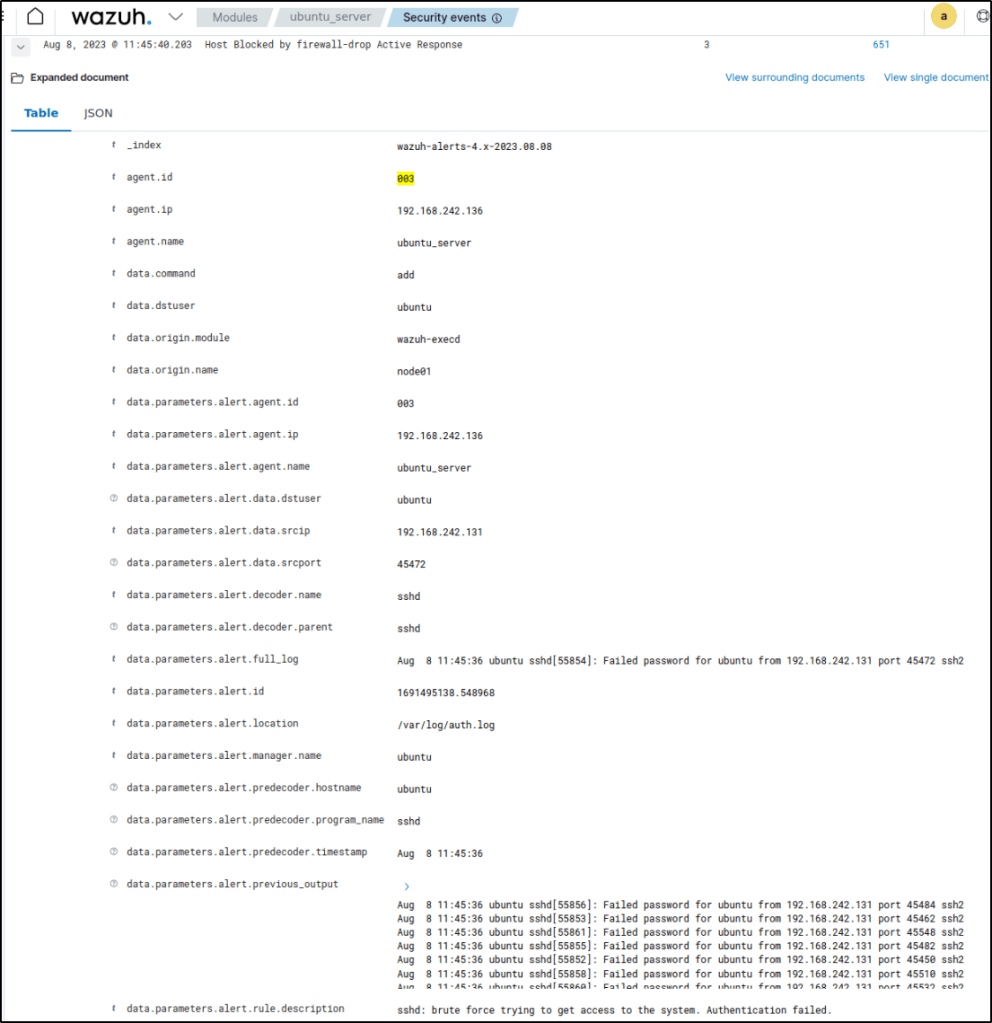
It can be seen that after the attack triggered alerts, the IP address of the attacker was successfully blocked.
And right after 180 seconds or 3 minutes, the attacker’s IP is unblocked by the firewall active response.
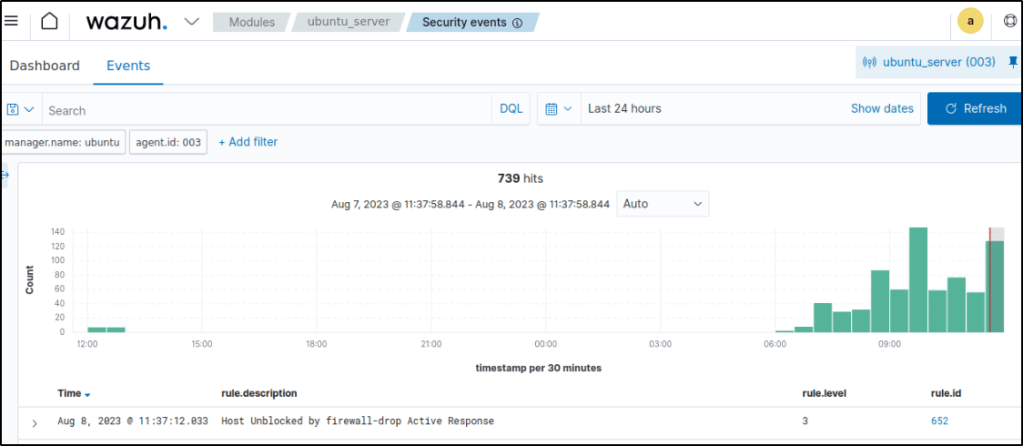
Once the attack ends, rule ID 5763 is fired in the dashboard.
To verify that the active response module was effective and has blocked the attacker’s IP address, I pinged the Ubuntu endpoint within the 3 mins configuration.
After five attempts of pinging, my attacker VM is unable to establish connection with the Ubuntu endpoint which means that the active response module worked.

Generating an alert when an active response is fired
Log files of monitored Linux/Unix endpoints are located at /var/ossec/logs/active-responses.log where Wazuh registers the active response activities. By default, the Wazuh server monitors the active response log file. The relevant section in the Wazuh server /var/ossec/etc/ossec.conf configuration file is shown below:
<localfile>
<log_format>syslog</log_format>
<location>/var/ossec/logs/active-responses.log</location>
</localfile>
When the active response triggers, a corresponding alert appears on the Wazuh dashboard.
The alert appears because rule ID 651 is part of the default /var/ossec/ruleset/rules/0015-ossec_rules.xml rule file on the Wazuh server.
For repeat offenders in a system, this link provides configurations to be made in increasing blocking time for repeated offenders.
Detecting unauthorized processes
Wazuh’s command monitoring feature executes specified commands on endpoints and analyzes the resulting output for indicators of compromise or other criteria.
For this proof of concept exercise, Wazuh will be configured to detect when Netcat is running on an Ubuntu endpoint. Netcat is used by attackers for various malicious activitieslike file transfer or establishing a shell to an endpoint.
Configuration – Ubuntu Endpoint
Configured the Ubuntu endpoint by monitoring commands executed and query a list of all running processes on the Ubuntu endpoint.
- Added the following configuration block to the Wazuh agent
/var/ossec/etc/ossec.conffile. This will periodically get a list of running processes:
<ossec_config>
  <localfile>
    <log_format>full_command</log_format>
    <alias>process list</alias>
    <command>ps -e -o pid,uname,command</command>
    <frequency>30</frequency>
  </localfile>
</ossec_config>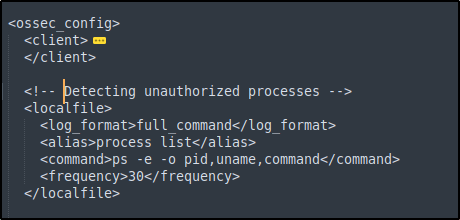
2. Restarted the Wazuh agent to apply the changes
3. Installed Netcat and the required dependencies:
sudo apt install ncat nmap -y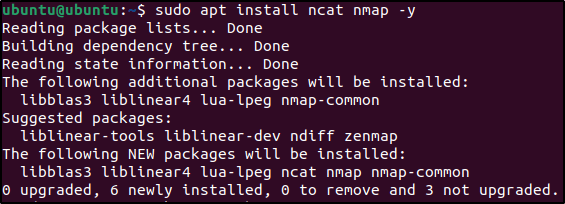
Configuration – Server
Configured the Wazuh server to create a rule that triggers every time the Netcat program launches.
- The following rules were added to the
/var/ossec/etc/rules/local_rules.xmlfile on the Wazuh server:
<group name="ossec,">
  <rule id="100050" level="0">
    <if_sid>530</if_sid>
    <match>^ossec: output: 'process list'</match>
    <description>List of running processes.</description>
    <group>process_monitor,</group>
  </rule>

  <rule id="100051" level="7" ignore="900">
    <if_sid>100050</if_sid>
    <match>nc -l</match>
    <description>netcat listening for incoming connections.</description>
    <group>process_monitor,</group>
  </rule>
</group>
2. Restarted the Wazuh manager to apply the changes:
Attack emulation
Executed nc -l 8000 for 30 seconds on the Ubuntu endpoint. The command nc -l 8000 was used to set up a simple network service which listens on port 8000. This will create a basic server that can receive incoming connections and transmit data between the connected clients and the server.

Visualize the alerts
Alerts with rule.id:(100051) were triggered
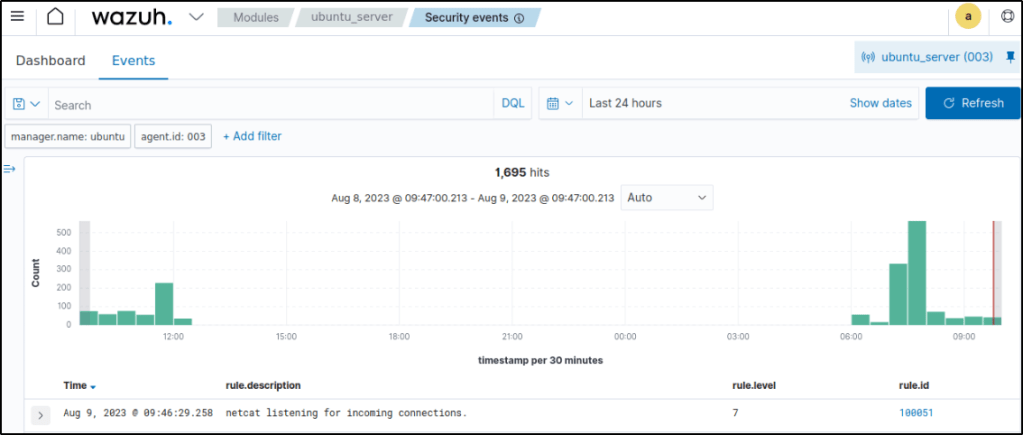
Expanding the alert, it displays the information like the rule.description, which was configured in the server.

Conclusion
In this hands-on walkthrough, I explored at how Wazuh can monitor and trigger alerts on a variety of threat scenarios within my own infrastructure. I used file integrity monitoring to catch unauthorized configuration and account changes on my Ubuntu server. When an SSH brute force attack was launched against the ubuntu machine, I was able to use Wazuh to quickly block the attacking IP address. And Wazuh alerted me about unexpected processes indicative of malware or intrusion.
By leveraging Wazuh’s built-in rules and integrations, I was able to gain unified visibility and control across my endpoints. In my next post, I’ll continue how to further customize Wazuh and explore its capabilities to gain additional insights on how this tool monitors and secures systems.
Reference
Thanks for Reading. Till next time.

Leave a comment