
Introduction
In my previous posts, I demonstrated the capabilities of Wazuh for monitoring and protecting an Ubuntu endpoint, including detecting malware, analyzing system calls, assessing configurations, and more. This time, I will be replicating some use cases and proof of concept on a Windows endpoint.
In this post, I’ll walk through practical examples of using Wazuh for file integrity monitoring and malware detection on Windows. For file integrity, I’ll look at detecting registry persistence techniques used by malware and removing threats with VirusTotal integration and active response. For malware detection, file hashes and Yara rules are integrated to block and identify malicious tools and malware. My goal is to explore Wazuh’s versatility across both Linux and Windows environments.
File integrity monitoring
The FIM module helps detect unauthorized changes to files by comparing them with a baseline. It sends alerts when it finds differences between the current files and the baseline.
How to configure the FIM module
The FIM module scans files in Windows, Linux, and macOS. It has settings for both global and operating system-specific configurations. Directories or individual files can be specified to monitor using either the Wazuh server or agent configuration files. The monitoring directories can be set using wildcard characters like * and ?. When the FIM module scans, it generates alerts for any modified files, and these alerts can be viewed in the Wazuh dashboard.
Here is a description of the steps needed to configure the FIM module for monitoring a specific file and a directory. Simply replace the placeholders FILEPATH/OF/MONITORED/FILE and FILEPATH/OF/MONITORED/DIRECTORY with the actual filepaths.
1. Add the following settings to the Wazuh agent configuration file:
- Windows:
C:\Program Files (x86)\ossec-agent\ossec.conf
<syscheck>
   <directories>FILEPATH/OF/MONITORED/FILE</directories>
   <directories>FILEPATH/OF/MONITORED/DIRECTORY</directories>
</syscheck>
2. Restart the Wazuh agent with administrator privilege to apply any configuration change.
- Windows:
Restart-Service -Name wazuh
Detecting malware persistence technique
Adversaries can establish persistence by inserting a malicious script or program into the startup folder of a Windows endpoint. When a user logs in to the endpoint, the program located in this folder runs automatically.
By utilizing the Wazuh FIM module to monitor the Windows startup folder, any unusual or unfamiliar programs added by users can be identified. This enables the detection and removal of such programs to prevent potential harm to the endpoint.
Configuration
Wazuh automatically monitors the startup folder without any user intervention. The default configuration file of Wazuh, located at C:\Program Files (x86)\ossec-agent\ossec.conf, includes the following setting for monitoring the startup folder:
<syscheck>
  <directories realtime="yes">%PROGRAMDATA%\Microsoft\Windows\Start Menu\Programs\Startup</directories>
</syscheck>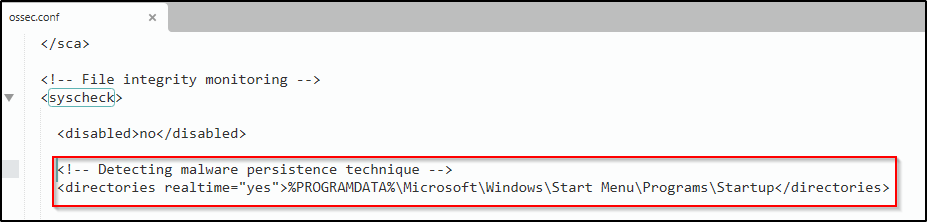
Test the configuration
1. Employ PowerShell to acquire the EICAR test file and save it to the C:\ProgramData\Microsoft\Windows\Start Menu\Programs\Startup folder.
cd "C:\ProgramData\Microsoft\Windows\Start Menu\Programs\Startup" Invoke-WebRequest -Uri https://secure.eicar.org/eicar.com.txt -OutFile eicar.txt2. Delete the file from the Windows endpoint:
Remove-Item eicar.txt
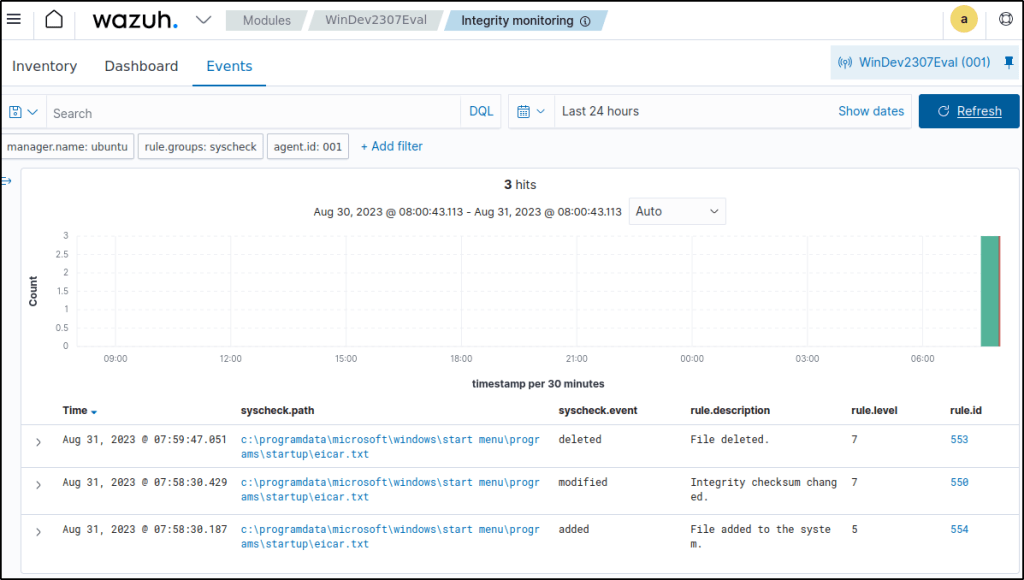
Visualizing the alert
Navigate to Modules > Integrity monitoring on the Wazuh dashboard to access the alert triggered when the FIM module identifies modifications in the Windows startup folder.
Events would show the addition, modification, and deletion of the file.
Furthermore, the Wazuh FIM module can be seamlessly integrated with VirusTotal to effectively eliminate such threats.
Windows Registry monitoring
The Windows Registry has a vital role in the Windows operating system as it stores important configuration data for installed programs and hardware. When a program is installed, a subkey is created in the registry containing details like the program’s location, version, and startup instructions.
Unauthorized or unexpected modifications to the registry can lead to system instability, application failures, and security breaches. Hackers may tamper with registry keys to execute malicious code or maintain a presence on the system. Additionally, legitimate software and system updates can also modify the registry. Monitoring these changes is crucial to ensure system stability and security.
The Wazuh FIM module performs regular scans of the Windows Registry and generates alerts whenever it detects any modifications to the entries.
How it works
The FIM module scans and keeps track of changes to Windows Registry entries. It compares the attributes and checksums of the entries to detect any modifications. The module reports these changes to the Wazuh server, generating alerts if discrepancies are found. The FIM data is stored in two databases: one on the monitored endpoint and another on the Wazuh server.
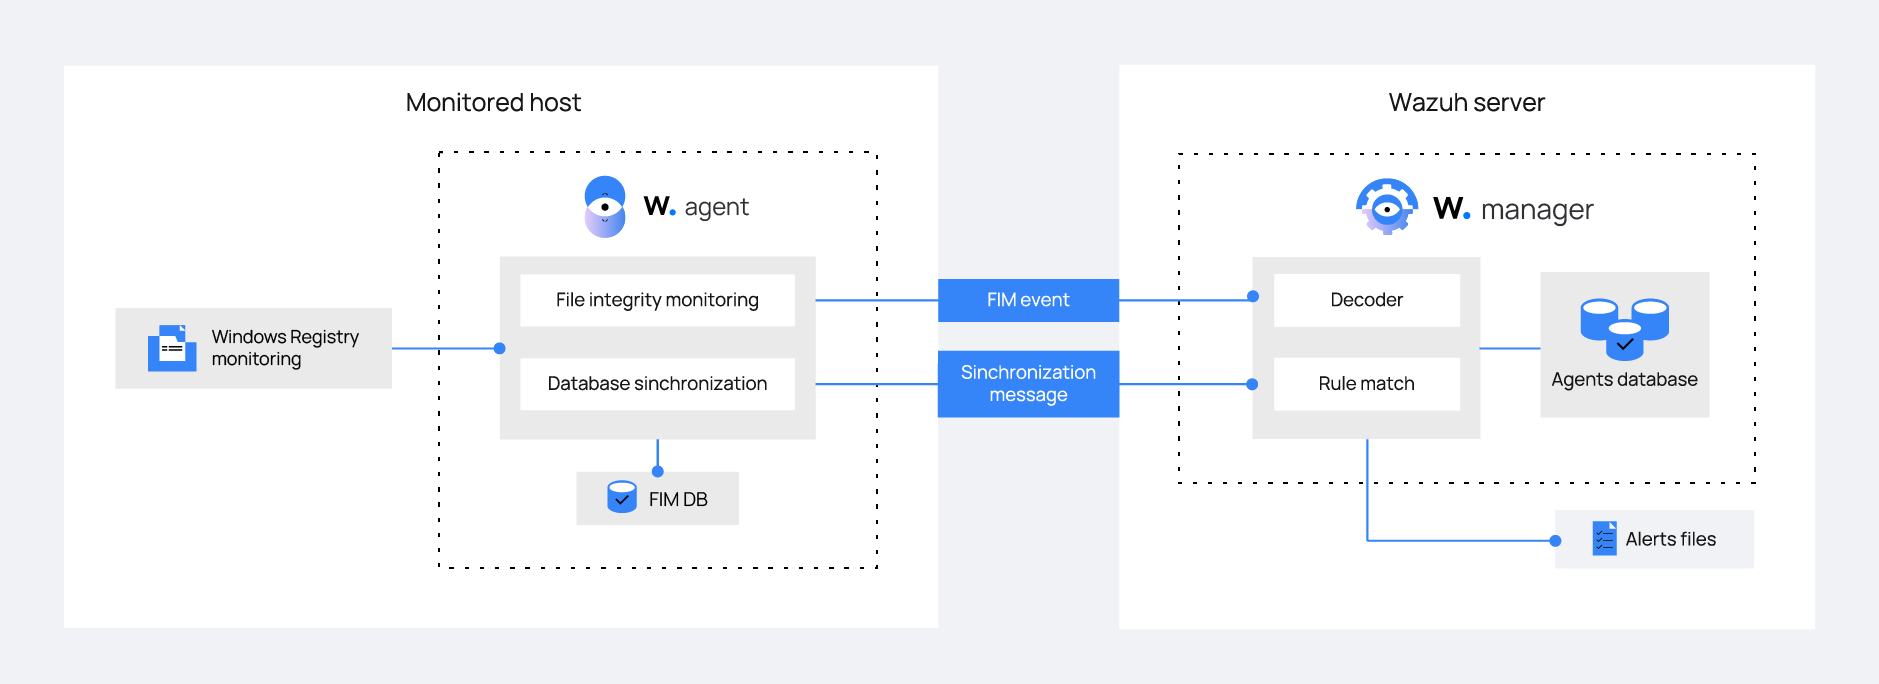
The FIM module syncs data between the Wazuh agent and server, keeping them updated. It helps with FIM-related queries.
Configuration
To set up the FIM module for monitoring changes in the Windows Registry, it is necessary to specify the registry keys that need to be tracked. This can be achieved by listing the keys using the <windows_registry> label in the FIM configuration.
The default FIM configuration can be modified in the ossec.conf file of the Wazuh agent located at C:\Program Files (x86)\ossec-agent\. Alternatively, remote configuration can be used through centralized configuration.
The FIM module provides different options for monitoring Windows Registry entries. For instance, basic checks can be enabled with the check_all attribute, or specific changes can be tracked using the report_changes attribute. More detailed information about these options can be found in the documentation’s windows_registry section.
For a step-by-step guide on configuring FIM to monitor the Windows Registry, refer to the documentation.
Use case: Detect malware persistence in Windows Registry
Malware persistence in the Windows Registry is a method employed by attackers to ensure their malicious software runs automatically whenever the system is booted or restarted. The malicious program is often added to the “Run” and “RunOnce” entries within the Registry. By utilizing the Wazuh FIM module, any unfamiliar or suspicious applications appended to the startup registry keys can be identified, enabling necessary measures to eliminate them before potential damage occurs.
Configuration
Wazuh automatically monitors the startup registry keys without the need for any special user action or configuration. The default configuration file for the Wazuh agent located at C:\Program Files (x86)\ossec-agent\ossec.conf includes a setting that enables the monitoring of the startup registry keys.
<syscheck>
  <frequency>300</frequency>
  <windows_registry arch="both">HKEY_LOCAL_MACHINE\Software\Microsoft\Windows\CurrentVersion\Run</windows_registry>
  <windows_registry arch="both">HKEY_LOCAL_MACHINE\Software\Microsoft\Windows\CurrentVersion\RunOnce</windows_registry>
</syscheck>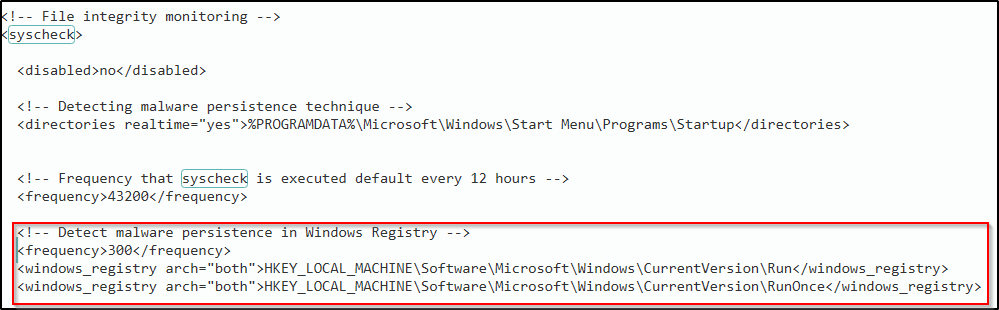
Test the configuration
Warning! Only test this out in a sandbox environment. Delete the added registry keys after running the test.
- Add the registry value name
DemoValueand registry value datacmdto theHKEY_LOCAL_MACHINE\Software\Microsoft\Windows\CurrentVersion\Runkey.

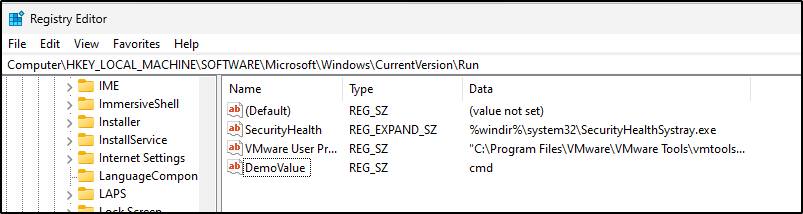
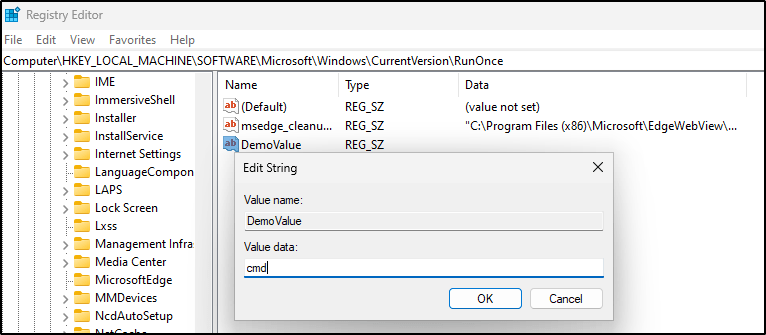
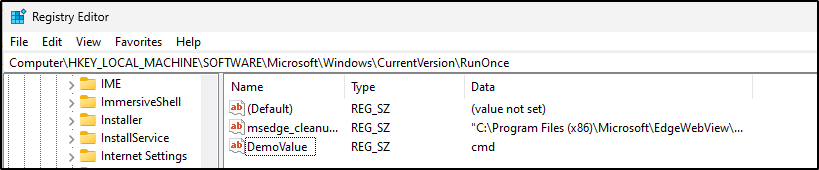
- Add the registry value name
DemoValueand registry value datacmdto theHKEY_LOCAL_MACHINE\Software\Microsoft\Windows\CurrentVersion\RunOnceregistry keys.
- Wait for 5 minutes which is the time configured for the FIM scan.
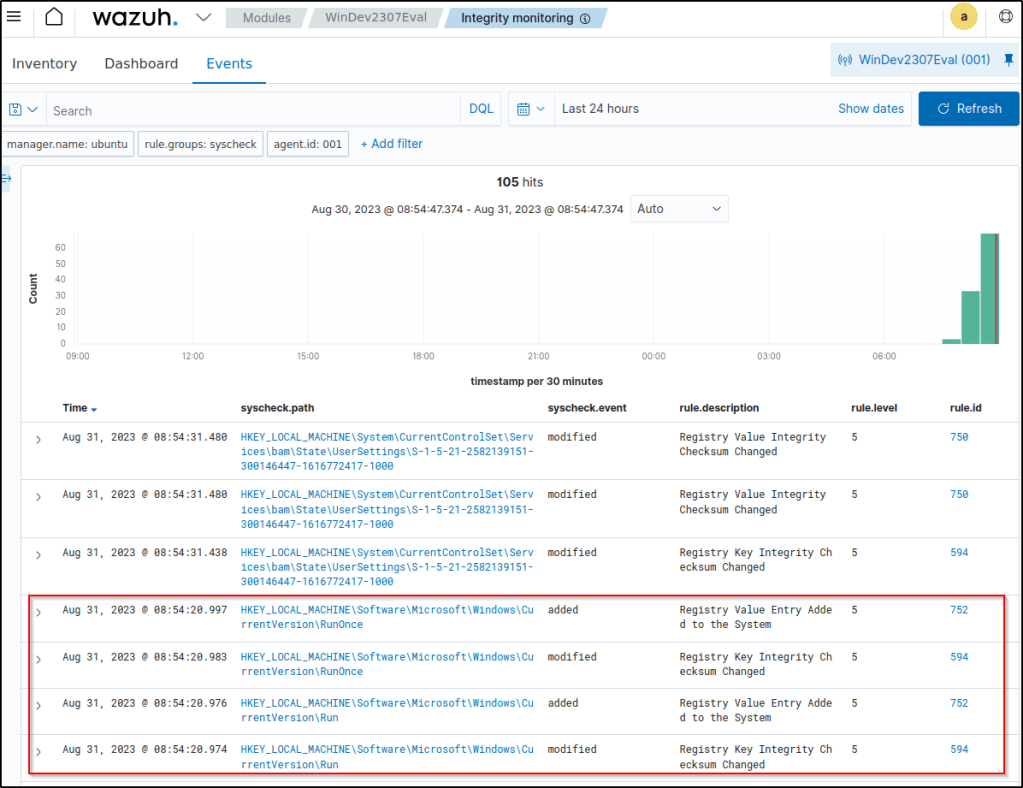
Visualizing the alert
Navigate to Modules > Integrity monitoring on the Wazuh dashboard to view the alert generated when the FIM module detects changes in the Windows startup registries.
Proof of Concept: File integrity monitoring
Configuring the Windows endpoint
Here’s how to set up the Wazuh agent to monitor changes in the C:\Users\Administrator\Desktop folder:
1. Edit the configuration file located at C:\Program Files (x86)\ossec-agent\ossec.conf on the Windows endpoint being monitored. Within the <syscheck> block, include the directories to be monitored. In this case, Wazuh is configured to monitor the C:\Users\<USER_NAME>\Desktop directory. To gather more detailed information about the user and process responsible for any changes, who-data audit is also enabled.
<directories check_all="yes" report_changes="yes" realtime="yes" whodata="yes">C:\Users\<USER_NAME>\Desktop</directories>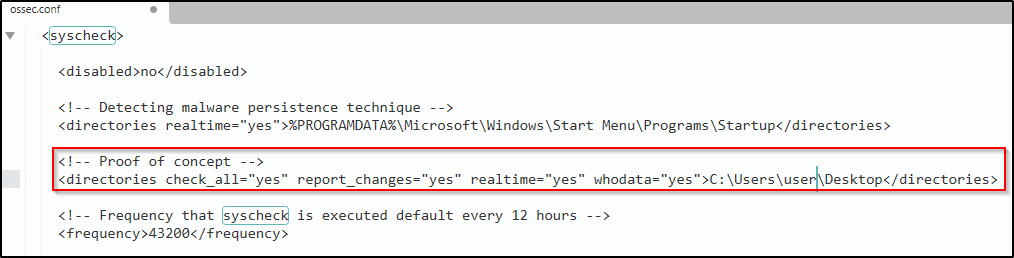
Note: It is also possible to configure any chosen directory path within the <directories> block.
2. Restart the Wazuh agent using Powershell with administrator privileges to apply the changes.
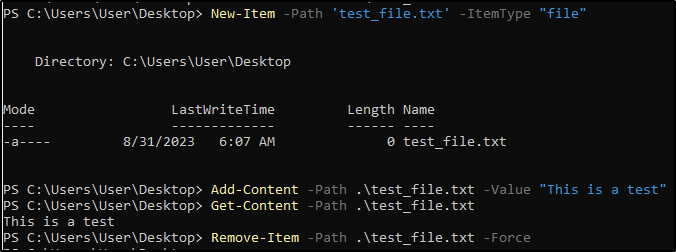
Testing the configuration
1. Create a text file in the monitored directory then wait for 5 seconds.
2. Add content to the text file and save it. Wait for 5 seconds.
3. Delete the text file from the monitored directory.
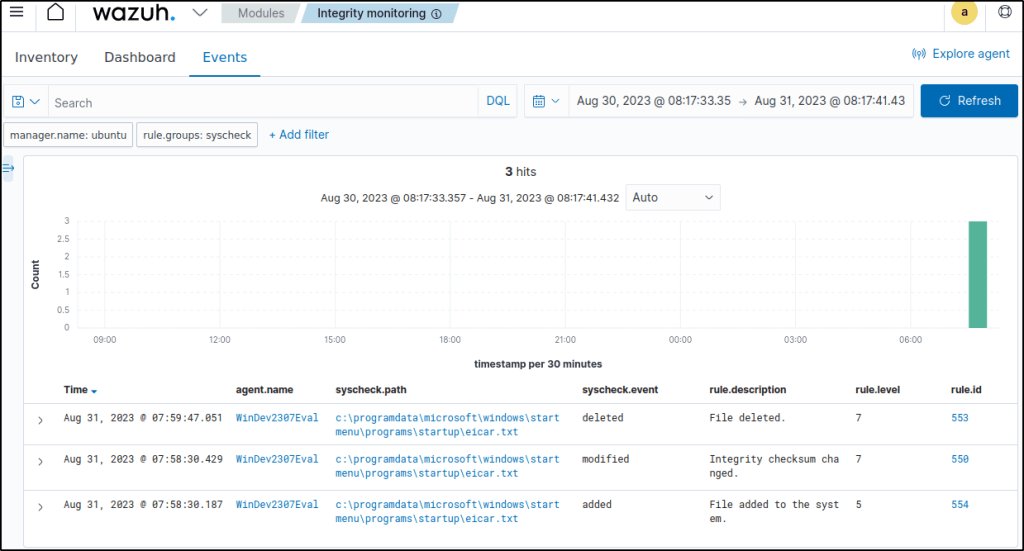
Visualize the alerts
Navigate to Integrity Monitoring module.
- Filter the events with
rule.id: is one of 550,553,554. - The filtered events show the file I created, adding a content to the file therefore changing its hash value, then finally its deletion.
Detecting and removing malware using VirusTotal integration
Wazuh employs the integrator module to establish a connection with external APIs and alerting systems, such as VirusTotal.
In this scenario, the Wazuh File Integrity Monitoring (FIM) module is utilized to monitor a specific directory for any modifications, while the VirusTotal API is employed to scan the files within said directory. Subsequently, Wazuh is configured to initiate an active response script that promptly eliminates any files identified as malicious by VirusTotal. This use case has been tested on both Ubuntu and Windows endpoints.
To authenticate Wazuh with the VirusTotal API in this particular use case, it is essential to possess a valid VirusTotal API key.
Configuring the Windows endpoint
Perform the following steps to set up Wazuh for monitoring near real-time modifications in the /Downloads folder. These steps include installing the required packages and creating an active response script to delete potentially harmful files.
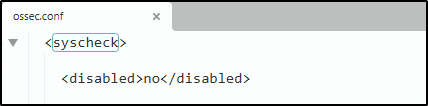
1. Search for the <syscheck> block in the Wazuh agent C:\Program Files (x86)\ossec-agent\ossec.conf file. Make sure that <disabled> is set to no. This enables the Wazuh FIM module to monitor for directory changes.
2. Include an entry in the <syscheck> block to set up monitoring for a specific directory in almost real-time. In this scenario, I will configure Wazuh to monitor the C:\Users\<USER_NAME>\Downloads folder. Replace <USER_NAME> with the relevant user name.
<directories realtime="yes">C:\Users\<USER_NAME>\Downloads</directories>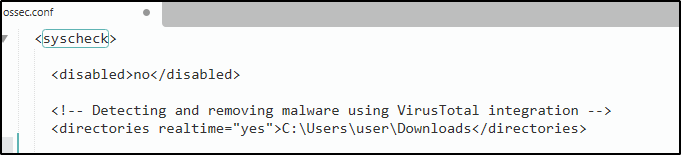
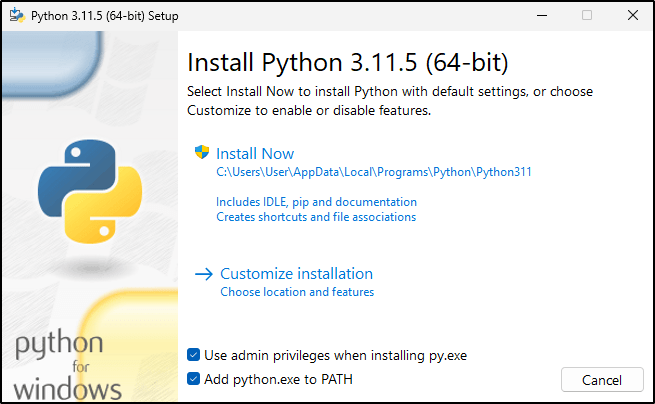
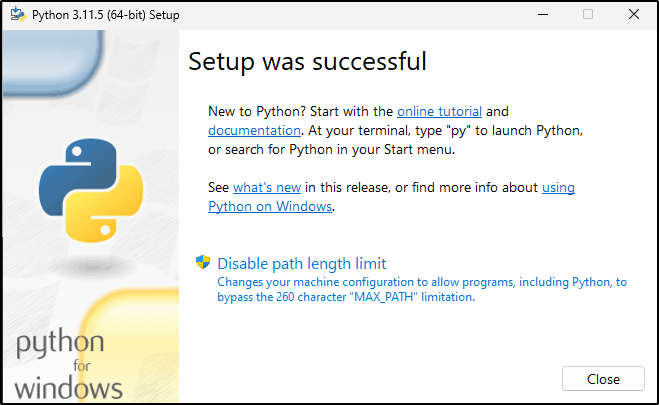
3. Download the Python executable installer from the official Python website.
4. Execute the Python installer after it has been downloaded. Select the appropriate options:
Install launcher for all usersAdd Python 3.X to PATH(This places the interpreter in the execution path)
5. After Python finishes the installation, open an administrator PowerShell terminal and proceed with installing PyInstaller using pip.
pip install pyinstaller
pyinstaller --version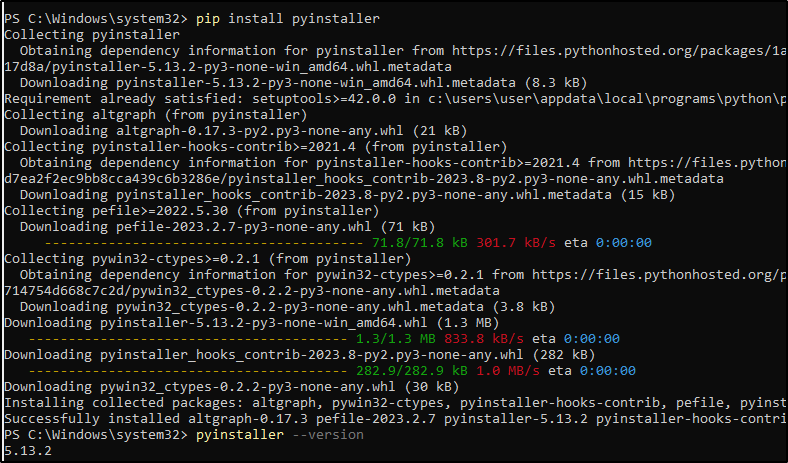
Pyinstaller is utilized in this case to convert the Python script responsible for generating active responses into a standalone executable application compatible with Windows endpoints.
6. Create an active response script remove-threat.py to remove a file from the Windows endpoint:
notepad remove-threat.py
#!/usr/bin/python3
# Copyright (C) 2015-2022, Wazuh Inc.
# All rights reserved.

import os
import sys
import json
import datetime

if os.name == 'nt':
    LOG_FILE = "C:\\Program Files (x86)\\ossec-agent\\active-response\\active-responses.log"
else:
    LOG_FILE = "/var/ossec/logs/active-responses.log"

ADD_COMMAND = 0
DELETE_COMMAND = 1
CONTINUE_COMMAND = 2
ABORT_COMMAND = 3

OS_SUCCESS = 0
OS_INVALID = -1

class message:
    def __init__(self):
        self.alert = ""
        self.command = 0

def write_debug_file(ar_name, msg):
    with open(LOG_FILE, mode="a") as log_file:
        log_file.write(str(datetime.datetime.now().strftime('%Y/%m/%d %H:%M:%S')) + " " + ar_name + ": " + msg +"\n")

def setup_and_check_message(argv):

    # get alert from stdin
    input_str = ""
    for line in sys.stdin:
        input_str = line
        break


    try:
        data = json.loads(input_str)
    except ValueError:
        write_debug_file(argv[0], 'Decoding JSON has failed, invalid input format')
        message.command = OS_INVALID
        return message

    message.alert = data

    command = data.get("command")

    if command == "add":
        message.command = ADD_COMMAND
    elif command == "delete":
        message.command = DELETE_COMMAND
    else:
        message.command = OS_INVALID
        write_debug_file(argv[0], 'Not valid command: ' + command)

    return message


def send_keys_and_check_message(argv, keys):

    # build and send message with keys
    keys_msg = json.dumps({"version": 1,"origin":{"name": argv[0],"module":"active-response"},"command":"check_keys","parameters":{"keys":keys}})

    write_debug_file(argv[0], keys_msg)

    print(keys_msg)
    sys.stdout.flush()

    # read the response of previous message
    input_str = ""
    while True:
        line = sys.stdin.readline()
        if line:
            input_str = line
            break

    # write_debug_file(argv[0], input_str)

    try:
        data = json.loads(input_str)
    except ValueError:
        write_debug_file(argv[0], 'Decoding JSON has failed, invalid input format')
        return message

    action = data.get("command")

    if "continue" == action:
        ret = CONTINUE_COMMAND
    elif "abort" == action:
        ret = ABORT_COMMAND
    else:
        ret = OS_INVALID
        write_debug_file(argv[0], "Invalid value of 'command'")

    return ret

def main(argv):

    write_debug_file(argv[0], "Started")

    # validate json and get command
    msg = setup_and_check_message(argv)

    if msg.command < 0:
        sys.exit(OS_INVALID)

    if msg.command == ADD_COMMAND:
        alert = msg.alert["parameters"]["alert"]
        keys = [alert["rule"]["id"]]
        action = send_keys_and_check_message(argv, keys)

        # if necessary, abort execution
        if action != CONTINUE_COMMAND:

            if action == ABORT_COMMAND:
                write_debug_file(argv[0], "Aborted")
                sys.exit(OS_SUCCESS)
            else:
                write_debug_file(argv[0], "Invalid command")
                sys.exit(OS_INVALID)

        try:
            os.remove(msg.alert["parameters"]["alert"]["data"]["virustotal"]["source"]["file"])
            write_debug_file(argv[0], json.dumps(msg.alert) + " Successfully removed threat")
        except OSError as error:
            write_debug_file(argv[0], json.dumps(msg.alert) + "Error removing threat")


    else:
        write_debug_file(argv[0], "Invalid command")

    write_debug_file(argv[0], "Ended")

    sys.exit(OS_SUCCESS)

if __name__ == "__main__":
    main(sys.argv)
7. Transforming the Python script remove-threat.py into a Windows executable application can be achieved by executing the following PowerShell command as an administrator:
pyinstaller -F \path_to_remove-threat.py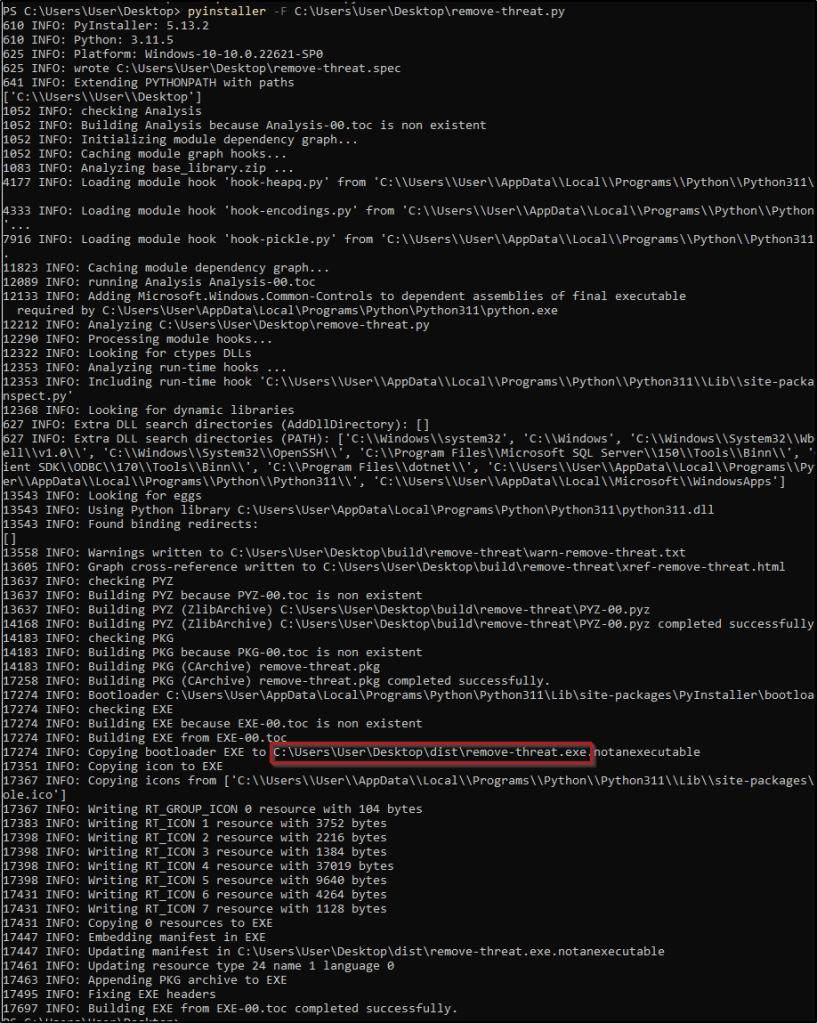

Take note of the path where pyinstaller created remove-threat.exe.
8. Move the executable file remove-threat.exe to the C:\Program Files (x86)\ossec-agent\active-response\bin directory.
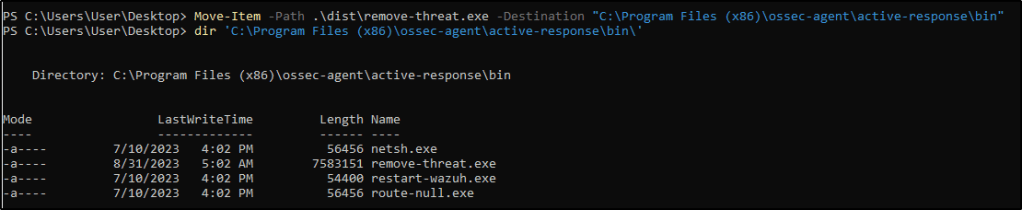
9. Restart the Wazuh agent to apply the changes.
Configuring the Wazuh server
To configure the integration between Wazuh and VirusTotal, follow these steps on the Wazuh server. These steps will also activate and trigger the active response script when a suspicious file is found.
1. Insert the provided configuration into the /var/ossec/etc/ossec.conf file on the Wazuh server. This configuration enables the integration with VirusTotal, allowing VirusTotal queries to be triggered whenever any of the rules in the FIM syscheck group are activated. I replaced <YOUR_VIRUS_TOTAL_API_KEY> with my own VirusTotal API key.
<ossec_config>
  <integration>
    <name>virustotal</name>
    <api_key><YOUR_VIRUS_TOTAL_API_KEY></api_key> <!-- Replace with your VirusTotal API key -->
    <group>syscheck</group>
    <alert_format>json</alert_format>
  </integration>
</ossec_config>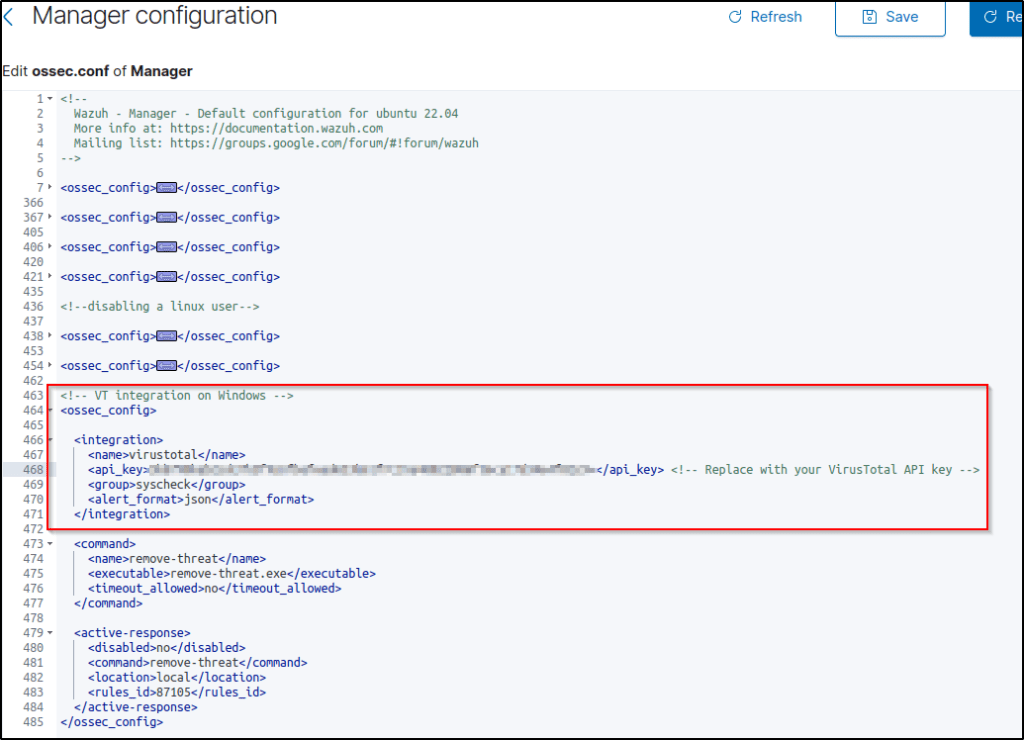
Note: The free VirusTotal API rate limits requests to four per minute. With a premium VirusTotal API key, high frequency of queries are allowed, and more rules can be added besides these two. Wazuh can also be be configured to monitor more directories besides C:\Users\<USER_NAME>\Downloads.
2. Append the following blocks to the Wazuh server /var/ossec/etc/ossec.conf file. This enables active response and trigger the remove-threat.exe executable when the VirusTotal query returns positive matches for threats:
<ossec_config>
  <command>
    <name>remove-threat</name>
    <executable>remove-threat.exe</executable>
    <timeout_allowed>no</timeout_allowed>
  </command>

  <active-response>
    <disabled>no</disabled>
    <command>remove-threat</command>
    <location>local</location>
    <rules_id>87105</rules_id>
  </active-response>
</ossec_config>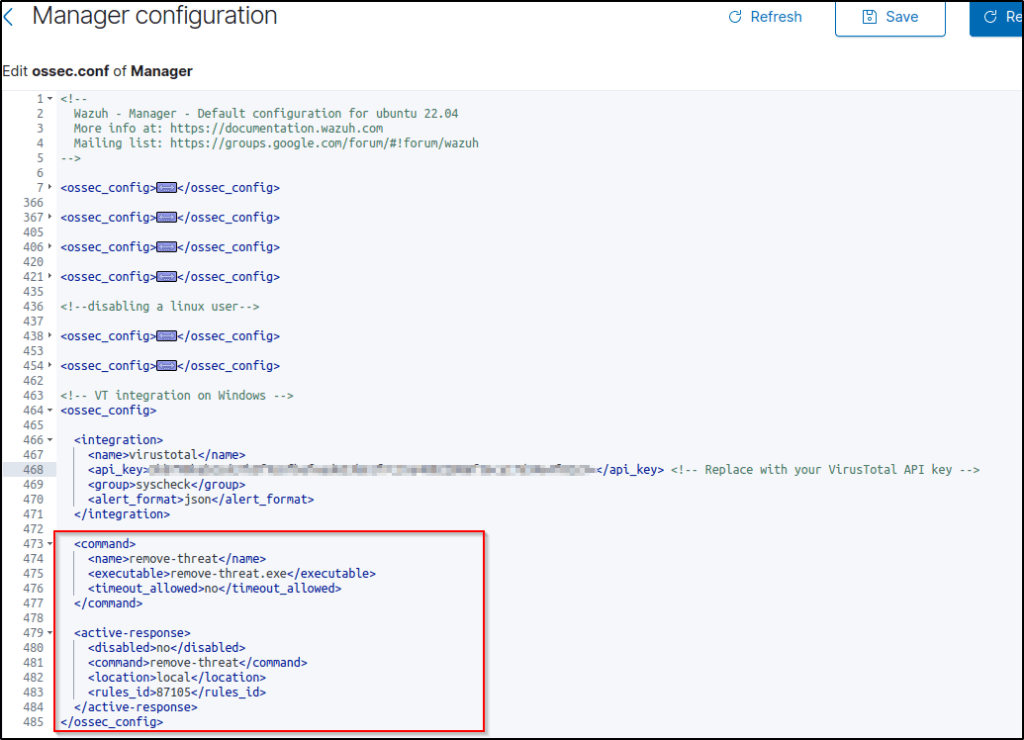
3. Add the following rules to the Wazuh server /var/ossec/etc/rules/local_rules.xml file to alert about the active response results.
<group name="virustotal,">
  <rule id="100092" level="12">
      <if_sid>657</if_sid>
      <match>Successfully removed threat</match>
      <description>$(parameters.program) removed threat located at $(parameters.alert.data.virustotal.source.file)</description>
  </rule>

  <rule id="100093" level="12">
    <if_sid>657</if_sid>
    <match>Error removing threat</match>
    <description>Error removing threat located at $(parameters.alert.data.virustotal.source.file)</description>
  </rule>
</group>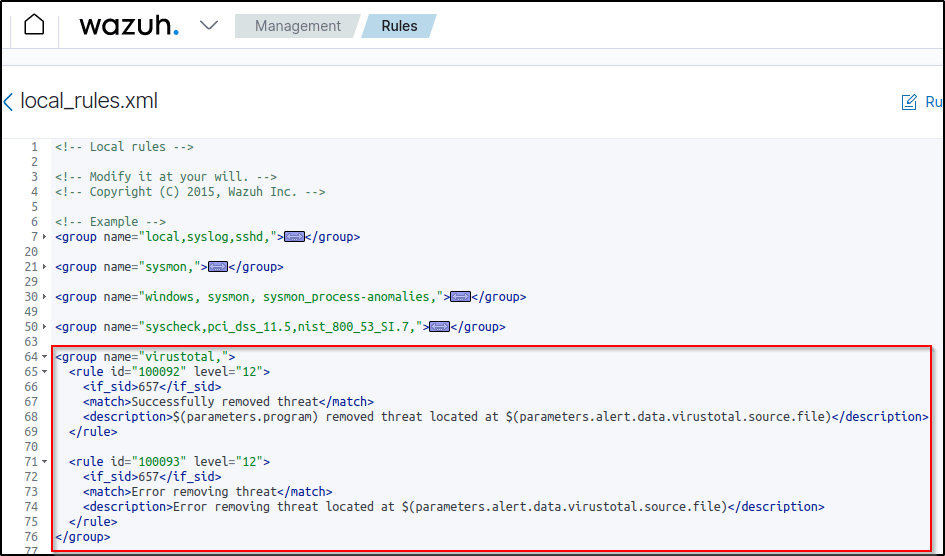
Same rule ID was used during the testing of this capability on the Ubuntu machine.
4. Restart the Wazuh manager to apply the configuration changes.
Attack emulation
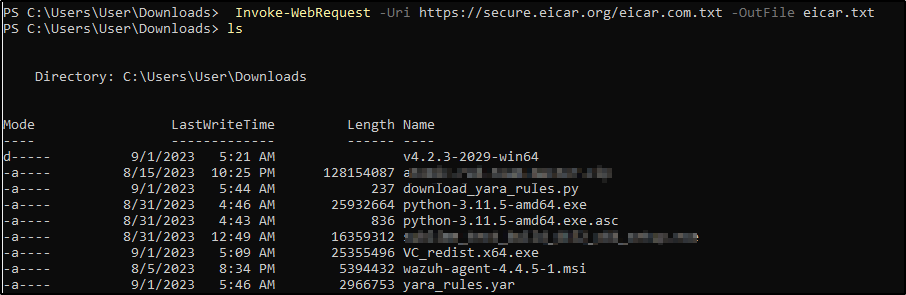
1. Download an EICAR test file to the C:\Users\<USER_NAME>\Downloads directory on the Windows endpoint.
Invoke-WebRequest -Uri https://secure.eicar.org/eicar.com.txt -OutFile eicar.txt
cp .\eicar.txt C:\Users\<USER_NAME>\Downloads
This triggers a VirusTotal query and generates an alert. In addition, the active response script automatically removes the file.
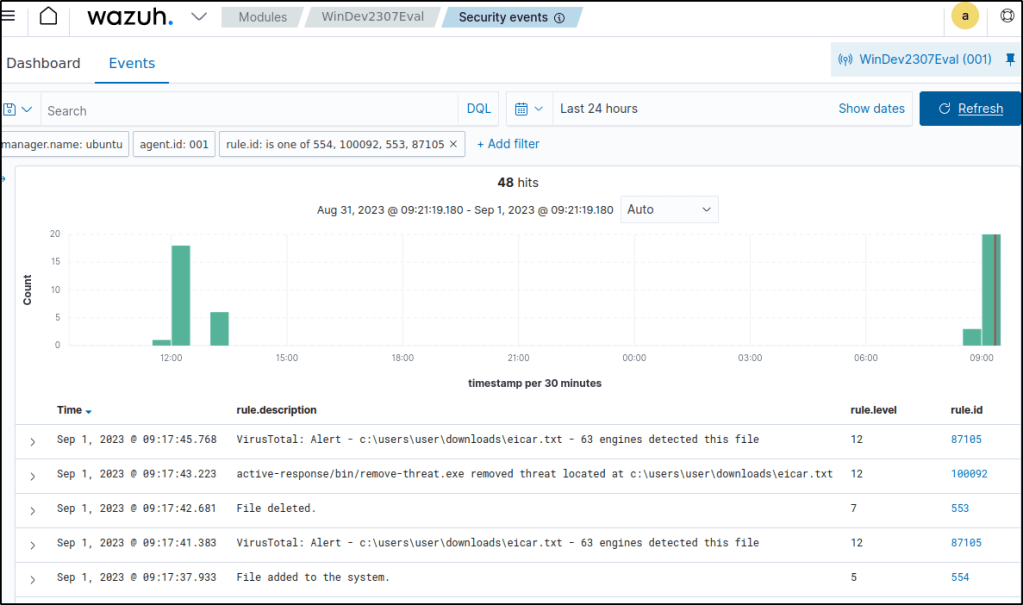
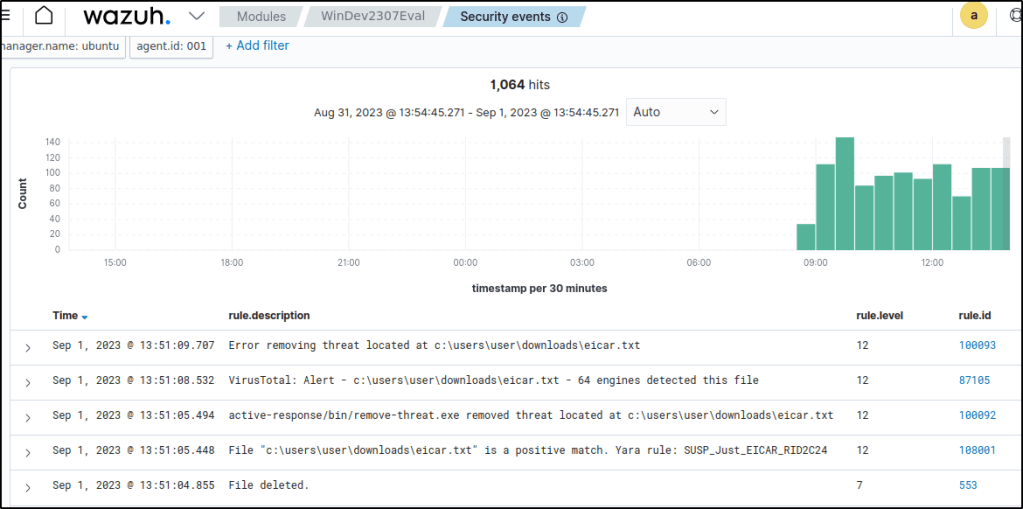
Visualizing the alerts
The alert data are visualized in the Wazuh dashboard. Go to the Security events module and add the filters in the search bar to query the alerts.
- Filter the events-
rule.id: is one of 554,100092,553,87105 - It can be seen that once the file was downloaded, VirusTotal detected the file as malicious and the active-response automatically deletes the file.
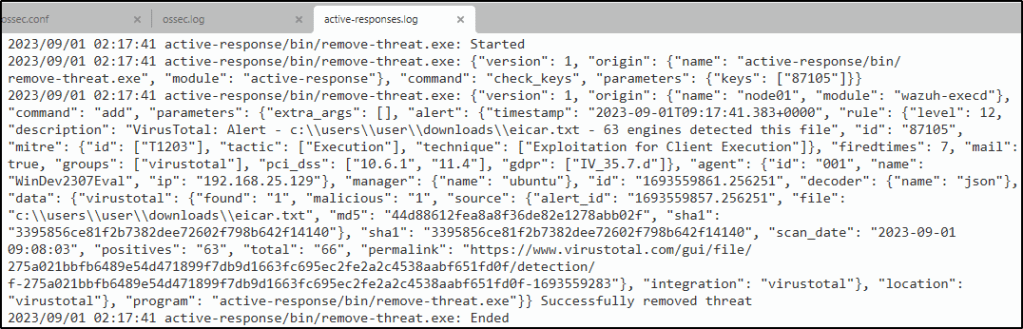
The active-responses log contains the successful execution of the active-response of deleting the malicious file.
Malware Detection
Malware detection is the process of identifying and analyzing harmful software on an endpoint. It can be done by checking for known malware signatures or detecting suspicious behavior from software. Wazuh helps detect malware using a variety of techniques. For example, it has a file integrity monitoring module which can identify malicious files. It also has a rootkit detection module that alerts users of any anomalies on their devices.
File integrity monitoring and threat detection rules
File integrity monitoring allows for the examination of specific directories and the generation of alerts in the event of any modifications to the files on infected endpoints. This activity is commonly associated with malware, as it involves the creation and alteration of files.
Additionally, rules can be created based on events of file creation and modification in order to identify particular types of malware.
An example of FIM and malware detection rules working seamlessly was covered previously in Detecting and removing malware using VirusTotal integration.
CDB lists and threat intelligence
Wazuh helps detect harmful files by comparing them to a list of known bad files. This list, called a CDB list, includes indicators like file names, IP addresses, and domain names. New entries can be added to the CDB list and use it to either allow or prevent access to certain files. To learn more, check out the CDB list documentation.
How it works
Wazuh checks if field values, such as IP address, file hashes, and others, extracted from security events during decoding are in a CDB list to hunt and detect malware. To detect malware, a CDB lists with the file integrity monitoring (FIM) module is employed. Below describes how it works:
- The Wazuh FIM module scans monitored directories on endpoints to identify alterations like file creation and modifications. The FIM module stores the checksums and attributes of the monitored files.
- When the FIM module generates an alert, the Wazuh analysis engine compares the file attributes, such as the file hash, to the keys in a predefined CDB list.
- If the Wazuh analysis engine discovers a match, it generates or suppresses an alert based on how the rule is configured.
Use case: Detecting malware using file hashes in a CDB list
Note: In the Wazuh documentation, this use case was tested on an Linux endpoint.
In this use case, I will test how to detect malware using file hashes that have been added to a CDB list.
Configuring the Wazuh server
1. Create a CDB list malware-hashes of known malware hashes and save it to the /var/ossec/etc/lists directory on the Wazuh server.
gedit /var/ossec/etc/lists/malware-hashesNote: I created the list using the dashboard.
2. Add the known malware hashes to the file as key:value pairs. In this case, I used the known MD5 hashes of the Mirai and Xbash malware as shown below.
e0ec2cd43f71c80d42cd7b0f17802c73:mirai
55142f1d393c5ba7405239f232a6c059:Xbash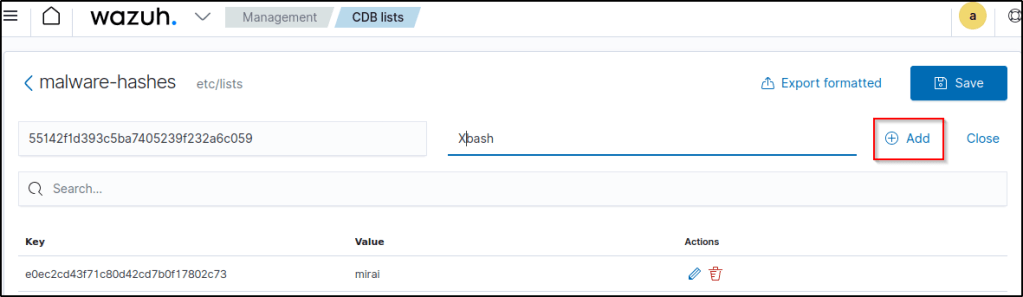
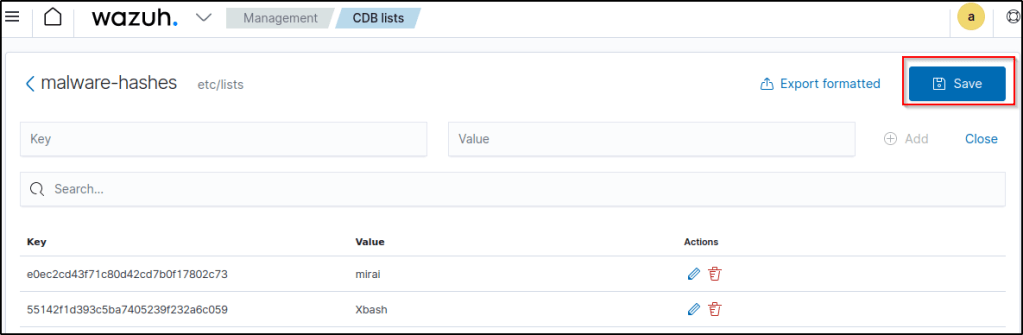
Save the list.
3. Add a reference to the CDB list in the Wazuh manager configuration file /var/ossec/etc/ossec.conf by specifying the path to the list within the <ruleset> block:
<ruleset>
    <!-- Default ruleset -->
    <decoder_dir>ruleset/decoders</decoder_dir>
    <rule_dir>ruleset/rules</rule_dir>
    <rule_exclude>0215-policy_rules.xml</rule_exclude>
    <list>etc/lists/audit-keys</list>
    <list>etc/lists/amazon/aws-eventnames</list>
    <list>etc/lists/security-eventchannel</list>
    <list>etc/lists/malware-hashes</list>
  <ruleset>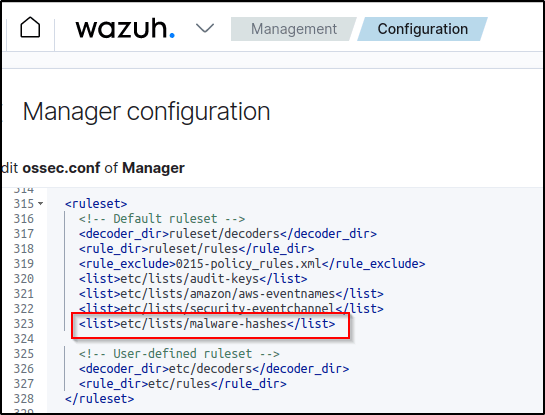
4. Craft a custom rule in the /var/ossec/etc/rules/local_rules.xml document on the Wazuh server. This rule triggers events when Wazuh identifies a match between the MD5 hash of a recently modified or created file and a hash in the CDB list. Rule numbers 554 and 550 will match events that indicates the existence of a newly updated or created file.
<group name="malware,">
  <rule id="110002" level="13">
    <!-- The if_sid tag references the built-in FIM rules -->
    <if_sid>554, 550</if_sid>
    <list field="md5" lookup="match_key">etc/lists/malware-hashes</list>
    <description>File with known malware hash detected: $(file)</description>
    <mitre>
      <id>T1204.002</id>
    </mitre>
  </rule>
</group>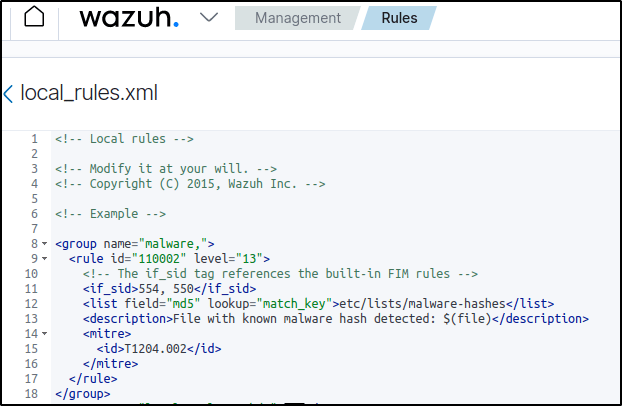
5. Restart the Wazuh manager to apply changes.
Configuring the Windows endpoint
1. Configure directory monitoring by adding the <directories> block specifying the folders to be monitored in the agent configuration file or using the centralized configuration option.
<ossec_config>
  <syscheck>
    <disabled>no</disabled>
    <directories check_all="yes" realtime="yes">/PATH/TO/MONITORED/DIRECTORY</directories>
  </syscheck>
</ossec_config>
Note: The check_all option ensures Wazuh checks all file attributes including the file size, permissions, owner, last modification date, inode, and the hash sums. I also included the whodata option. C:\Users\User\AppData\Local\Temp is the directory in this example to be monitored.
2. Restart the Wazuh agent to apply the changes.
Testing the configuration
To test that everything works correctly, download the Mirai and Xbash malware samples to the directory the FIM module is monitoring.
Warning: These malicious files are dangerous, so use them for testing purposes only. Do not install them in production environments.
1. Download the malware samples. Replace /PATH/TO/MONITORED/DIRECTORY with the path of the monitored directory, C:\Users\User\AppData\Local\Temp.
Invoke-WebRequest -Uri https://wazuh-demo.s3-us-west-1.amazonaws.com/mirai -OutFile /PATH/TO/MONITORED/DIRECTORY/mirai

Invoke-WebRequest -Uri https://wazuh-demo.s3-us-west-1.amazonaws.com/xbash -OutFile /PATH/TO/MONITORED/DIRECTORY/Xbash 
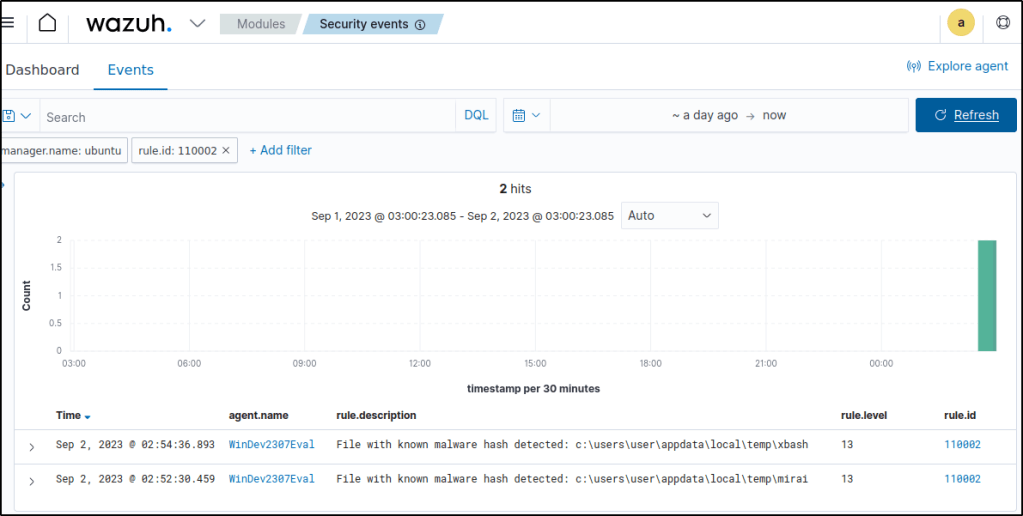
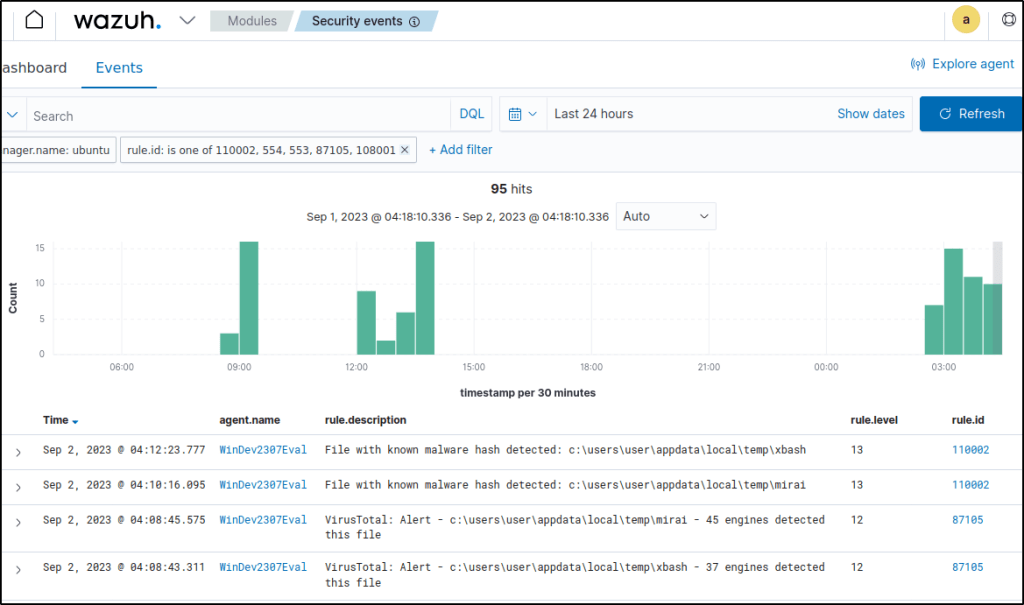
Visualizing the alerts
Wazuh has effectively detected the malware samples.
Responding to malicious files using CDB lists and active response
Detecting Malicious Files
In continuation with the above use case, the below custom rule is added in /var/ossec/etc/rules/local_rules.xml to alert when the hash of a downloaded file is found in the malware blacklist. This portions is referenced from the blog Detecting and responding to malicious files using CDB lists and active response.
  <rule id="100003" level="5">
    <if_sid>100002</if_sid>
    <field name="file" type="pcre2">(?i)[c-z]:</field>
    <description>A file - $(file) - in the malware blacklist was added to the system.</description>
  </rule>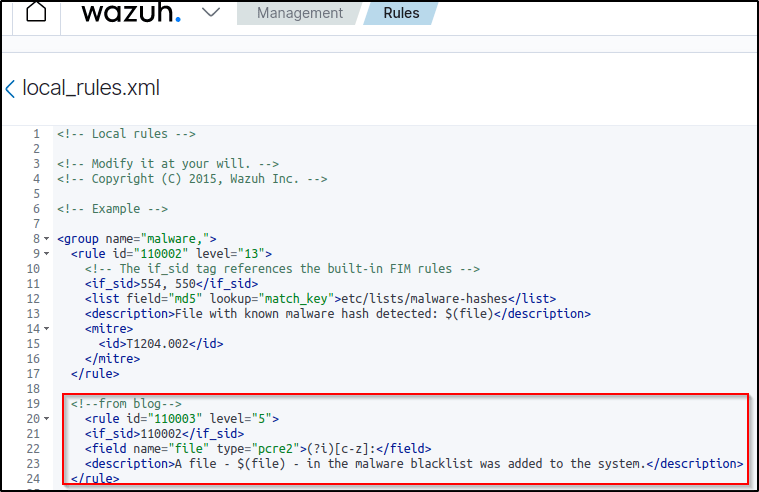
Restart the manager to apply the rule and configuration changes.
Configuring active response
In this case, a Python script on a Windows agent is executed to remove the malicious files that were downloaded.
Note the following items in the active response script:
- The active response script is created on the agent.
- If the active response script is being run on Linux-based endpoints, the first line on the script must indicate the Python interpreter.
#!/usr/bin/python3- The
os.remove()function is the function that handles the removal of the malicious file.
os.remove(msg.alert["parameters"]["alert"]["syscheck"]["path"])- The outcome of the file removal action is logged to the file
active-responses.log. Its path is dependent on the operating system the script is run on. In my case, it is atC:\Program Files(x86)\ossec-agent\active-response\active-responses.log
The file remove-malware.py is created with the contents below.
#!/usr/bin/python3
# Copyright (C) 2015-2022, Wazuh Inc.
# All rights reserved.

import os
import sys
import json
import datetime

if os.name == 'nt':
    LOG_FILE = "C:\\Program Files (x86)\\ossec-agent\\active-response\\active-responses.log"
else:
    LOG_FILE = "/var/ossec/logs/active-responses.log"

ADD_COMMAND = 0
DELETE_COMMAND = 1
CONTINUE_COMMAND = 2
ABORT_COMMAND = 3

OS_SUCCESS = 0
OS_INVALID = -1

class message:
    def __init__(self):
        self.alert = ""
        self.command = 0

def write_debug_file(ar_name, msg):
    with open(LOG_FILE, mode="a") as log_file:
        log_file.write(str(datetime.datetime.now().strftime('%Y/%m/%d %H:%M:%S')) + " " + ar_name + ": " + msg +"\n")

def setup_and_check_message(argv):

    # get alert from stdin
    input_str = ""
    for line in sys.stdin:
        input_str = line
        break


    try:
        data = json.loads(input_str)
    except ValueError:
        write_debug_file(argv[0], 'Decoding JSON has failed, invalid input format')
        message.command = OS_INVALID
        return message

    message.alert = data

    command = data.get("command")

    if command == "add":
        message.command = ADD_COMMAND
    elif command == "delete":
        message.command = DELETE_COMMAND
    else:
        message.command = OS_INVALID
        write_debug_file(argv[0], 'Not valid command: ' + command)

    return message


def send_keys_and_check_message(argv, keys):

    # build and send message with keys
    keys_msg = json.dumps({"version": 1,"origin":{"name": argv[0],"module":"active-response"},"command":"check_keys","parameters":{"keys":keys}})

    write_debug_file(argv[0], keys_msg)

    print(keys_msg)
    sys.stdout.flush()

    # read the response of previous message
    input_str = ""
    while True:
        line = sys.stdin.readline()
        if line:
            input_str = line
            break

    # write_debug_file(argv[0], input_str)

    try:
        data = json.loads(input_str)
    except ValueError:
        write_debug_file(argv[0], 'Decoding JSON has failed, invalid input format')
        return message

    action = data.get("command")

    if "continue" == action:
        ret = CONTINUE_COMMAND
    elif "abort" == action:
        ret = ABORT_COMMAND
    else:
        ret = OS_INVALID
        write_debug_file(argv[0], "Invalid value of 'command'")

    return ret

def main(argv):

    write_debug_file(argv[0], "Started")

    # validate json and get command
    msg = setup_and_check_message(argv)

    if msg.command < 0:
        sys.exit(OS_INVALID)

    if msg.command == ADD_COMMAND:
        alert = msg.alert["parameters"]["alert"]
        keys = [alert["rule"]["id"]]
        action = send_keys_and_check_message(argv, keys)

        # if necessary, abort execution
        if action != CONTINUE_COMMAND:

            if action == ABORT_COMMAND:
                write_debug_file(argv[0], "Aborted")
                sys.exit(OS_SUCCESS)
            else:
                write_debug_file(argv[0], "Invalid command")
                sys.exit(OS_INVALID)

        try:
            os.remove(msg.alert["parameters"]["alert"]["syscheck"]["path"])
            write_debug_file(argv[0], json.dumps(msg.alert) + " Successfully removed threat")
        except OSError as error:
            write_debug_file(argv[0], json.dumps(msg.alert) + "Error removing threat")


    else:
        write_debug_file(argv[0], "Invalid command")

    write_debug_file(argv[0], "Ended")

    sys.exit(OS_SUCCESS)

if __name__ == "__main__":
    main(sys.argv)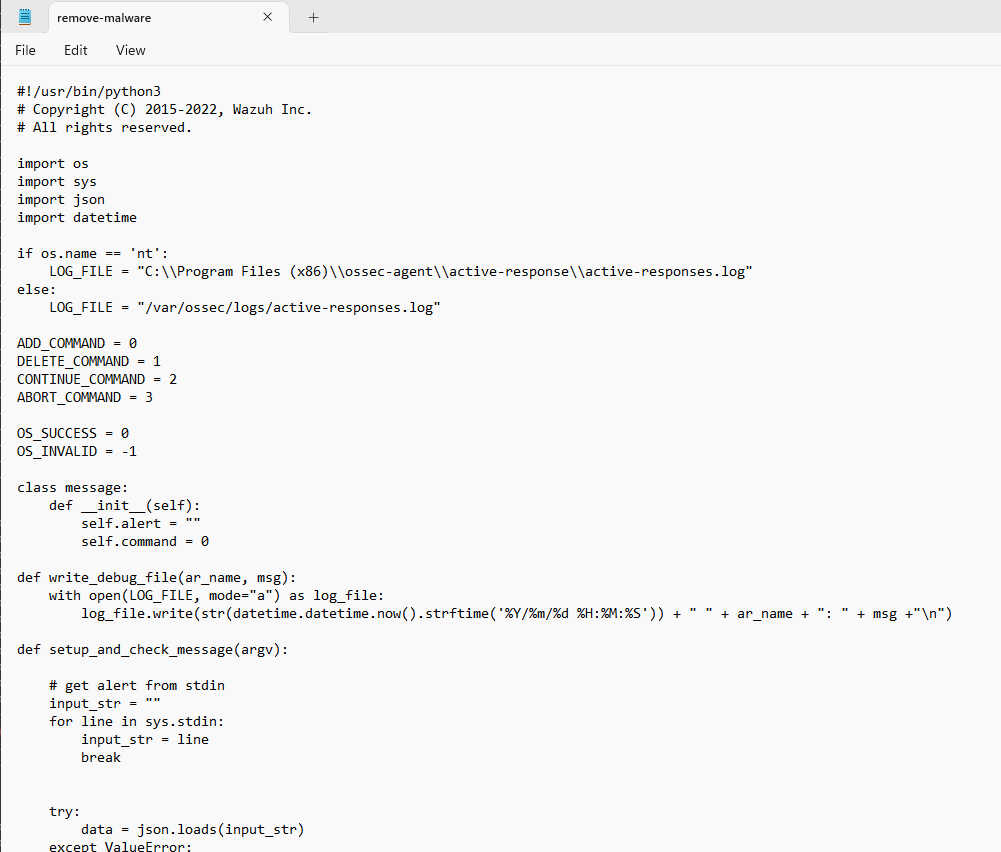
To run a Python script on any Windows computer, convert it into an executable file using pyinstaller.
pyinstaller -F remove-threat.py 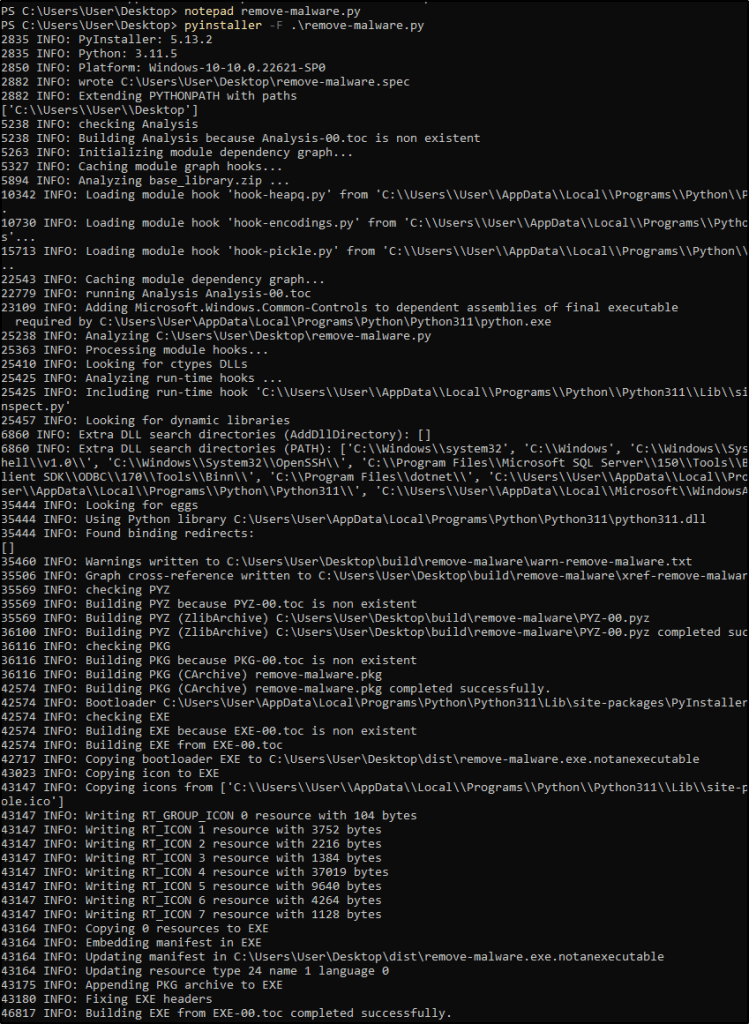
Copy the built executable to C:\Program Files (x86)\ossec-agent\active-response\bin

Configuring the Wazuh Server
Now that the active response executable has been placed in the bin folder on the agent, proceed to configure the manager to trigger an active response when the malware blacklist detection rule is triggered. In the manager configuration file, the following block is added in the ossec_config block:
<command>
   <name>remove-malware</name>
   <executable>remove-malware.exe</executable>
   <timeout_allowed>no</timeout_allowed>
</command>

<active-response>
   <disabled>no</disabled>
   <command>remove-malware-windows</command>
   <location>local</location>
   <rules_id>100003</rules_id>
</active-response>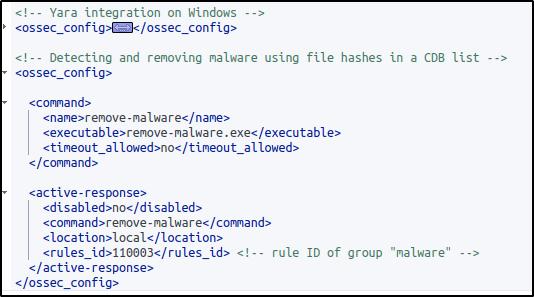
Creating rules for the active response log
To create rules to alert when the active response file removal succeeded or failed, add the following rule to the /var/ossec/etc/rules/local_rules.xml file on the manager then restart it.
<rule id="100004" level="7">
    <if_sid>657</if_sid>
    <match>Successfully removed threat</match>
    <description>$(parameters.program): Successfully removed threat $(parameters.alert.syscheck.path) whose MD5 hash appears in a malware blacklist.</description>
  </rule>
  <rule id="100005" level="7">
    <if_sid>657</if_sid>
    <match>Error removing threat</match>
    <description>$(parameters.program): Error removing threat $(parameters.alert.syscheck.path) whose MD5 hash appears in a malware blacklist.</description>
</rule>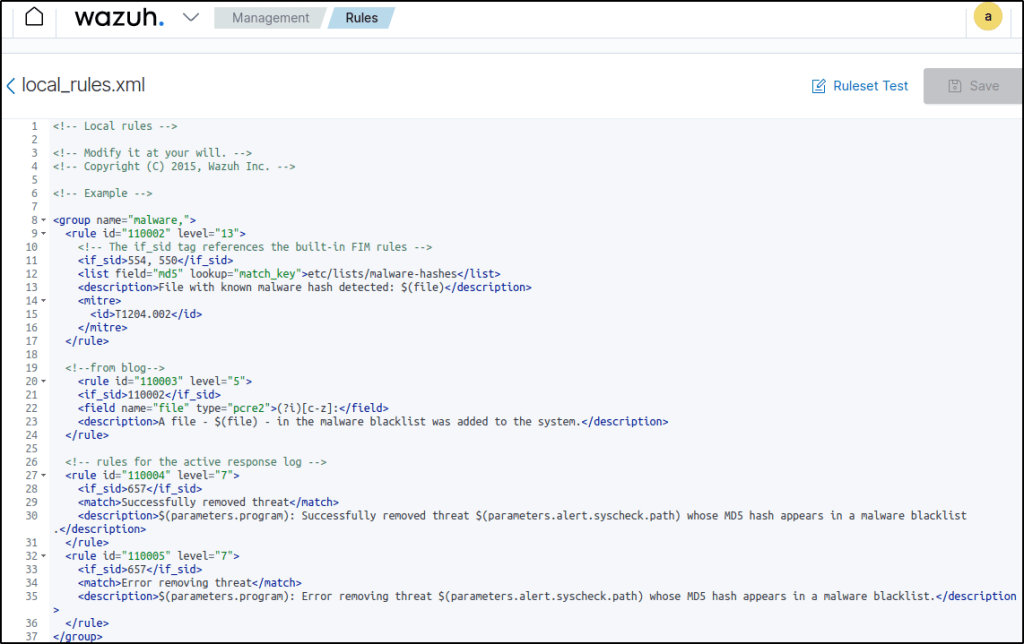
I edited the rule ID. This rule will create an alert with the result of the active response action i.e. “Successfully removed threat” or “Error removing threat” and the path to the file that was removed
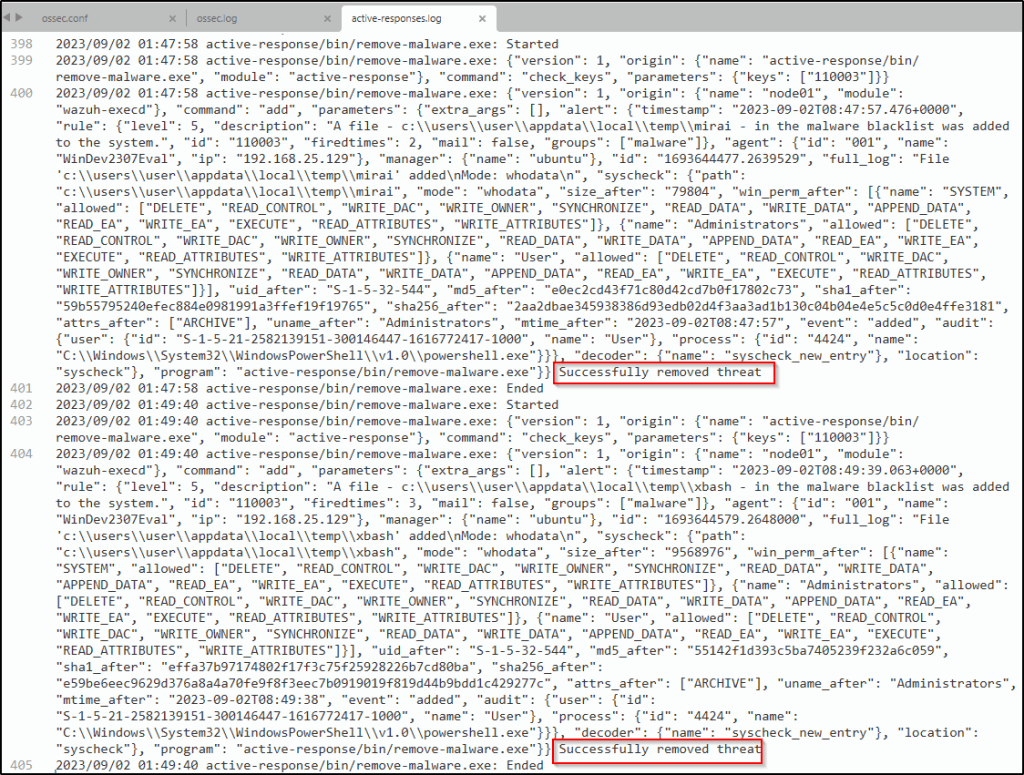
Testing the configuration
Perform same test by downloading the malware samples in the Temp directory.

Visualizing the alerts
VirusTotal also tagged the malware samples.
The malware samples are deleted after they were detected.
Blocking a known malicious actor
This section provides illustrations on how to prevent unauthorized access to web resources on a web server by blocking malicious IP addresses. The process involves setting up an Apache web server on an Ubuntu virtual machine and conducting a test using a Kali virtual machine, which simulates an attacker.
In order to prevent access from a potentially harmful IP address, such as a Kali virtual machine which in this case is the attacker, it is necessary to add said IP address to the reputation database. Following this, the configuration of Wazuh will effectively restrict the Kali VM’s access to the Apache web server for a duration of 60 seconds.
In this use case, I will be using the Wazuh CDB list and active response capabilities.
Configuring the Windows endpoint
Install the Apache web server
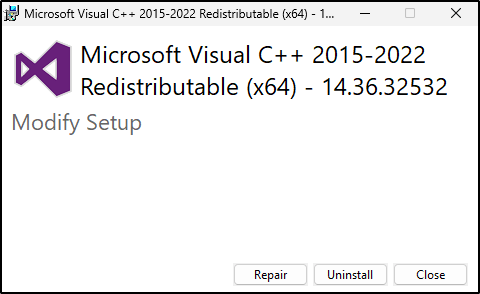
1. Install the latest Visual C++ Redistributable package.
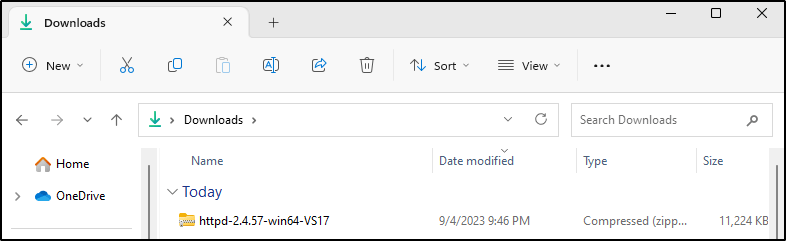
2. Download the Apache web server ZIP installation file. I downloaded this instead, Apache2.4.254 win64. This is an already compiled binary for Windows operating systems.
3. Unzip the contents of the Apache web server zip file and copy the extracted Apache24 folder to the C: directory.
Expand-Archive -Path .\httpd-2.4.57-win64-VS17.zip -DestinationPath 'C:'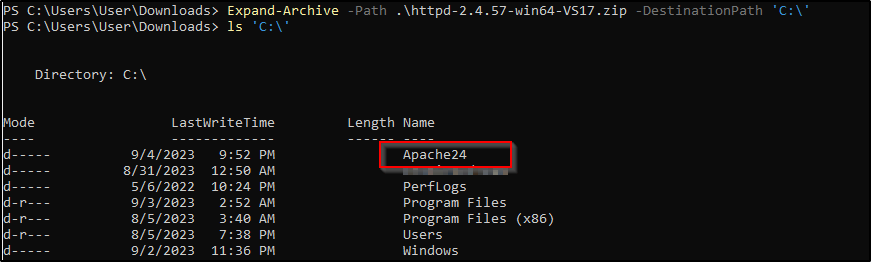
4. Navigate to the C:\Apache24\bin folder and run the following command in a PowerShell terminal with administrator privileges:
C:\Apache24\bin>httpd.exe 
Windows Defender Firewall was disabled in my windows machine.
5. Click on Allow Access. This allows the Apache HTTP server to communicate on your private or public networks depending on your network setting. It creates an inbound rule in your firewall to allow incoming traffic on port 80.
6. Open http://<WINDOWS_IP> in a browser to view the Apache landing page and verify the installation. Also, verify that this URL can be reached from the attacker endpoint.

Configure the Wazuh agent
1. Add the following to C:\Program Files (x86)\ossec-agent\ossec.conf to configure the Wazuh agent and monitor the Apache access logs:
<localfile>
  <log_format>syslog</log_format>
  <location>C:\Apache24\logs\access.log</location>
</localfile>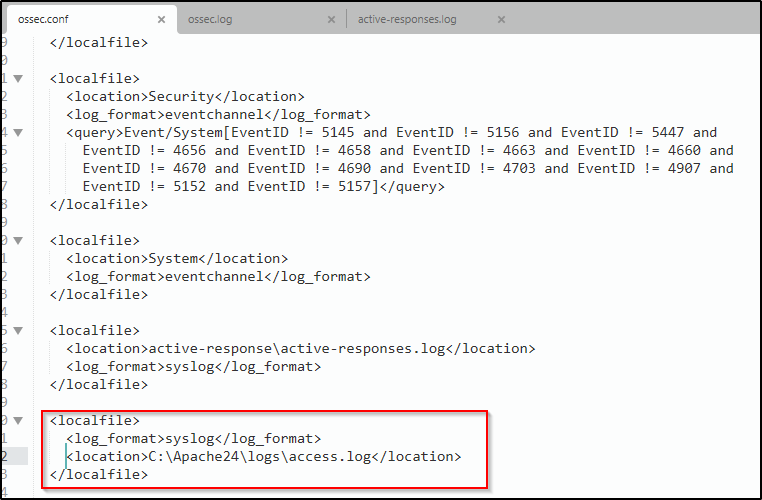
2. Restart the Wazuh agent in a PowerShell terminal with administrator privileges to apply the changes
Note: I already configured the Wazuh Server and configured the active response module to block the malicious IP address in one of my blogs where I expored Wazuh capabilities on an Ubuntu endpoint.
Configuring the Wazuh Server
Here are the steps I followed to add the IP address of my Kali VM to a CDB list and configure rules and active response.
Download the utilities and configure the CDB list
1. Install the wget utility to download the necessary artifacts using the command line interface:
sudo yum update && sudo yum install -y wget
sudo apt update -y && sudo apt install wget -y
Wget is already installed in my Wazuh server so I didn’t have to install it.
2. Download the Alienvault IP reputation database:
sudo wget https://raw.githubusercontent.com/firehol/blocklist-ipsets/master/alienvault_reputation.ipset -O /var/ossec/etc/lists/alienvault_reputation.ipset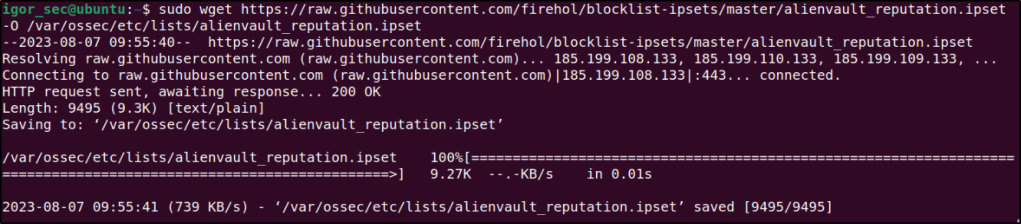
3. Append the IP address of the attacker endpoint to the IP reputation database. Replace <ATTACKER_IP> with my Kali IP address in the command below:
sudo echo "<ATTACKER_IP>" >> /var/ossec/etc/lists/alienvault_reputation.ipset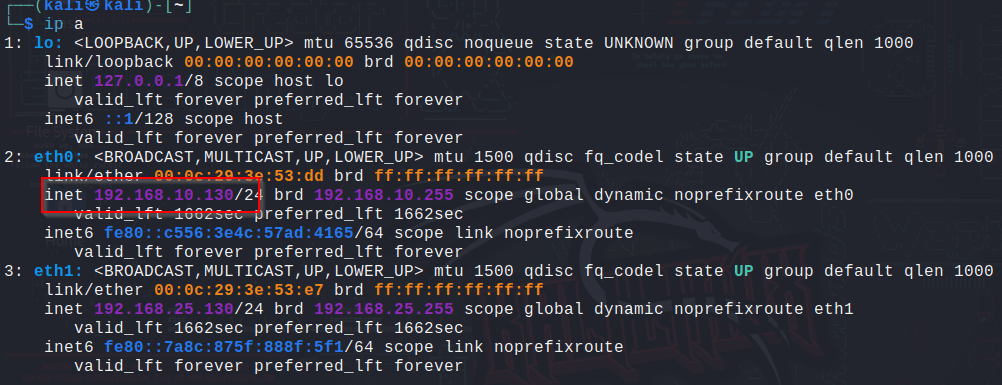

4. Download a script to convert from the .ipset format to the .cdb list format:
sudo wget https://wazuh.com/resources/iplist-to-cdblist.py -O /tmp/iplist-to-cdblist.py
5. Convert the alienvault_reputation.ipset file to a .cdb format using the previously downloaded script:
sudo /var/ossec/framework/python/bin/python3 /tmp/iplist-to-cdblist.py /var/ossec/etc/lists/alienvault_reputation.ipset /var/ossec/etc/lists/blacklist-alienvault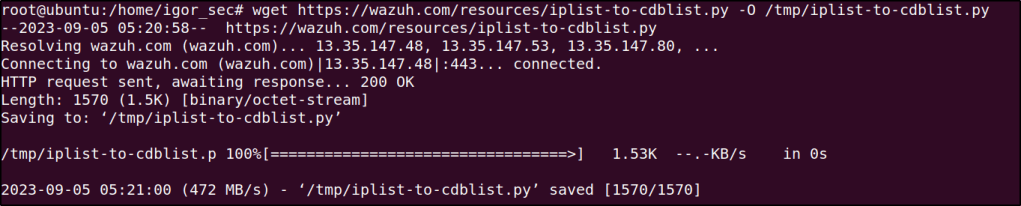
6. Optional: Remove the alienvault_reputation.ipset file and the iplist-to-cdblist.py script, as they are no longer needed:
sudo rm -rf /var/ossec/etc/lists/alienvault_reputation.ipset
sudo rm -rf /tmp/iplist-to-cdblist.py
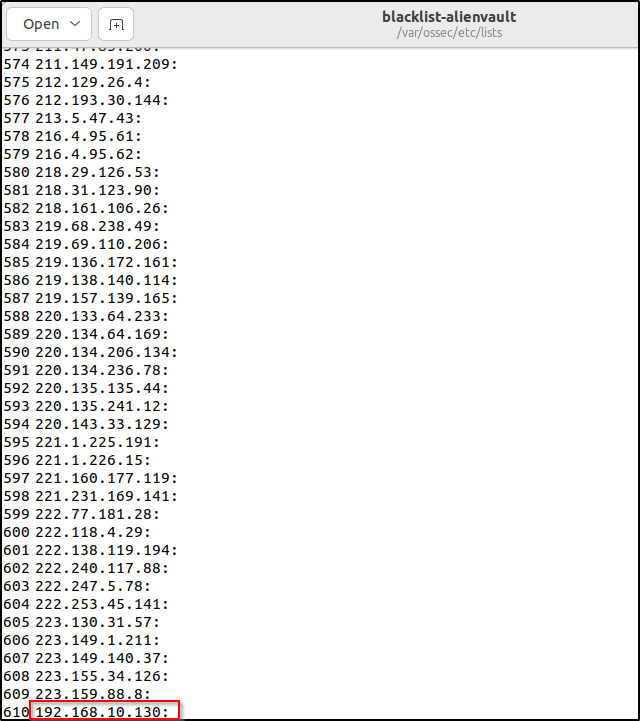
7. Assign the right permissions and ownership to the generated file:
sudo chown wazuh:wazuh /var/ossec/etc/lists/blacklist-alienvault
Opening the file would confirm that the attacker’s IP was added in the list.
Configure the active response module to block the malicious IP address
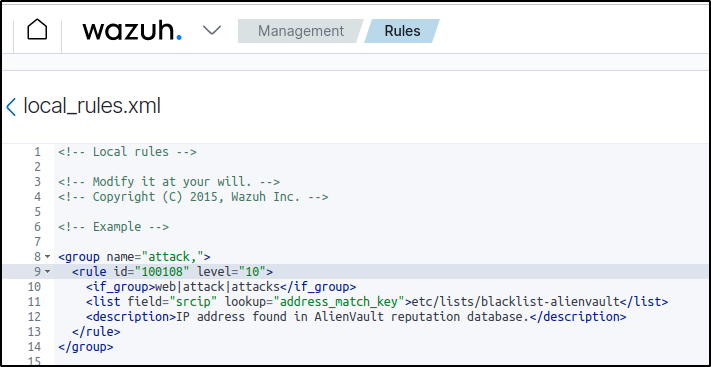
1. Add a custom rule in /var/ossec/etc/rules/local_rules.xml to trigger a Wazuh active response script:
<group name="attack,">
  <rule id="100100" level="10">
     <if_group>web|attack|attacks</if_group>
     <list field="srcip" lookup="address_match_key">etc/lists/blacklist-alienvault</list>
     <description>IP address found in AlienVault reputation database.</description>
  </rule>
</group>
Editing the custom ruleset file can be done through a text editor or utilizing the dashboard.
Note: I changed the rule ID because of duplication. When I try to access the http server, the events are not being detected.
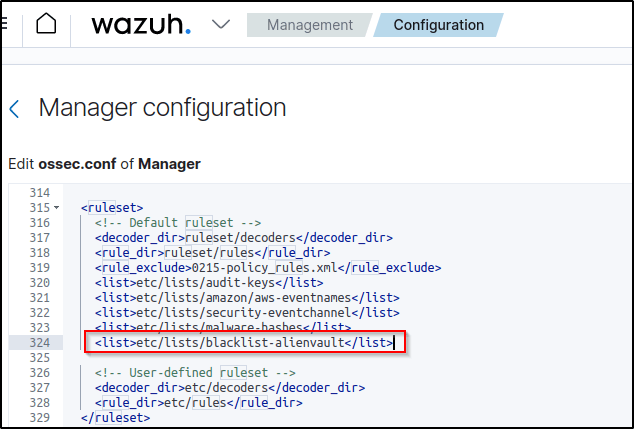
The image below shows that the ID 100100 is already being used.

ID 100108 is available, so I used it instead.

Save the rules.
2. Edit the Wazuh server /var/ossec/etc/ossec.conf configuration file and added the etc/lists/blacklist-alienvault list to the <ruleset> section:
<ossec_config>
   <ruleset>
     <!-- Default ruleset -->
     <decoder_dir>ruleset/decoders</decoder_dir>
     <rule_dir>ruleset/rules</rule_dir>
     <rule_exclude>0215-policy_rules.xml</rule_exclude>
     <list>etc/lists/audit-keys</list>
     <list>etc/lists/amazon/aws-eventnames</list>
     <list>etc/lists/security-eventchannel</list>
     <list>etc/lists/blacklist-alienvault</list>

     <!-- User-defined ruleset -->
     <decoder_dir>etc/decoders</decoder_dir>
     <rule_dir>etc/rules</rule_dir>
   </ruleset>

</ossec_config>
3. Add the active response block to the Wazuh server /var/ossec/etc/ossec.conf file:
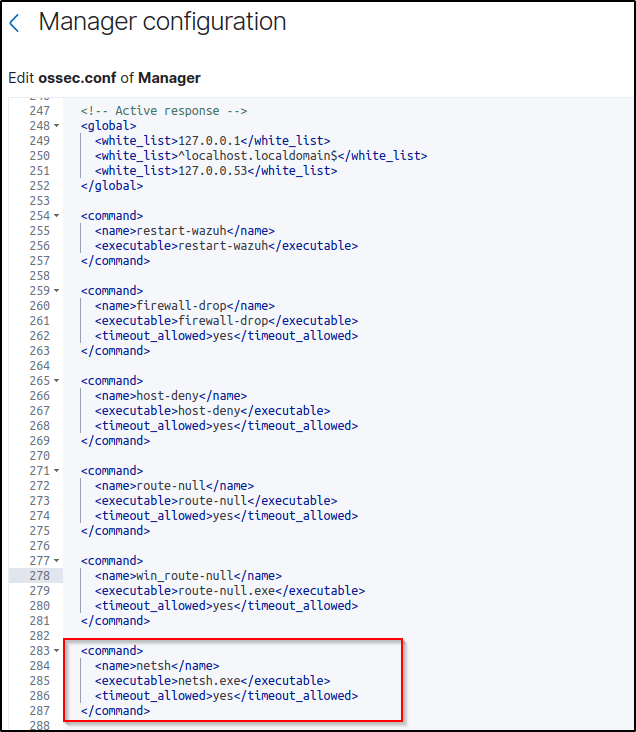
The active response script uses the netsh command to block the attacker’s IP address on the Windows endpoint. It runs for 60 seconds.
<ossec_config>
  <active-response>
    <command>firewall-drop</command>
    <location>local</location>
    <rules_id>100108</rules_id>
    <timeout>60</timeout>
  </active-response>
</ossec_config>
Note: I changed the rule_id to 100108 to reflect the rule created in the local_rules.xml configuration

4. Save and restart the Wazuh manager to apply the changes.
Attack emulation
Performed the following command from my Kali VM to access the web server on my Windows endpoint:
curl http://<Attacker IP >
The attacker’s endpoint establishes a connection with the victim’s web server initially. Once connected, the active response module in Wazuh temporarily restricts the IP address of the Kali system from further connecting to the web servers for a duration of 60 seconds.
Visualizing the alerts
The alerts are visually presented int the Dashboard. The rules triggered are 657 or 100108.
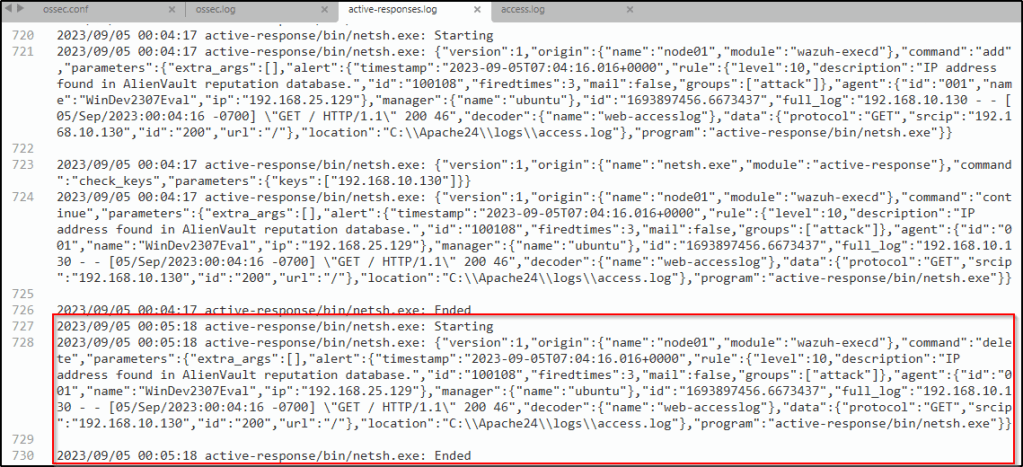
The description “Active response: active-response/bin/netsh.exe – delete” mean that the IP address has been blocked once the IP address was identified to be in the AlienVault reputation database that was created.
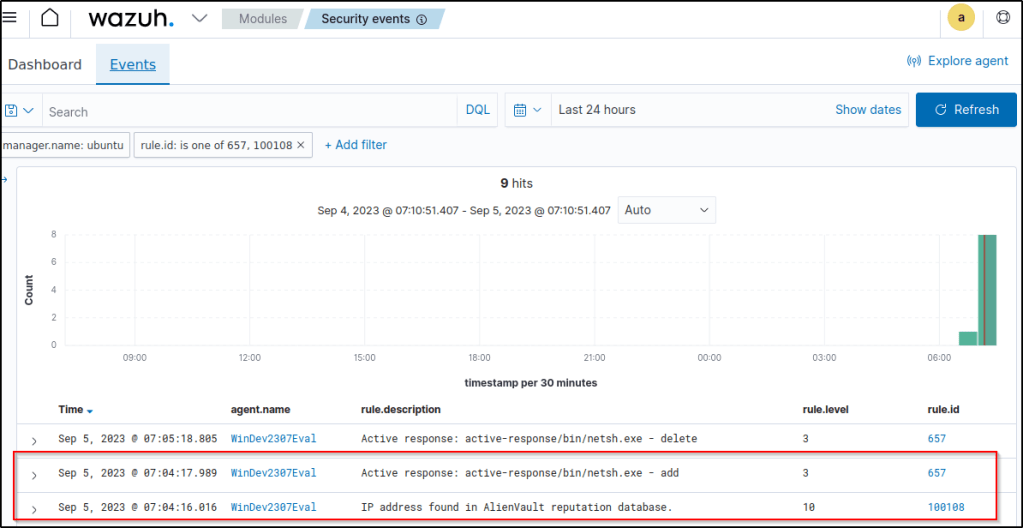
The image below displays the active response kicking in.
60 seconds after the IP address was blocked, a description “Active response: active-response/bin/netsh.exe – delete” emerges, which is a response action that is used to unblock a host that was previously blocked.
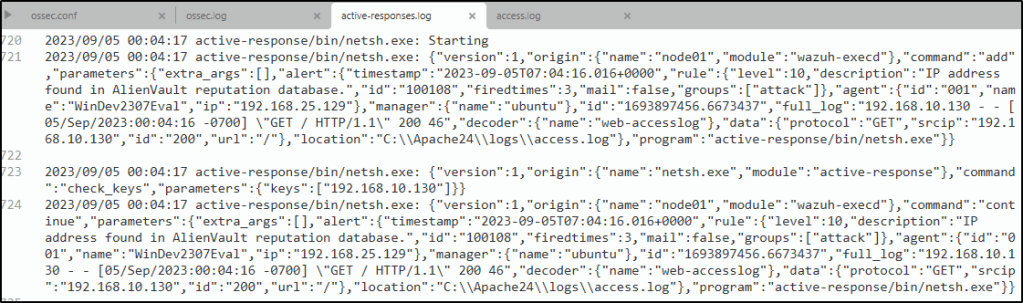
It is also logged in the active-responses.log
Detecting malware using Yara integration
The YARA integration with Wazuh enables the scanning of files that have been added or modified on an endpoint for malware. With YARA, it becomes possible to detect and classify different types of malicious software artifacts. This setup demonstrates the configuration process of YARA with Wazuh, specifically designed to identify malware on both Linux and Windows endpoints.
Configuring the Windows endpoint
Configure Python and YARA
Perform the following steps to install Python, YARA, and download YARA rules.
1. Download Python executable installer from the official Python website.
2. Run the Python installer once downloaded and make sure to check the following boxes:
Install launcher for all usersAdd Python 3.X to PATH. This places the interpreter in the execution path.
I already installed Python in “Detecting and removing malware using VirusTotal Integration” section.
3. Download and install the latest Visual C++ Redistributable package.
4. Open PowerShell with administrator privileges to download and extract YARA:
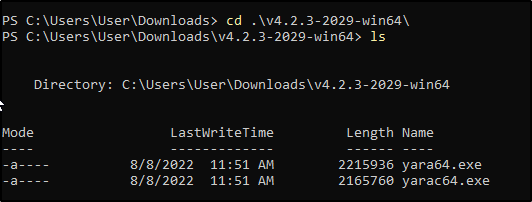
Invoke-WebRequest -Uri https://github.com/VirusTotal/yara/releases/download/v4.2.3/yara-4.2.3-2029-win64.zip -OutFile v4.2.3-2029-win64.zip
Expand-Archive v4.2.3-2029-win64.zip; Remove-Item v4.2.3-2029-win64.zip
5. Create a directory called C:\Program Files (x86)\ossec-agent\active-response\bin\yara\ and copy the YARA executable into it:
mkdir 'C:\Program Files (x86)\ossec-agent\active-response\bin\yara\'
cp .\v4.2.3-2029-win64\yara64.exe 'C:\Program Files (x86)\ossec-agent\active-response\bin\yara\'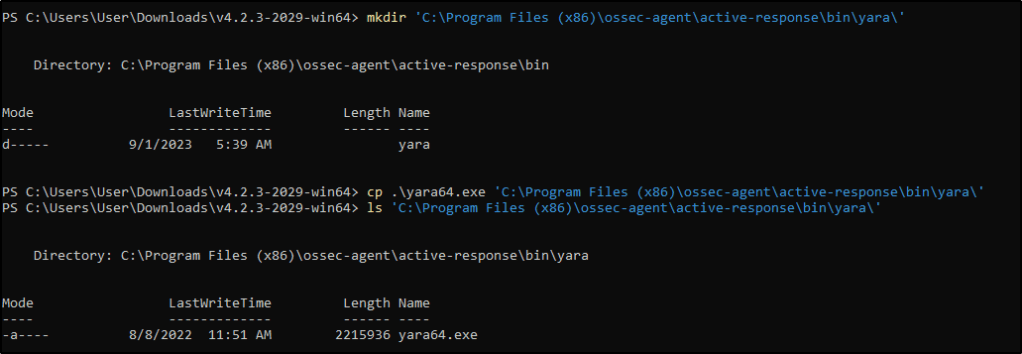
6. Install the valhallaAPI module:
pip install valhallaAPI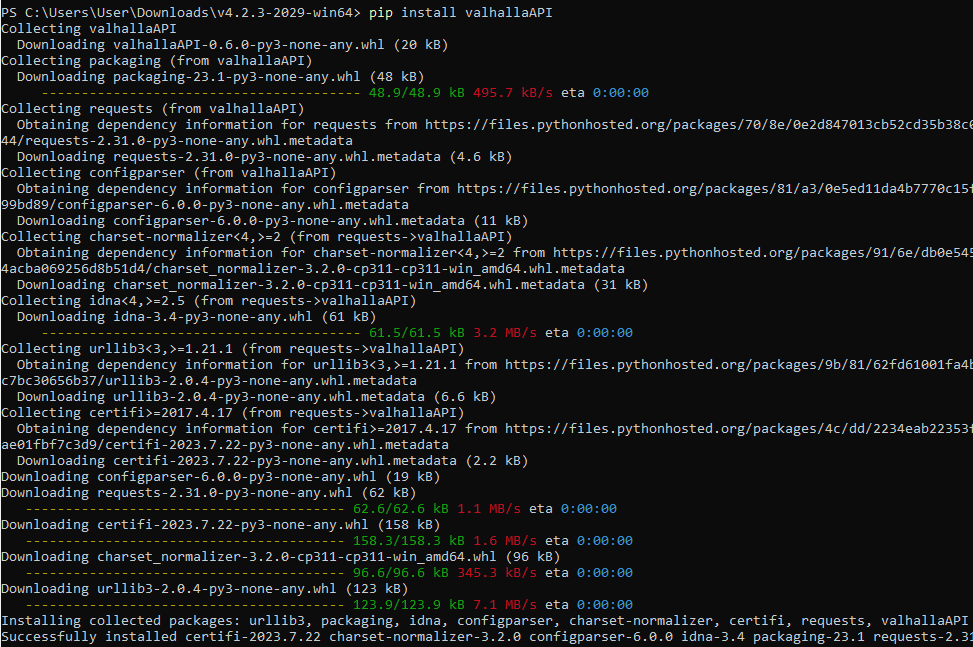
7. Copy the following script and save it as download_yara_rules.py:
from valhallaAPI.valhalla import ValhallaAPI

v = ValhallaAPI(api_key="1111111111111111111111111111111111111111111111111111111111111111")
response = v.get_rules_text()

with open('yara_rules.yar', 'w') as fh:
    fh.write(response)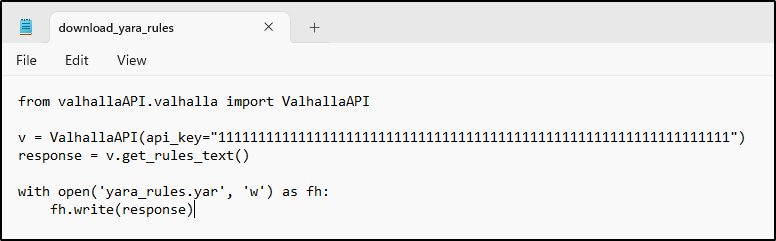
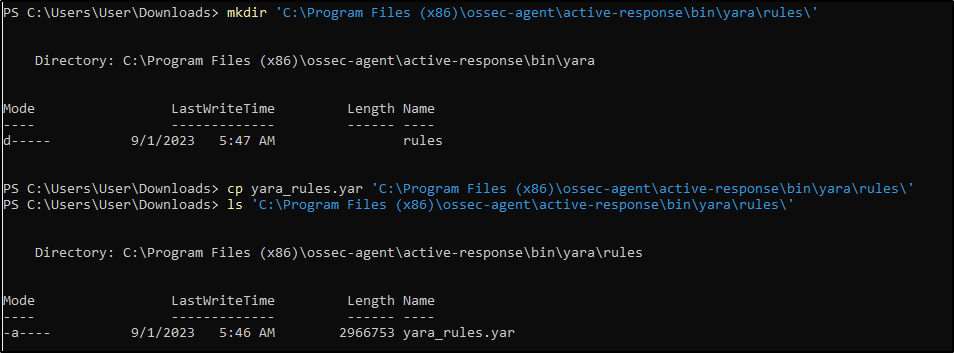
8. Run the following commands to download the rules and place them in the C:\Program Files (x86)\ossec-agent\active-response\bin\yara\rules\ directory:
python.exe download_yara_rules.py
mkdir 'C:\Program Files (x86)\ossec-agent\active-response\bin\yara\rules\'
cp yara_rules.yar 'C:\Program Files (x86)\ossec-agent\active-response\bin\yara\rules\'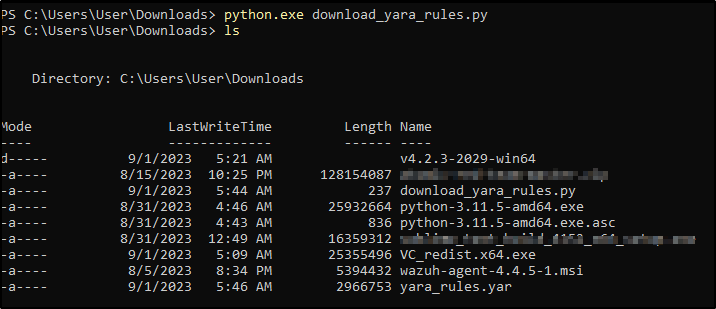
Configuring active response and FIM
Perform the steps below to configure the Wazuh FIM and an active response script for the detection of malicious files on the endpoint.
1. Create the yara.bat script in the C:\Program Files (x86)\ossec-agent\active-response\bin\ directory. This is necessary for the Wazuh-YARA active response scans:
@echo off

setlocal enableDelayedExpansion

reg Query "HKLM\Hardware\Description\System\CentralProcessor\0" | find /i "x86" > NUL && SET OS=32BIT || SET OS=64BIT


if %OS%==32BIT (
    SET log_file_path="%programfiles%\ossec-agent\active-response\active-responses.log"
)

if %OS%==64BIT (
    SET log_file_path="%programfiles(x86)%\ossec-agent\active-response\active-responses.log"
)

set input=
for /f "delims=" %%a in ('PowerShell -command "$logInput = Read-Host; Write-Output $logInput"') do (
    set input=%%a
)


set json_file_path="C:\Program Files (x86)\ossec-agent\active-response\stdin.txt"
set syscheck_file_path=
echo %input% > %json_file_path%

for /F "tokens=* USEBACKQ" %%F in (`Powershell -Nop -C "(Get-Content 'C:\Program Files (x86)\ossec-agent\active-response\stdin.txt'|ConvertFrom-Json).parameters.alert.syscheck.path"`) do (
set syscheck_file_path=%%F
)

del /f %json_file_path%
set yara_exe_path="C:\Program Files (x86)\ossec-agent\active-response\bin\yara\yara64.exe"
set yara_rules_path="C:\Program Files (x86)\ossec-agent\active-response\bin\yara\rules\yara_rules.yar"
echo %syscheck_file_path% >> %log_file_path%
for /f "delims=" %%a in ('powershell -command "& \"%yara_exe_path%\" \"%yara_rules_path%\" \"%syscheck_file_path%\""') do (
    echo wazuh-yara: INFO - Scan result: %%a >> %log_file_path%
)

exit /b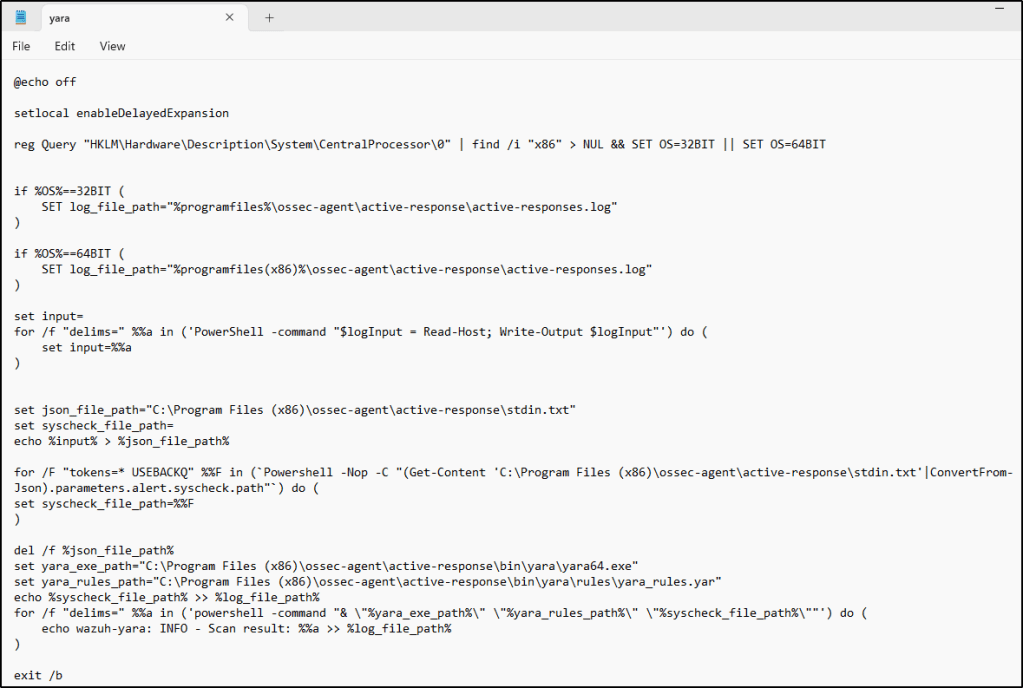
2. Add the C:\Users\<USER_NAME>\Downloads directory for monitoring within the <syscheck> block in the Wazuh agent configuration file C:\Program Files (x86)\ossec-agent\ossec.conf. Replace <USER_NAME> with the username of the endpoint:
<directories realtime="yes">C:\Users\<USER_NAME>\Downloads</directories>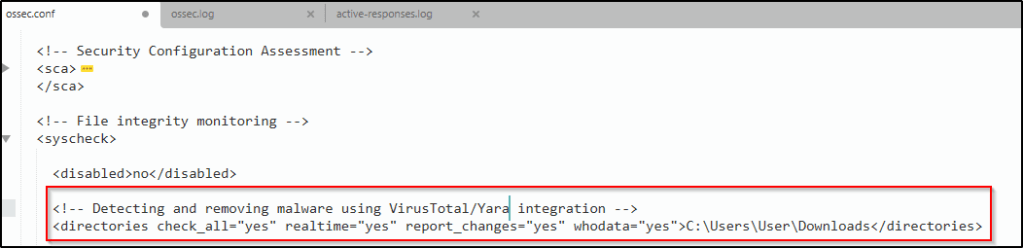
3. Restart the Wazuh agent to apply the configuration changes:
Configuring the Wazuh Server
To enable alerting for directory changes and trigger a response script on the Wazuh server, following are the steps.
1. Add the following decoders to the Wazuh server /var/ossec/etc/decoders/local_decoder.xml file. This allows extracting the information from YARA scan results:
<decoder name="yara_decoder">
    <prematch>wazuh-yara:</prematch>
</decoder>

<decoder name="yara_decoder1">
    <parent>yara_decoder</parent>
    <regex>wazuh-yara: (\S+) - Scan result: (\S+) (\S+)</regex>
    <order>log_type, yara_rule, yara_scanned_file</order>
</decoder>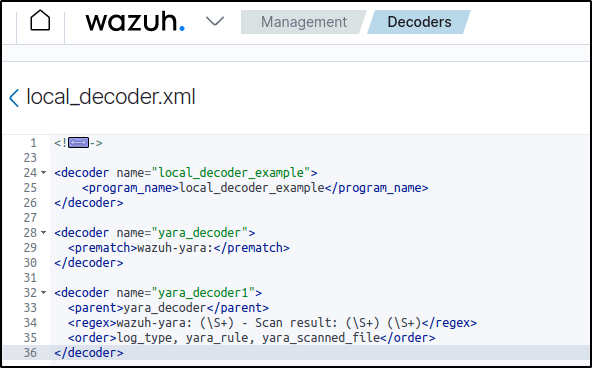
Same configuration is used when I did this proof of concept with an ubuntu endpoint.
2. Add the following rules to the Wazuh server /var/ossec/etc/rules/local_rules.xml file. The rules detect FIM events in the monitored directory. They also alert when malware is found by the YARA integration:
<group name="syscheck,">
  <rule id="100303" level="7">
    <if_sid>550</if_sid>
    <field name="file">C:\\Users\\<USER_NAME>\\Downloads</field>
    <description>File modified in C:\Users\<USER_NAME>\Downloads directory.</description>
  </rule>
  <rule id="100304" level="7">
    <if_sid>554</if_sid>
    <field name="file">C:\\Users\\<USER_NAME>\\Downloads</field>
    <description>File added to C:\Users\<USER_NAME>\Downloads  directory.</description>
  </rule>
</group>

<group name="yara,">
  <rule id="108000" level="0">
    <decoded_as>yara_decoder</decoded_as>
    <description>Yara grouping rule</description>
  </rule>

  <rule id="108001" level="12">
    <if_sid>108000</if_sid>
    <match>wazuh-yara: INFO - Scan result: </match>
    <description>File "$(yara_scanned_file)" is a positive match. Yara rule: $(yara_rule)</description>
  </rule>
</group>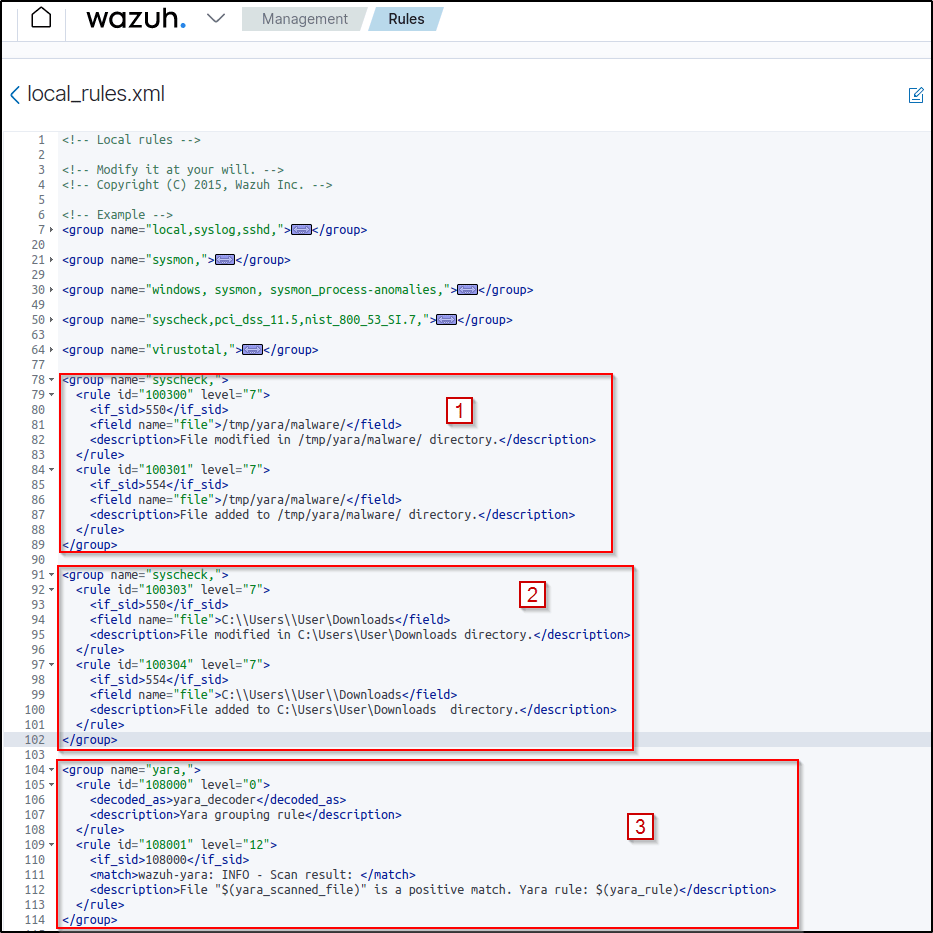
The first rule was used on an Ubuntu, the second rule is for Windows, and the third is bor both.
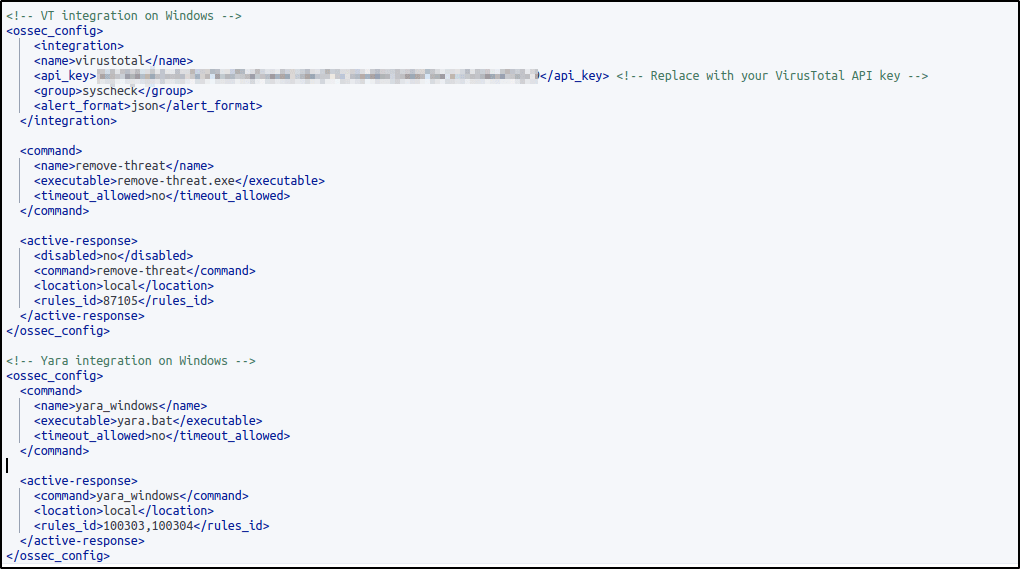
3. Add the following active-response configuration to the Wazuh server /var/ossec/etc/ossec.conf file:
<ossec_config>
  <command>
    <name>yara_windows</name>
    <executable>yara.bat</executable>
    <timeout_allowed>no</timeout_allowed>
  </command>

  <active-response>
    <command>yara_windows</command>
    <location>local</location>
    <rules_id>100303,100304</rules_id>
  </active-response>
</ossec_config>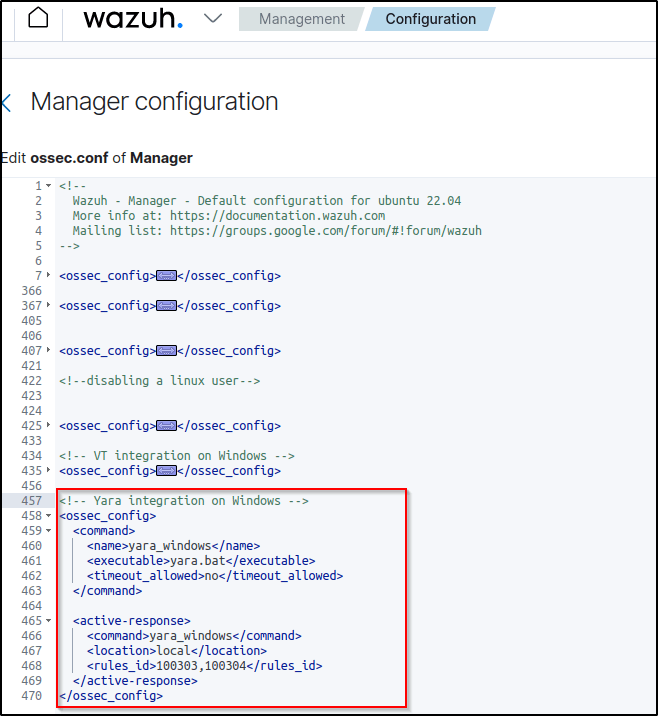
4. Restart the Wazuh manager to apply the configuration changes:
Attack emulation
Note: For testing purposes, I download the EICAR anti-malware test file as shown below. It is highly recommended to perform the testing in a sandbox, not in a production environment. VT is disabled in this scenario.
Download a malware sample on the monitored Windows endpoint:
1. Turn off Microsoft Virus and threat protection.
2. Download the EICAR zip file:
Invoke-WebRequest -Uri https://secure.eicar.org/eicar_com.zip -OutFile eicar.zip3. Unzip it:
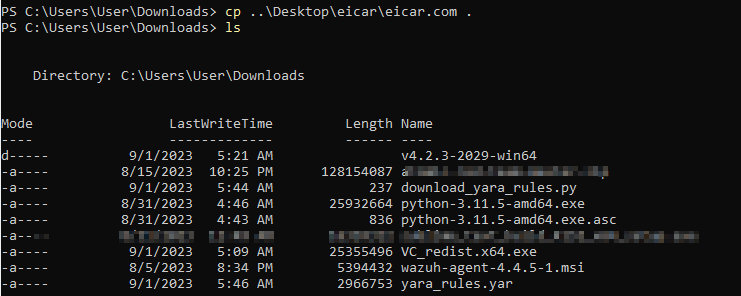
Expand-Archive .\eicar.zip4. Copy the EICAR file to the monitored directory:
cp .\eicar\eicar.com C:\Users\<USER_NAME>\Downloads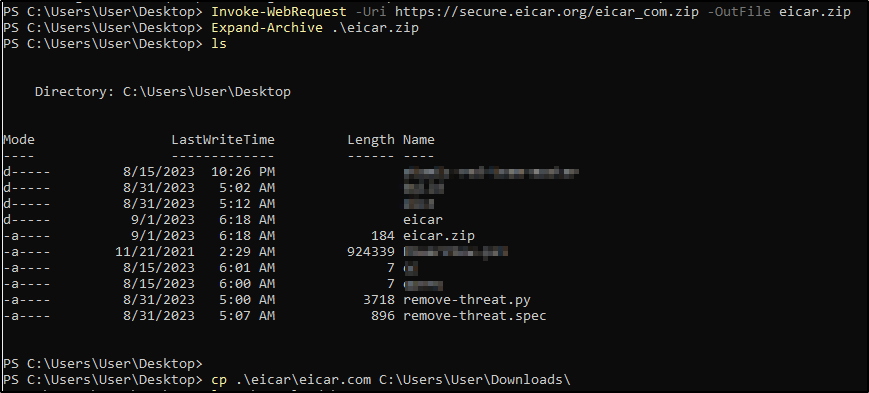
Visualizing the alerts
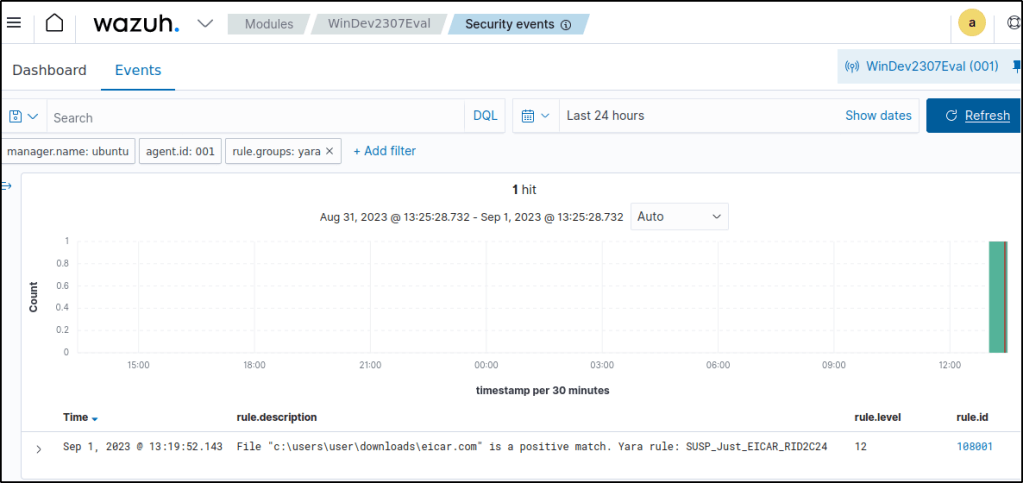
Filter the events with rule.groups:yara. Using Yara rule, the malware sample was properly identified.
The following section covers where VirusTotal integration is activated, with the same active response configuration.
The configurations for integrating VirusTotal and Yara that were used are the same configurations that were used in this blog.
For the simulating the attack, the following command is from the section on “Detecting and removing malware using VirusTotal integration”
Both VirusTotal and the Yara rules detected the malware sample and was deleted from the directory.
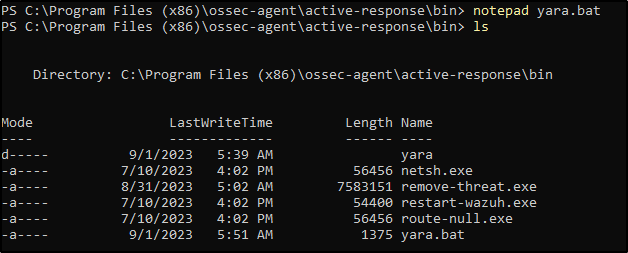
Got an error but the file was removed as seen in the image when the command ls was performed.
The following attack simulation is from this current section.
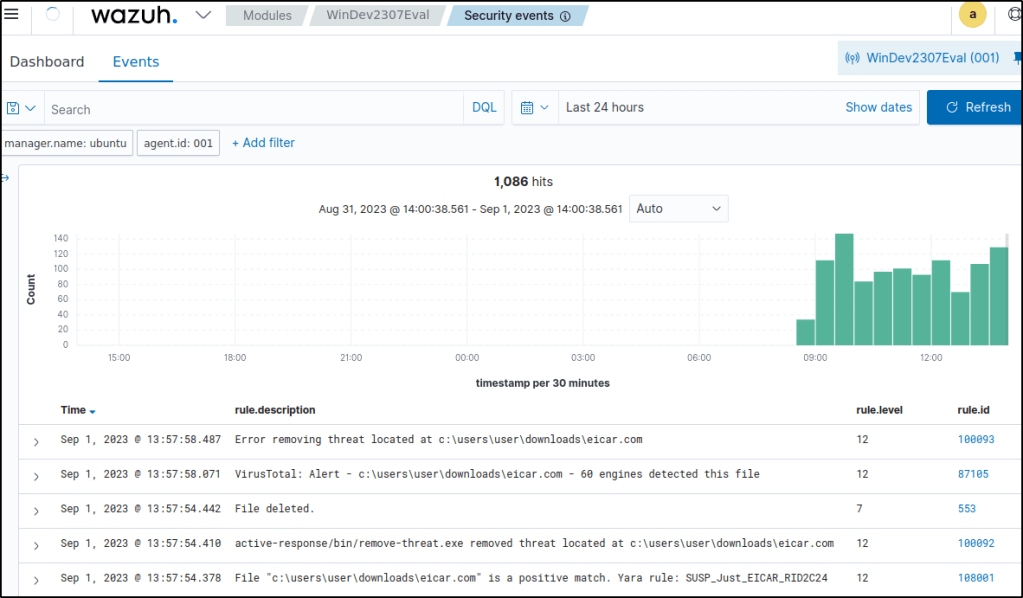
Same result where the malware sample was detected and ultimately removed.
Conclusion
In this article, I replicated key file integrity and malware detection use cases on a Windows machine, after previously showcasing them on an Ubuntu endpoint. The file integrity module alerted on malware persistence techniques in the registry. Integrating VirusTotal enabled removing detected malware. Custom Yara rules blocked known malware samples.
In my next posts, I’ll explore Wazuh’s other capabilities on Windows, including security configuration assessments, active response, log data collection, vulnerability scanning, command monitoring, container security, system inventory, and more.
References
Thanks for reading. Until next time. 🙂

Leave a comment